Import
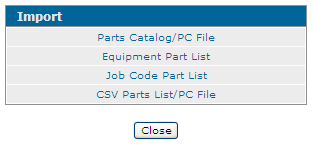
Use the Import screen to import part files from Part Catalogs/PC Files, Equipment Part Lists, Job Code Part Lists, or CSV Parts List/PC Files.
To open the Import screen, click the Import button on the Parts Invoicing Details tab, Parts Ordering screen, Parts tab, or Surplus Returns screen.
Fields on the Import screen when you select Part Catalogs/PC Files are:
| Parts Catalog/PC File | |
|---|---|
| Field | Description |
| Enter PC File name |
Enter the desired PC file name or click the Search File Format Information for the accepted fixed width 80 - character file:
|
| Delete Pick List | Deletes the list of parts being imported after it has been imported. |
Note: IntelliDealer does not support certain special characters (for example, - or ') in PC file names. If a PC file name contains an unsupported character, the file does not appear in the Search results for the Enter PC File name field. To make the file selectable, rename it to remove the unsupported characters. PC files are stored on the IBM iSeries in the dealer's IntelliDealer library at /PFW/PFWnnnn/INVOICE, where PFWnnnn is the dealer's assigned IntelliDealer library on the ASP hosted solution. Dealers with IBM i Access Client Solutions (or the legacy iSeries Navigator) can rename the file directly in that folder.
Fields on the Import screen when you select Equipment Part Lists are:
| Equipment Part List | |
|---|---|
| Field | Description |
| Stock Number | Enter or select a stock number to import from the Equipment Parts List. |
Fields on the Import screen when you select Job Code Part Lists are:
| Job Code Part List | |
|---|---|
| Field | Description |
| Make | The manufacturer of the unit. |
| Model | The model number on the unit. |
| Job Code | The predetermined service charge code number. |
Fields on the Import screen when you select CSV Parts List/PC Files are:
| CSV Parts List/PC File | |
|---|---|
| Field | Description |
| File to Upload |
Enter the desired PC file name or click the Browse button to search for the file. The CSV file must have header columns containing the part number and quantity of the part. |
Example of how the CSV file should appear:
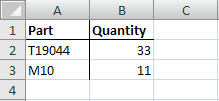
Note: The CSV file name and its part-number values must use characters supported by IntelliDealer. Remove unsupported characters (for example, - or ') before uploading.
Click Import to import the selected file when you select CSV Parts List/PC File.
Buttons on any version of the Import screen are:
| Button | Description |
|---|---|
| Save | Saves changes made on the Import screen and returns to the Parts tab. |
| Close | Closes the Import screen and returns to the Parts Invoicing Details tab. |
Security: 823 - Product Support - Parts Invoicing
Revision: 2026.06