Customer Profile: Maintain Agency Parameters
The Maintain Agency Parameters screen allows you to activate or deactivate A/R Agency codes loaded on the A/R Agency tab in the Customer Profile.
To access the Maintain Agency Parameters screen, click the Maintain Agency Parameters button located at the bottom of the Financial Management > Accounts Receivable > Customer Profile Listing screen.
Topics in this section include:
What are Agency Codes?
A/R Agency codes specify methods of payment available to the customer of a dealership. For example cash, credit card, or house account. You first configure a set of A/R Agency codes for the dealership, and then you can assigned those codes to specific customers. You can assign multiple A/R Agency codes to a customer and specify one in particular to be the default.
An A/R Agency code can be in either an active or inactive state. If inactive, the specified method of payment is not available to the customer.
When are A/R Agency Codes Active?
The state of the A/R Agency code depends the configured rules based on these criteria:
-
Deactivate—If the total outstanding amount starting at aging period configured is > 0 OR the total of entire outstanding amount is > or = the customer credit limit, the agency will be deactivated.
The outstanding is calculated by adding up the aging period buckets (0-30, 31-60, etc). When deactivating, the active checkbox is changed from checked to unchecked on the customer’s agency, the default code is not changed.
-
Activate—If the total of all buckets starting at the aging period configured is <0 AND the total of all buckets is < credit limit, then the agency is activated.
When activating, the active checkbox is changed from unchecked to checked on the customer’s agency, the default code is not changed.
-
Rules not applied—The activate/deactivate logic is not applied to any customer that has a credit rating of '99' for the configured ARAGENCY code. If you want a customer to be ignored by this process, put credit rating of 99 on their agency profile.
These rules must be run in a batch job to be applied. See Running the Update Job
Updating Agency Codes
-
From any IntelliDealer screen, navigate to Financial Management > Accounts Receivable > Customer Profile.
-
Click the Maintain Agency Parameters button.
-
To add an Agency Code, click the Add rows link, then select one from the drop down list. Fill in the remaining fields referring to the Screen Description.
-
To remove an Agency Code, click the trash can icon at the right side of the screen.
-
Click the Save button to save your changes.
Post-requisite: To apply your changes, see Running the Update Job
Running the Update Job
Use this process to initiate the Update Job immediately.
-
From any IntelliDealer screen, navigate to Financial Management > Accounts Receivable > Customer Profile.
-
Click the Maintain Agency Parameters button, located at the bottom right of the Customer Profile screen.
-
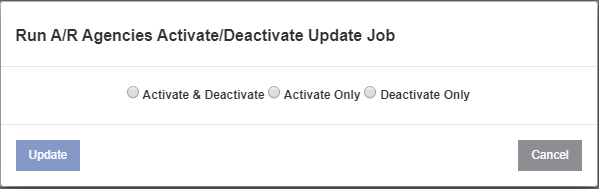
Select the row to toggle, then click the Activate/Deactivate button.
-
Select one of the options, then click Update.
The Update Job runs immediately and updates the selected A/R Agency code to the selected state based on the configured rules.
Scheduling the Update Job
To set up the system to update customer A/R Agency codes automatically you must configure the parameters for the run and set up a trigger.
-
To configure the parameters, navigate to Configuration > Properties and click Create.
-
Use the drop-down menu to select A/R Agencies Activate/Deactivate Batch Run Parameters, then click Continue.
The Property Detail screen opens.
-
Set these parameters:
-
Run Type—chose one of Activate, Deactivate or Activate & Deactivate.
-
Report User—the user to receive the results report.
-
-
Click Save.
-
Navigate to Administration > Settings > Batch Jobs.
Use the search bar to locate the Agencies job and open it.
-
To edit the Job Schedule, click Edit, then change the date and time. You can also pause the job using the Pause Job button.

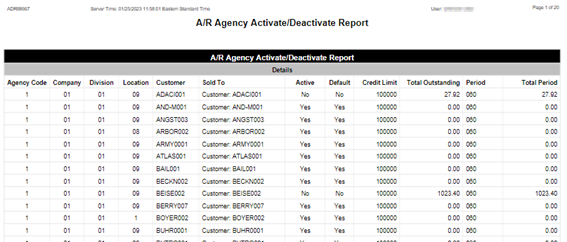
Update Job Results Report
When the Update Job is run, either manually or automatically, a PDF report called ADR88667 is generated to identify which customers had agency codes activated and/or deactivated during the run. In the following sample, the setting was for anything 61-90 for 10401099 to activate or deactivate so there are several customers being set to Active ‘Yes’, and a few being set to Active ‘No’ .
Screen Description
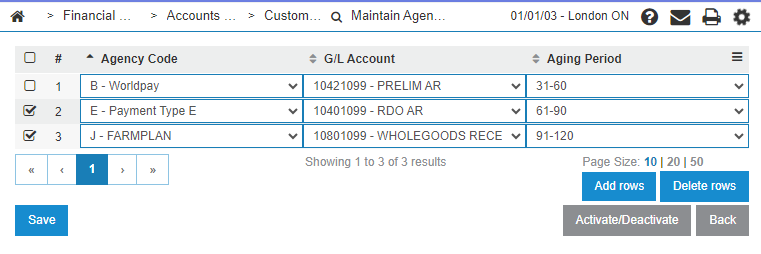
The fields on the Activate/Deactivate Agency Codes screen are:
| Field | Description |
|---|---|
| Agency Code | The A/R Agency code being activated or deactivated. |
| G/L Account | The G/L account associated with the A/R agency. |
| Aging Period |
The aging period for the A/R agency code. Possible values are: current, 31-60, 61-90, 91-120, or over 120 days. |
Click the Activate/Deactivate button to change the state of a selected Agency Code. See Running the Update Job.
Click Add rows to add a new Agency Code. See Updating Agency Codes.
Select one or more rows and click Delete rows to remove Agency Codes.
Data Source: PFWTAB, CMCHK
Security Switch: 996 - Customer Profile, Access A/R Agencies, Add A/R Agency, Modify A/R Agency
Revision: 2024.08