
Scheduled Jobs
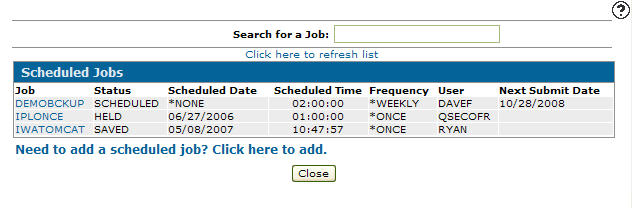
The Scheduled Jobs screen allows you to view job statuses and create job schedules.
This option is not available for ASP dealers.
ASP (hosted) dealers must contact VitalEdge Support to set up or change a job schedule entry; the Scheduled Jobs screen is not available in hosted environments.
To open the Scheduled Jobs screen, navigate to Configuration > Utilities > Scheduled Jobs.
Topics in this section are:
Creating a Job Schedule Entry for an Unattended Billing Run
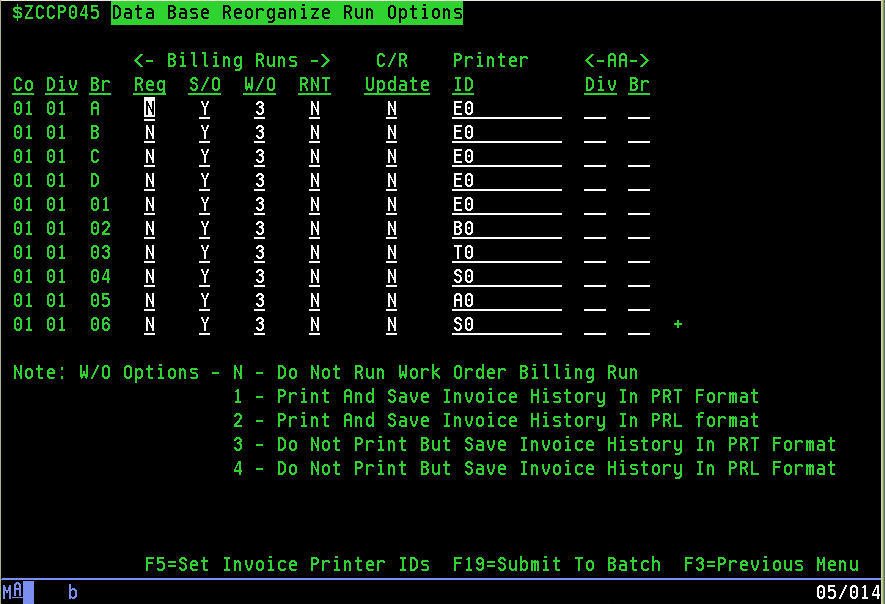
Billing runs must be enabled on the legacy Data Base Reorganize Run Options screen before you set up an unattended billing run. These settings are typically configured during implementation and are required for billing runs to process. You rarely need to change them. If billing runs are not processing as expected, contact VitalEdge Support.
Prerequisites: This procedure applies to standalone (on-site) dealers.
-
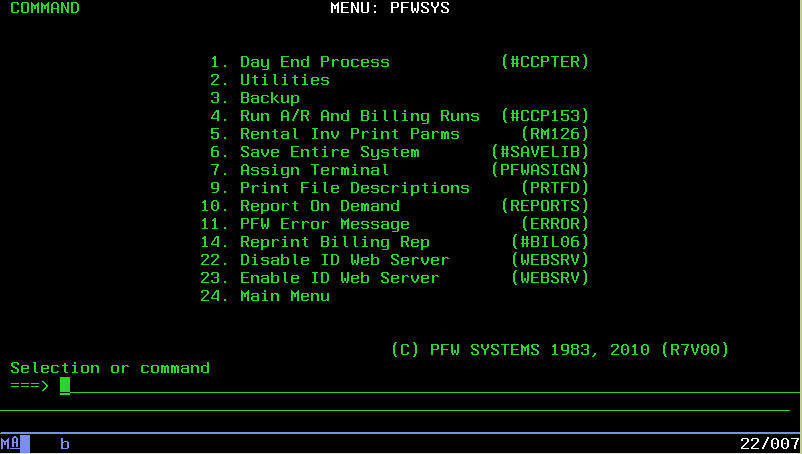
To open the Data Base Reorganize Run Options screen, type GO PFWSYS at any command line. The PFWSYS MENU screen opens.
-
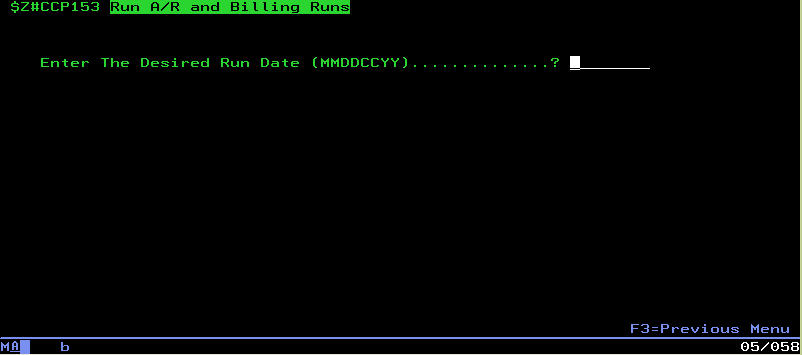
Select menu option 4 - Run A/R and Billing Runs. The Run A/R and Billing Runs screen opens.
-
Enter the appropriate run date and press ENTER. The Data Base Reorganize Run Options screen opens. Use this screen to set billing run options.
Note: Place a Y (Yes) in the Billing Runs fields for each company/division/location to mark billing runs to run. Billing run types are Reg (regular billing runs), S/O (sales orders), W/O (work orders), and RNT (rental).
After you confirm billing run settings on the Data Base Reorganize Run Options screen, set up the job schedule entry on the Scheduled Jobs screen.
-
In IntelliDealer, navigate to Configuration > Utilities > Scheduled Jobs tab and then on the Utilities list, select the Scheduled Jobs link.
-
Click the Need to add a scheduled job? Click here to add link.
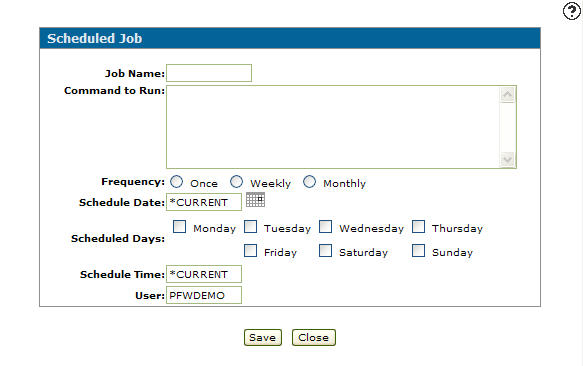
The Scheduled Job screen opens.
-
On the Scheduled Job screen, enter a Job Name.
-
Enter a Command to Run.
-
Select a Frequency.
-
Once: The job runs once.
-
Weekly: The job runs on a weekly schedule.
-
Monthly: The job runs on a monthly schedule.
Note: When you select Once in the Frequency field, the Save field appears below the User field. Use the Save field to save the scheduled job (select Yes) after it completes.
-
-
Enter a Schedule Date.
- or -
Click the Calendar icon to open the Calendar screen in a new browser window and select the appropriate date.You can also enter these commands in the Schedule Date field:
-
*SAME: The date value does not change. Used when editing a scheduled job.
-
*CURRENT: The job is submitted on the current date.
-
*MONTHSTR: The job is submitted on the first day of the month.
-
*MONTHEND: The job is submitted on the last day of the month.
-
*NONE: No date is specified for a job to be submitted, but you must select a Scheduled Days checkbox.
-
-
Enter a Schedule Time (HH:MM:SS).
You can also enter these commands in the Schedule Time field:
-
*SAME: The time value stays the same. Used when editing a scheduled job.
-
*NONE: No time is specified for a job to be submitted. You cannot use this value if you already used the *NONE value in the Schedule Date field.
-
*CURRENT: The job is submitted at the current time.
-
-
Enter a User ID.
-
The Save field only appears when you select Once in the Frequency field. Use the Save field to save the scheduled job after it completes for future use.
-
Click Save to save the scheduled job.
After you set up the job schedule entry on the Scheduled Jobs screen, create a billing run schedule in IntelliDealer on the Unattended Billing Runs screen.
See also: How to Create a Mass Set up for Unattended Billing Runs and Manually Setting Unattended Billing Run Dates.
-
Type CALL S#CCP153 at any command line within the legacy system to run the billing runs set up on the Data Base Reorganize Run Options screen and any associated parameters. When the CALL S#CCP153 program runs, IntelliDealer first checks the Date on the Billing Recurrence or Unattended Billing Runs screen for billing runs with a run date equal to the current system date. IntelliDealer then runs all billing runs with a run date equal to the current system date, logging all entries in the BCHLOG file.
 PFWSYS MENU screen
Screen Description
In the search field you can enter a search term. The system searches all column data for a match and returns search results based on your entry. Select the Click here to refresh list link to refresh the scheduled jobs list.
The fields the Scheduled Jobs screen are:
| Field | Description |
|---|---|
| Job | The name of the scheduled job. |
| Status | The current status of the job (e.g. change, hold, release, remove or run). |
| Scheduled Date | The date the job is submitted to be completed. |
| Scheduled Time | The time the job is submitted to be completed. |
| Frequency | How often you would like the job to run (e.g. once, weekly or monthly). |
| User | The ID of the user who created the job. |
| Next Submitted Date | The next date the job will be submitted, if the frequency of the job occurs more than once. |
Click on the Need to add a new job schedule? Click here to add link to create a new job schedule.
Move the cursor over a Job and select one of these options from the popup:
-
Change—to edit a scheduled job.
-
Hold—to change a job's status to held.
-
Release— to release a held scheduled job so its Status returns to Saved and the job can run on its schedule again.
-
Remove—to remove a job from the list.
-
Run—to submit a scheduled job to batch immediately.


Click Close to complete your work on the Scheduled Jobs screen.
Data Source: not applicable
Security: 999 - Configuration, Utilities - Access Scheduled Jobs, and Utilities - Access Unattended Billing Runs
Revision: 2024.01