Warning: Once a month end is closed, it cannot be reopened. This includes Accounts Receivable, Accounts Payable, General Ledger, and Parts month ends. Do not close any month end until you are certain of the details of each transaction in the month.
Month End Procedures
There are two important dates involved regarding month end procedures. This guide will itemize the steps for the last day of the month and steps for wrapping up the remainder, which could take place anywhere from 7 to 10 days in to the new month.
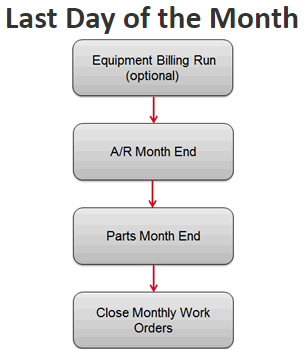
At the end of the month, you want to include all possible revenue, therefore you want to manually run an Equipment Billing Run to post any last minute Equipment billings for the month
Accounts Receivable always reflects the current month, so at the end of last day of the month, close Accounts Receivable. Once A/R is closed, all cash receipts posting will be reflected in the new current month.
Parts Month End “could” be performed by the Parts Manager, however, it is a “best practice” for the accounting office to execute this task to be sure that it is performed in a timely fashion. It takes only a couple of minutes and roll the parts history sales months back one month. This is necessary to keep calculations correct for the parts stock orders.
Monthly work orders are those used to track technician time spent on non-revenue producing activities such as cleaning the shop, truck unloading, or training. They are work orders with the type MW. To make sure this time is properly expensed to the month in which it occurred these work orders should be closed at the end of each month. Either the accounting office or the service manager could perform these steps.
Accounts Receivable Month End
A/R Month End – This controls the month of statements, late charges and ALL sales revenue transactions. Therefore the A/R month must always be current and is always closed on the last business day of the prior month or the first business day of the current month. This means you are always posting to the Accounts Receivable sub-ledger in the current period.
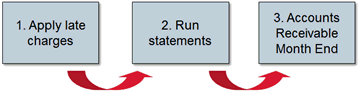
There are three steps to closing the Accounts Receivable Month End:
Items to complete Prior to closing A/R Month End:
- Complete Cash Receipts entries (all batches must be updated because closing the A/R Month end will erase any outstanding batches)
- Any invoices you want posted into the A/R Month your closing is invoiced out (Equipment, Service, Parts Departments)
- Month Work Orders are closed (Service Department)
- Run any final billing runs (either individually from IntelliDealer or all at once through Green Screen)
Considerations to complete prior to closing A/R Month End:
- Print an Aged Trial Balance to compare General Ledger Amounts for balancing purposes
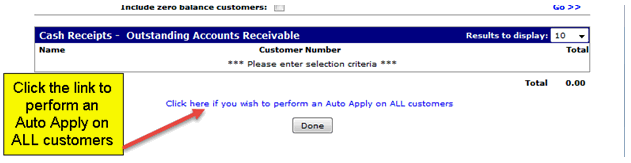
- Prior to applying late charges consider performing an Auto Apply of ALL customers
- Should be run to compare with the General Ledger balance of each account that is set as a true Accounts Receivable Account within the system
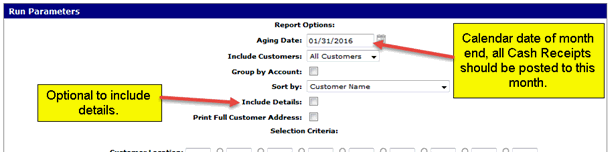
- Run the report for the date of the month end you are about to close
- The report can be ran by separate A/R general ledger account and can also include the details of the individual invoices
- This report will show the balance by customer and it is recommended that it be run for each A/R account on it's own for balancing at any time during the month
- This report could also be used prior to late charges and statements being ran to see detail requiring maintenance in cash receipts
This will produce a listing within the batch of all the customers where the auto apply has determined there are invoices that could be cleared out of the system
The "rule" of the auto apply is that is that if all invoices under a customer add to zero, then all invoices will be marked as paid
The auto apply procedure will only apply invoices of the exact absolute value amount (exact offsetting debit and credit outstanding amount on individual lines) should all outstanding invoices not add up to zero
You can review the entries within the batch and make adjustments if necessary
There is no preliminary run for late charges.
1. Financial Management
2. Accounts Receivable
3. Apply Late Charges

4. Enter in the Posting Date, where you want the items to Print (Suggested to go to PDF then you can print a copy from here because you cannot reprint this report)
Posting Date: The date on which the late charges will be posted to the relevant customer accounts. This date will be used for the late charge journal entries that are posted during this run. The date used must be a date in the current accounts receivable month, specific invoices that will have late charges applied to them and the exact late charge amounts are determined by the late charge code that has been activated at your dealership
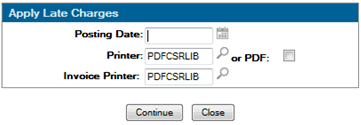
5. Click Continue
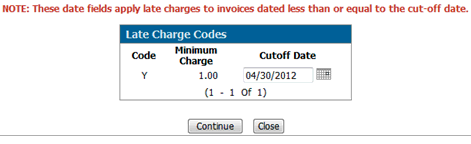
6. You will get a listing of all your Late Charge Codes and will default the cutoff date based of the Posting Date provided in the previous screen and how your Late Charge Code is setup (Configuration > General Ledger > Accounts Receivable > Late Charges)
Cutoff Date: Any invoices created on or before this date will have late charges applied and posted to the associated customer.
Note: The date specified in this field is calculated based on the Posting Date specified on the Apply Late Charge screen and the number of Months Grace configured for the selected late charge code
The Late Charge Register will give you a list all late charges, this will be available where you specified the Printer in the Apply Late Charges screen. Report # is AR0030
What to do after you run Late Charges:
1. Locate the report AR0030 LATE CHARGES REGISTER to see a list of all customers receiving late charges. The report displays the overdue amount and the late charge amount.
2. Scan this report and look for anyone who shouldn’t have late charges applied. . If something is wrong, go back to Cash Receipts and write off the late charge before running statements.
If a customer should NEVER have late charges applied, go in to the Customer Profile (first tab) and change the field “Late Charge” to a No. You will also need to write off the late charge appearing in this run.
1. Financial Management
2. Accounts Receivable
3. Statements

Print A/R Statements is for the traditional method of printing statements on paper and mailing them out to the customers.
Re-print AR Statements is used for reprinting. The function takes the last run and reprints it.
**Do not select Print A/R Statements twice, since the 2nd run will show no detail. It does still show your balance if you use Balance Forward or True Balance Forward Accounts Receivable. However, if you use Open Item A/R, rerunning an AR Statement run will reproduce all unpaid invoices again and will produce two statements with the same date.
eMail A/R Statements - If your customer wants the statement emailed, set this up in the customer Profile ahead of time. If you have customers requiring email statements, you will need to make two separate statement runs – select Print A/R Statements for the paper statements then select eMail A/R Statements for the eMail statement run.
In the Print A/R Statements screen there is a Report Option to print the aged trial balance. Print a copy of this and keep it.
4. Click Print A/R Statement
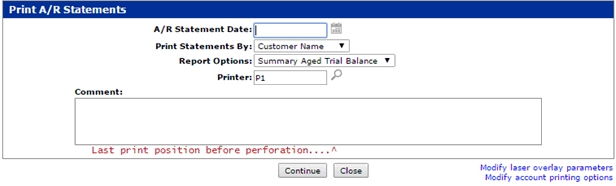
In the Print AR Statements window you will need to fill in the following:
- Statement Date – Usually the last day of the month but this is going to depend on your Dealership
- Print Statement by – this is a sort option (Customer Name, Customer Number, ZIP/Postal Code)
- Report Option - there are 3 different options
a) Summary Aged Trial Balance – Only the totals by again period for each customer are printed
b) Detailed Aged Trail Balance – all the invoices making up the totals by again period for each customer are printed
c) No Aged Trial Balance – No aged trial balance report will be printed
- Select the Printer you would like the statements to go to
Now before you Click Continue there are couple more options to consider
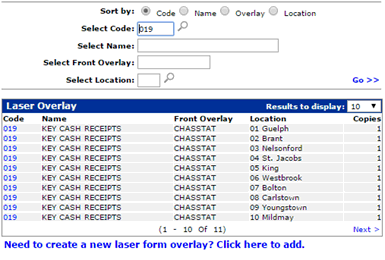
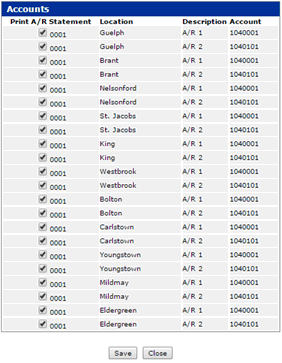
Some clients have branches needing their own logos, etc. to print on the A/R statement. This is handled by setting up each branch with their own Accounts Receivable account as well as an individualized laser overlay. The laser overlay controls what images print on the statement. In that case, each branch will have its own print statement run. Before printing each branch, you will need to access the two links at the bottom right of the Print A/R Statements windows. Use the first link to select the appropriate branch overlay. Use the second link to select the appropriate branch location and A/R account.
Modify Laser Overlay Parameters – this will show you the name of the overlay that will print for each location
Modify Account Printing Options – this allows you to select the General Ledger Accounts that you want to print statements for, this will only show you the accounts that setup as AR Accounts in the SPECACCT Table
5. Once you okay with all the information you can click continue
When you run statements there are reports that produced:
| Report Number | Description |
|---|---|
| AR0010-100 | Cash Receipts Edit (total page only) |
| AR0030 | Charge Register (only if late charges are being applied during the run) |
| GL1002 | Journal Voucher Distribution |
| ARI112 | Customer Statements |
| ATBR56694 | Aged Trial Balance |
Once all adjustments to customers A/R, late charges and statements are complete you should print out an Aged Trial Balance again and save this off to PDF because the system cannot back date this report
It is also suggested that you run an Equipment Balancing Report before closing the A/R Month end to ensure the equipment subledger is in balance with general ledger (it's recommended that you do this daily or weekly as well)
After applying Late Charges and after running A/R Statements, you are ready to close the A/R Month End
Select either the Summary Aged Trial Balance or the Detailed Aged Trial Balance, send it to the report printer and/or PDF. Be sure and save this report since it cannot be re-run for a closed A/R month. Once the A/R month end has completed, all billing runs and cash receipts updates will have to be run using a date in the following month.
** IMPORTANT NOTE ***: If there were any outstanding (not posted) A/R batches, the A/R Month End process will remove them.
1. Financial Management
2. Accounts Receivable
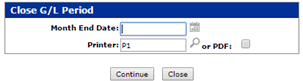
3. Month End
- Enter in the Month End Date you want to close
- Report you want to run
- Select where you want the reports to print
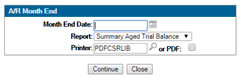
4. Click continue
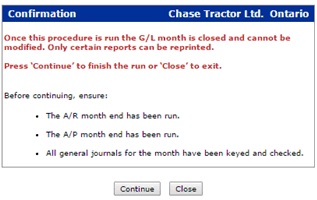
5. Now you will get the Confirmation window
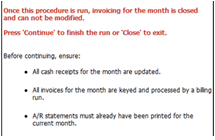
6. Click continue. (Cannot be reopened)
Parts Month End
This process needs to be done right after your Accounts Receivable month end, this procedure keeps your sales history accurate for each part so that the stock-order calculate correctly. Dealers that use AMAX or AGCO API it is extremely important that you close Parts Month End right after Month End
1. Product Support
2. Parts
3. Month End
- Enter in the Month End Date you want to close
- Select where you want the reports to print
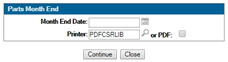
4. Click continue
5. You will receive a warning message that lets you know that you are able to close the Parts Month End
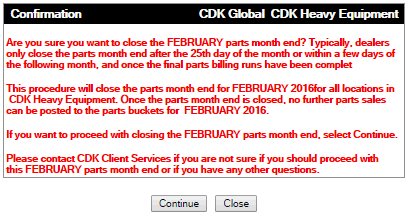
6. Click continue
Notes:
Cannot be reopened
What we can do if this does happen is work with our development team to reset the sales, bin trip and demand buckets to the proper values
there would be a charge for this, it gets sent to our development team for a quote
1. Financial Management
2. Accounts Payable
3. Month End
4. Enter in the Month End Date you are wanting to close and select the price option you would like (Printer or PDF)
5. Click Continue
6. You will receive a confirmation screen which is a warning that lets you know that your about to close the AP Month End and a list of what you need to ensure is complete.

7. Click continue
8. Check your home page under 'Submitted Jobs' for 'Normal End of Job' for Accounts Payable Month End
***An aged Accounts Payable report will print out that is back dated to the date keyed in and this should be kept for record keeping, particularly for the last month of the fiscal year. ***
Error Closing AP Month End
It's important that when your closing any Month Ends that you also check your page for any errors
Example of an Error:

- Depending on the print option you selected when running the month end will depend on where the report went
- The report your looking for is AP0006 - Accounts Payable Mont End Error Log
- Once you correct any errors you received, you will need to run the AP Month End again
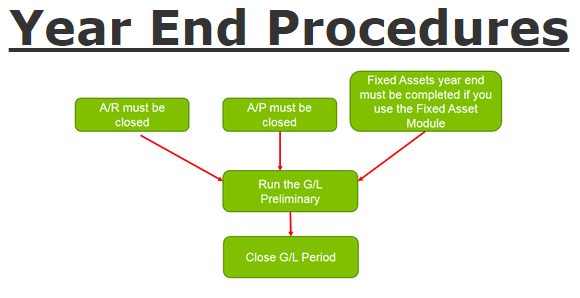
Other Month End Procedures
Fixed Assets Month End
This month end only needs to be performed if the IntelliDealer Fixed Assets system is being used used to produce the monthly depreciation entries in the system. The month ends for Fixed Assets that have been completed are not recorded in the system in any specific table so great care should be used to not run a month end more than one. Entries from the Fixed Assets month ends are made as journal entries so the timing of these should coincide with the General Ledger month ends. The month end need to be performed for each of the 12 fiscal months in the year, the Fixed Assets system will play catch up and record depreciation for several months if periods were not run but these will be one lump sum entry not made in each fiscal month for financial statement purposes. The Fixed Assets year end does not record any depreciation (hence the need to run all 12 monthly periods), it simply resets which year a fixed asset is in to use in yearly depreciation amount calculations.
1. Financial Management
2. General Ledger
3. Fixed Assets

4. Click on 'Run Depreciation year end/month end finals'
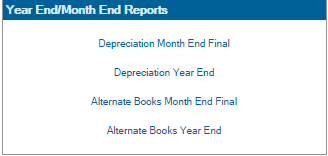
5. Select 'Depreciation Month End Final'
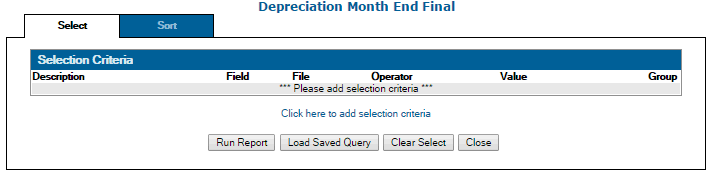
- You can specify a specific branch or types of fixed assets by using the 'Click here to add selection criteria'
- If you want to run it for all then leave then do not enter in any selection criteria
6. Click on Run Report
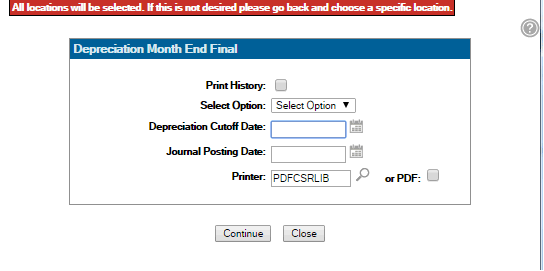
- Select whether or not you want to print the Detail or Summary Report
- Enter in the Depreciation Cut Off date
- Enter in the Journal Posting date - this is the GL period the depreciation will be posted into ** It is important to ensure the General Ledger period for the fixed asset month end being posted is an open month **
- Select your print option
Check Reconciliation Month End
This month end is only valid if you are NOT using the Bank Reconciliation feature within IntelliDealer, once the Bank Reconciliation procedure is activated within IntelliDealer there is no longer any month end option.
Items to complete Prior to closing Check Reconciliation Month End:
- Run a Check Reconciliation Preliminary to see activity done since the last month end
- Make all entries that need to be made that affect the month you are about to close
1. Financial Management
2. Account Payable
3. Check Reconciliation
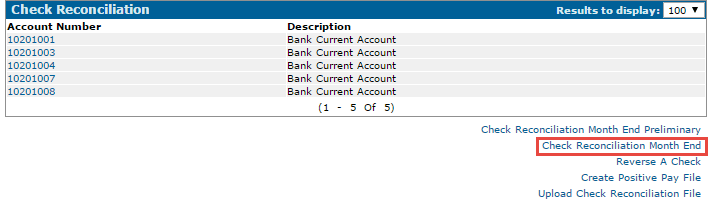
4. Click on 'Check Reconciliation Month End'
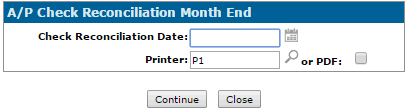
5. Enter in the Check Reconciliation Date you look to close and the printer you wish to send the reports to
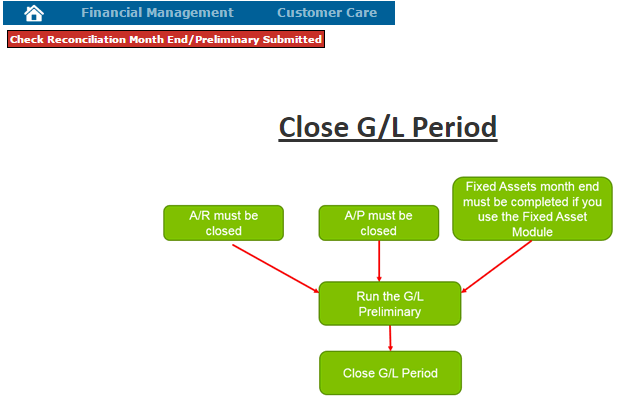
6. You will receive a message in red in the left corner of the screen that says 'Check Reconciliation Month End/Preliminary Submitted'
Prior to closing a G/L period there are reports that you want to run and check over to ensure that there are no additional postings that need to be done.
Financial Reports can be accessed from two areas of the system depending on your security
1. Financial Management
2. General Ledger
3. Financial Reporting
or
1. Management Central
2. Financial
3. Financial Reporting
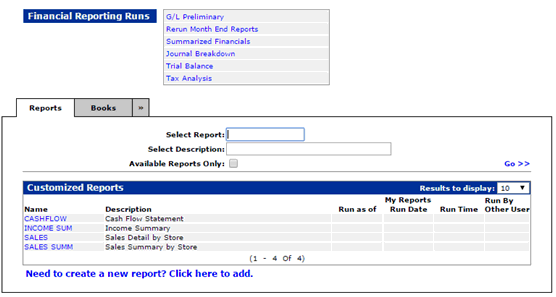
- The top portion of the screen displays links to system generated reports. When you hover over the links at the top of this screen, you see a description of each line.
- The tabbed area in the bottom half displays customized reports. In this section, you can build a new report from scratch or copy an existing report and customize it. For example, your parts manager wants a report of his income, expenses, and profit. You can build that report here and give him access to it without giving access to other financial reports.
- Before closing the G/L period start by running and proofing the G/L Preliminary.
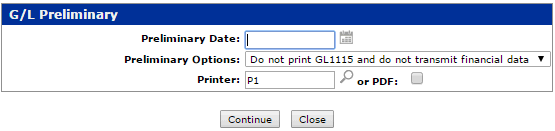
G/L Preliminary
- The G/L Preliminary option is a group of financial reports including Balance Sheet, Profit and Loss, Income Summary, etc. This allows the G/L month end reports to be printed, reviewed, and corrected, before a general ledger month end is run.
- John Deere and Case dealerships can use this option to transmit financial data if they have not yet closed the month.
- Before running the G/L Preliminary, make sure that the following have been completed:
- The accounts receivable month end must already have been run for this month.
- The accounts payable month end must already have been run for this month.
- The equipment costs of sales journal should be entered. This is only applicable you are not using the Automatic Costing option in PFW. Most dealerships going forward will be using the automatic costing.
- All other general journals should be entered.
- Running the G/L Preliminary helps you catch posting errors and allows you to make corrections prior to close. Once a period is closed, it cannot be re-opened.
- The G/L Preliminary can be re-run as many times as desired.
- Another way to run the GL Preliminary (Trial Balance) is through Chart of Accounts > Print Chart of Accounts and select to print account balances.
Running a G/L Preliminary:
1. From the Financial Reporting Menu select ‘GL Preliminary’ from the Financial Reporting Runs section
2. G/L Preliminary screen will appear which allows you to select:
- Date you want to run the report for
- Whether you want the trail balance report to print or not print and whether or not you want to transmit your financial
- Print option you want to use
Reports that will Print
| Report Number | Report Description |
|---|---|
| GL1000 | Journal Voucher Proof List all manual journals plus sales analysis, account payable, cash receipts, payroll and parts cost of sales |
| GL1070 | Balance Sheet Accounts |
| GL1080 | Profit and Loss Account Summary |
| GL1090 | Expense Items Account |
| GL1115 | Trial Balance |
| DE1110 | Balance Sheet Analysis |
| DE1171 | Statement of Change in Financial Position |
| DE1100 | Departmental Income Summary |
| DE1120 | Area of Responsibility Income Summary |
| DE1160 | Income Summary |
| DE1150 | Company Income Summary |
| DE2000 | Journal Summary by Profit Center |
Summarized Financial:
- A condensed version of three major financial statements: the Balance Sheet, Operating Statement and Expense Statement. Also included in the report are the Other Income And Deductions Statement and the Summary Report.
- The Journal Voucher Proof List displays all general journals that were entered through the Journal Listing screen and all system generated journals for the current month.
- Run any additional reports required by your dealership and remember to save copies. The easiest way to do so is to always print a copy to PDF so that you can save a copy on your workstation. Additionally, this option makes it easy to email a copy to your CPA if required.
Note: There is a sample of each of these reports in the on-line Help feature. Just click on the ? At the top right of any screen. The last item in the Contents list on the left displays the list of sample reports.
1. Financial Management
2. General Ledger
3. Close G/L Period
4. Enter in the G/L Period your are looking to close and the print option you want
5. Once you continue, the system take you to the confirmation window
6. As long as you are ready to close the G/L period click continue, this will finish off closing the G/L Period
- You will receive the same reports that you did in the preliminary, the only difference is that the number are finalized
When closing your Year End it's not different then closing any other G/L period throughout the year but there are some reports that we would recommend that your run
Assuming your fiscal year end is December and all reports mentioned below should be run right before you do your A/R and Parts month ends for December. I am also assuming that you run your A/R and Parts month ends at the same time.
Equipment:
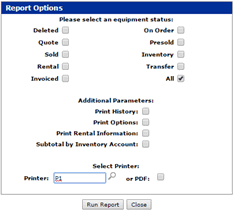
You should run an Equipment Wholesale listing for new and used equipment (Report #: CGI025 & CGI020) right before your A/R month end for the last month of your fiscal year. These reports will give you a snapshot of your equipment inventory at year end. It is important to run this report at year end because it can not be backdated after you start working in your new fiscal year.
1. Product Support
2. Equipment
3. Equipment Reports
4. Wholesale
This is not broken down automatically by New and Used but you can specify your Selection Criteria, so you may want to run 2 separate reports.
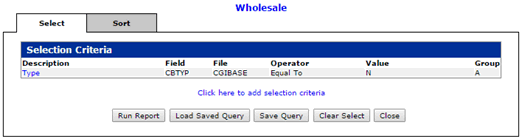
5. Select RUN
Service
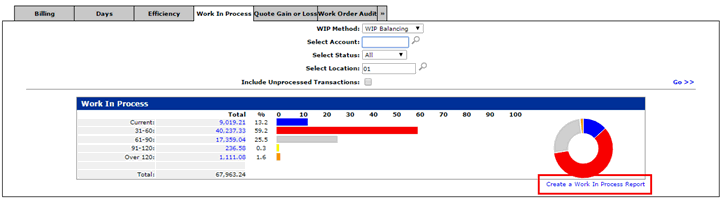
You should run a detailed Work In Progress before your last A/R Month End for your fiscal year
1. Product Support
2. Service
3. Analysis Reports
4. Select the Work In Progress Tab
5. in the bottom right corner click on 'Create Work In Progress Report'
Parts
- You should run a detailed parts inventory summary at year end. Use the On Hand Quantity, not Net on Hand. Use Average Cost to balance to the G/L
- If you track lost sales or special order frequency you should run a year end listing on these fields. Most dealers run an availability listing with lost sales > 0 OR special order frequency > 0. These fields are reset to zero in part master maintenance after your parts month end for your 12th month.
1. Product Support
2. Parts
3. Parts Reports
4. Inventory Summary
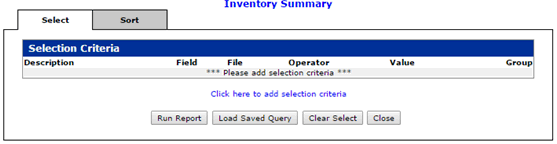
5. Once you add any selection criteria, click on Run Report
Customer Care
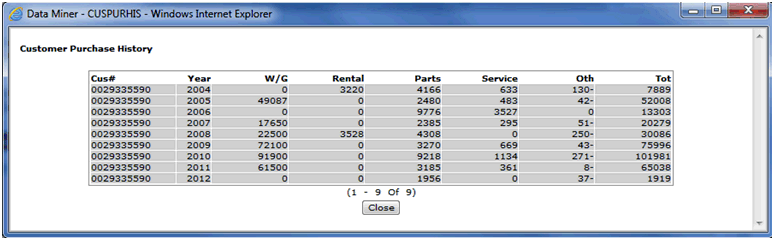
- You should run a Customer Purchasing History report (CMM123) BEFORE your last A/R month end of the year. The current YTD fields in customer maintenance are reset to zero during this month end and these figures are moved in to the last year column in customer maintenance. If you want to know who your best customers are this year this is a valuable report to run. There are a couple of other options for those users who still want access to this information but do not run this report. This detail can be accessed on-line through Management Central at anytime or you can QUERY the CMFIS file which also stores this valuable information.
- In 7.3 or greater this report is no longer available, you can create a Data Miner report using the CMFIS file (Customer Fiscal Sales History)
Accounts Payable
- There are no year end reports that you have to run before closing your last A/P month end of your fiscal year
General Ledger
- If you use Budgets within IntelliDealer you should decide whether or not you are doing Budget Upl
- Financial Management > General Ledger > Budgets > bottom right click on Budget Reports
1. Financial Management
2. General
3. Close G/L Period
4. Enter in the G/L period you are looking to close and the print option you want
5. Once you continue, the system takes you to the confirmation window that advises you that you're about to close the last month

You will also receive a GL2000 Report - Year end closing journal (Only prints during G/L final for last month fiscal year