Price Matrix: Listing
Use the Price Matrix listing screen to find and view existing price matrices, to print a matrix report, or to apply a new matrix.
To open the Price Matrix listing screen, navigate to Product Support > Parts > Price Matrix.
Topics in this section are:
Price Matrix Overview
A price matrix is a grid the system uses to set percentage increases for parts based on a part's current price and sales.
Parts of the Price Matrix
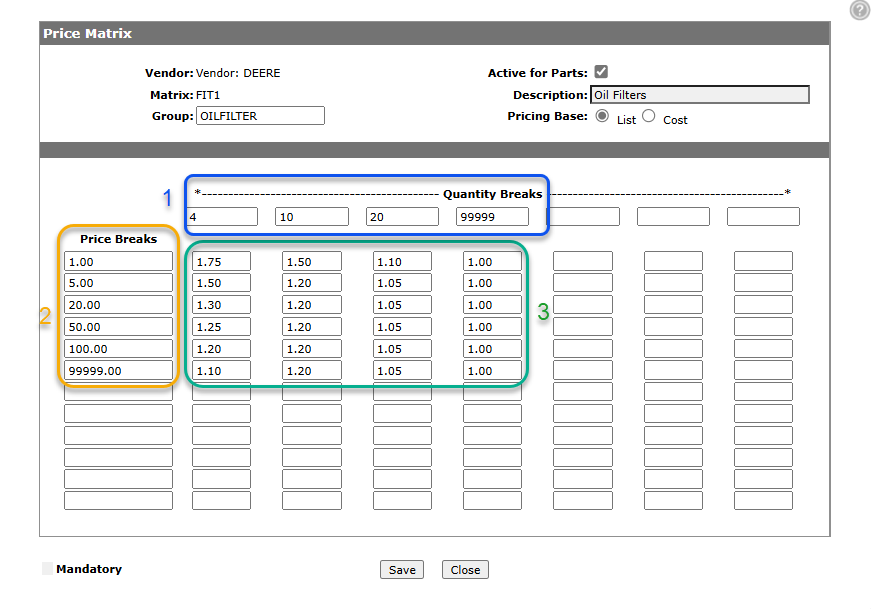
-
In the Quantity Breaks row (blue), you set how many parts must be sold, up to and including the value set, within the last 12 months for the price increase to be applied. Setting the last column to 99999 (as a maximum) ensures that parts that sold more than 20 in the past year are covered in the table.
-
In the Price Breaks column (yellow), you set the list or cost price that the part must be, up to and including the value set, for the increase to be applied. Whether the price break is based on list or cost is set by the radio buttons next to the Pricing Base field above the table.
-
Then, in the interior cells of the grid (green), you set the percentage by which the parts price should increase. A value of 1.00 means no change is applied, but a value of 1.02 means a 2% increase, and 2.00 a 200% increase.
Therefore, in the example above, if the list price of a John Deere oil filter is $1.00 or less, and 4 or less filters were sold in the last 12 months, then a 75% increase is applied to the price. If 10 or less were sold a 50% increase is applied, if 20 or less were sold a 10% increase, and if 21 or more were sold then no increase is applied.
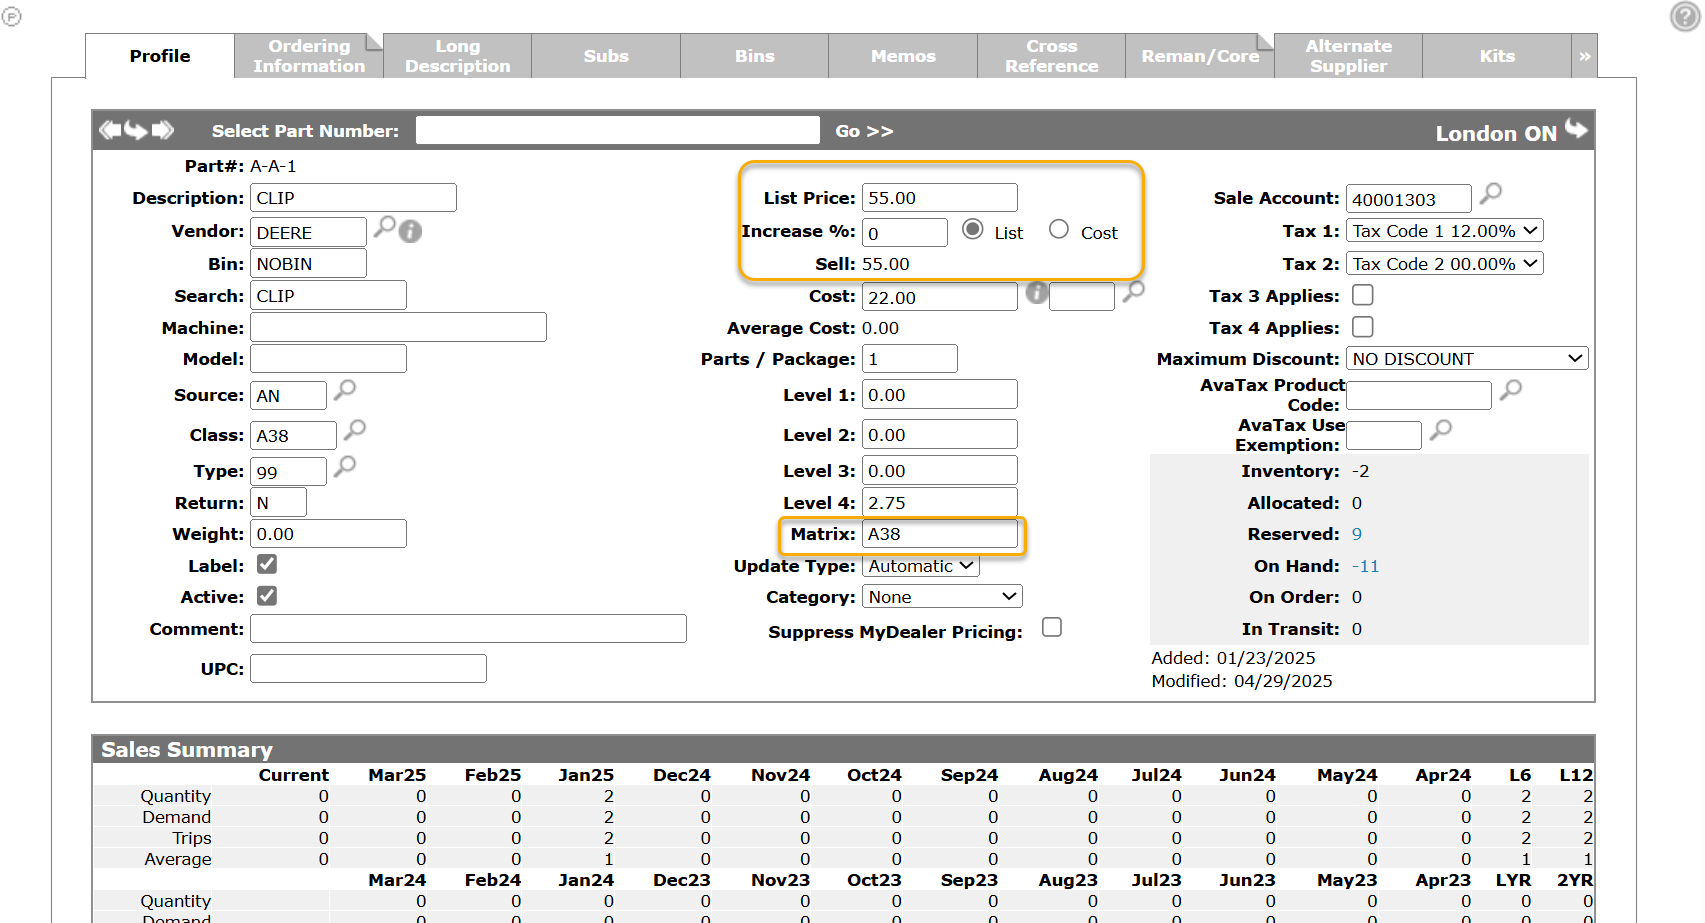
On the Parts Profile, in the Matrix field, you can configure which price matrix applies to the part. In the example below, the price of $55.00 is based on list, and since the Increase % is 0, the Sell price is 55.00. The Matrix field is set to A38, so the next time the matrix is applied the Increase %, and whether the price is based on List or Cost, is reset according to what is configured in the matrix. Then the system can recalculate the Sell price.
Naming a Price Matrix
The methods for naming a matrix are:
-
manually type the name of a price matrix in the Matrix field on the Parts Profile
-
on the Parts Adds screen configure a default name
-
on the Parts Adds screen, configure the system to generate one programmatically whenever a new part is added, using the part's Source, Class, Type, Inventory Class fields
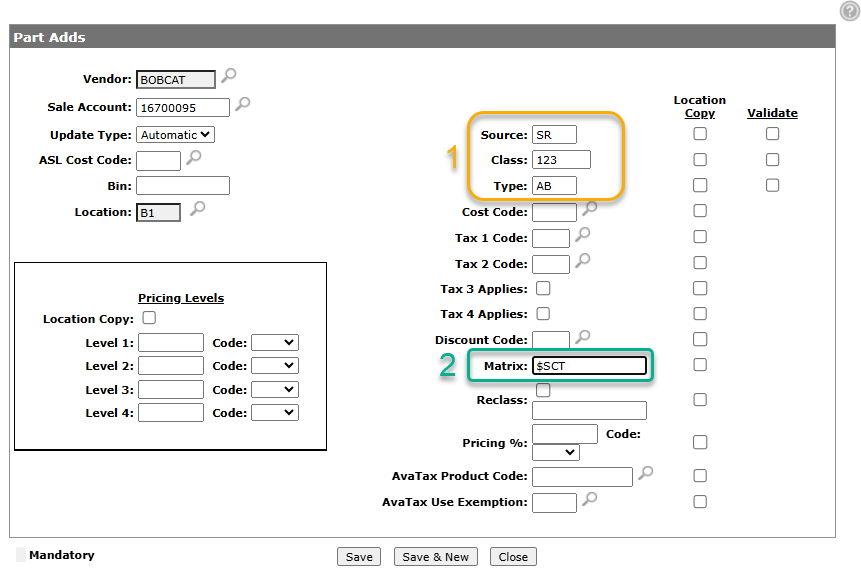
Use the Part Adds configuration table to specify (by vendor and location) the default price matrix name in the part profile when a new part is added.
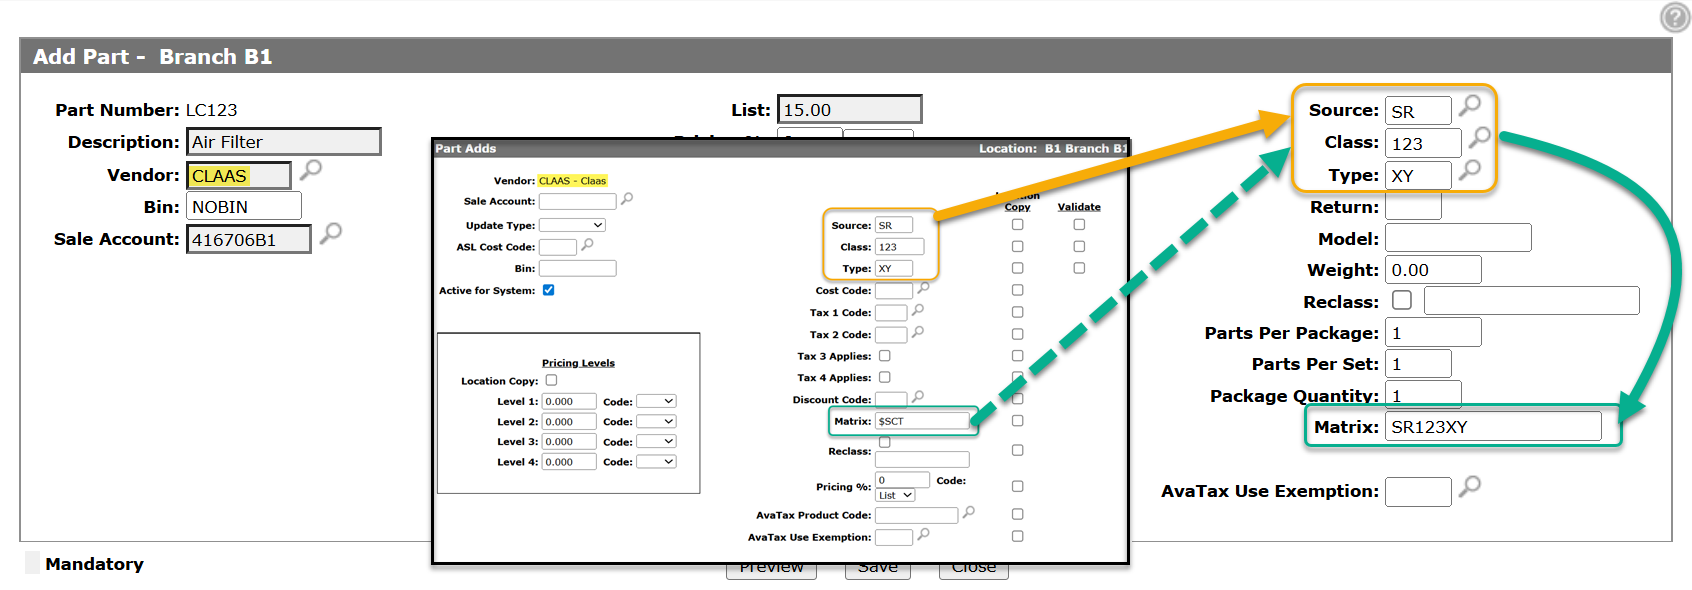
This example shows that the matrix configured in Part Adds is automatically populated into a new Claas part for the location.

If the Matrix field value on the Parts Adds screen starts with a $ sign then the system sets the matrix name based on the configuration in this field and the subsequent character(s) must be a combination of S, C, T, I.
For example, let's say you have a part where:
-
Source = SR
-
Class = 123
-
Type = AB
-
Inventory Class = I
This table shows the results of various settings in the Matrix field:
| Matrix field setting | Meaning | Resulting Matrix Name |
|---|---|---|
| $SC | source + class | SR123 |
| $CS | class + source | 123SR |
| $CST | class + source + type | 123SRAB |
| $SCTI | source + class + type + inventory class fields | SR123ABI |
The system takes the settings in box 1 and combines them with the settings in box 2 to configure the Matrix field of the newly added part to SR123AB.
Source, Class, and Type Values
When adding a new part to the system the defaults for Source, Class and Type values follow a hierarchy which also affects the default matrix when the system is configured to build the matrix value from a Source/Class/Type combination. The hierarchy, in priority order, is:
-
If the part exists in another location, and the Part Adds screen has the Location Copy box checked, then the values are copied.
-
If the part exists with Source/Class/Type values in the PARTPRC file, then those values are used.
-
The values specified on Part Adds screen.
If one of the fields is blank at any point, the system takes the next possible default for that field. For example, if you are adding a new part where:
-
the part doesn't exist in any other location
-
the master price file only has a Source value for that part
-
the Part Adds screen has Source, Class and Type values for the vendor and location configured
Then the system defaults the Source from the master price file and the Class and Type from the Part Adds screen.
Understanding Blanks in Matrix Names
A blank in the name of a matrix occurs anytime a field in a matrix name is a blank (there was no value in the field so the system puts a space in the name). It is very important to understand how blanks work in matrix names.
If one of the fields (source/class/type/inventory class) in the price file and on the Part Adds screen is blank, and that field is used in the Parts Add Matrix field formula, then the system puts a space in the matrix name depending on where that field is used. If it's on the end there is no blank, as there are no trailing spaces allowed. If it’s used in the middle then the matrix name will have spaces in the middle, which shouldn’t be an issue. However, if a space occurs at the beginning of a matrix name, that is called leading spaces, which could potentially be an issue as you can’t create a matrix with leading spaces in the name.
For example, let's say you have a part where:
-
Source =
-
Class = 123
-
Type = AB
-
Inventory Class = I
This table shows the results of various settings in the Matrix field (where underscores are used to represent a space):
| Matrix field setting | Meaning | Resulting Matrix Name |
|---|---|---|
| $SC | source + class | __123 |
| $CS | class + source | 123 |
| $CST | class + source + type | 123__AB |
| $SCTI | source + class + type + inventory class fields | __123ABI |
If one of the fields doesn't use all the available characters, then the system adds a space to make up the difference.
For example, Source is allowed 2 characters and Class is allowed 3. If the Part Adds settings are:
-
Source = SR (uses the full 2 characters that are available)
-
Class = 12 (uses only 2 of the 3 available characters)
Then if the Matrix field setting was $SC the resulting matrix name would be SR12 (no space at the end).
But, if the Matrix field setting was $CS, then the resulting matrix name would be = 12_SR (space in the middle where the third character of the Source would be).
A blank matrix has a blank name (all spaces) which can occur for a variety of reasons.
The *ALL Matrix Name
To make sure a price matrix gets applied to every part, for each vendor create one price matrix called *ALL. The *ALL matrix can be applied (job scheduler or manually) to any parts where there is not already a matching matrix. Using the *ALL matrix can mitigate any issues that might occur due to leading spaces in a matrix name.
To apply the *ALL matrix, on the Price Matrix - Apply screen, don't specify any matrices and ensure the Include Blank Matrix field is NOT selected.
Related Files and their Interaction
There are several files involved in adding, maintaining, and updating parts prices, as shown in the illustration below.
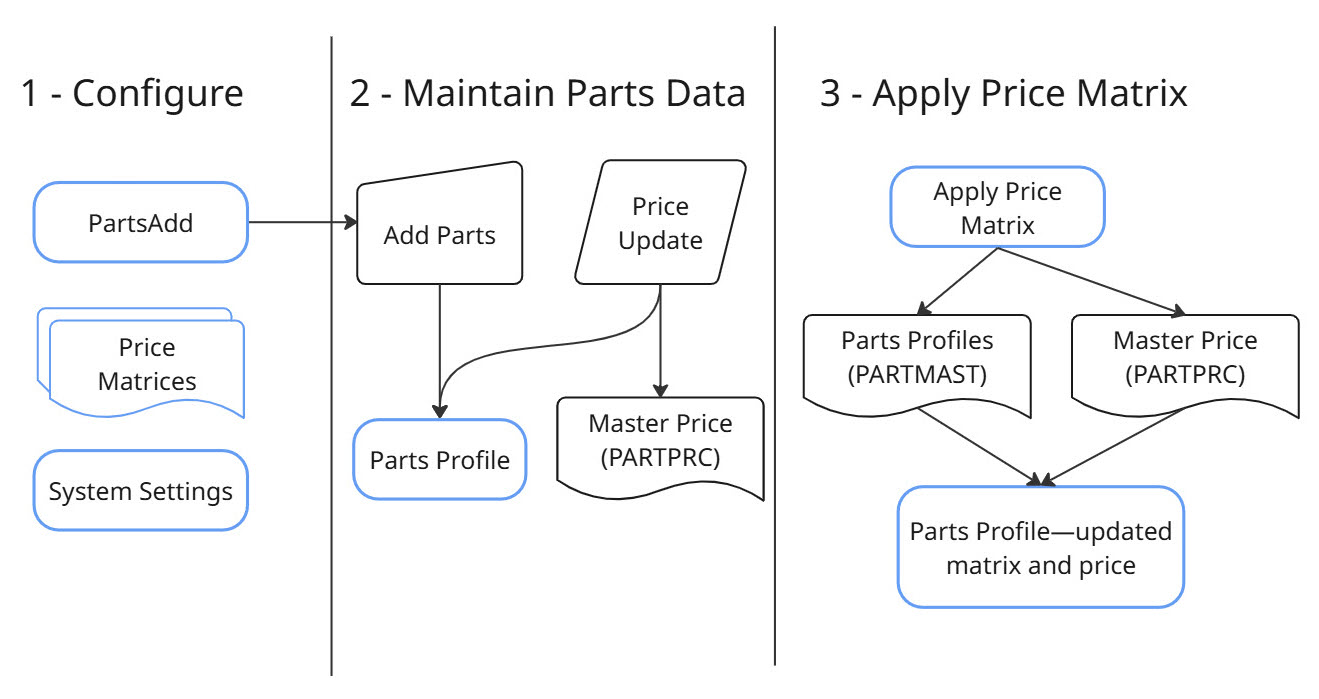
The general steps are for maintaining parts prices are:
-
Configure these settings:
-
Part Adds screen—to specify the default settings when quick adding parts.
-
Price Matrix—add at least one Price Matrix for each vendor.
-
System Settings—the Reclass/Matrix Trigger field controls how the Matrix field on the Parts Profile is maintained.
-
System Settings - Location tab—the Apply Matrix Rules When Adding Parts controls whether the rules of a matching matrix are applied to a part when it’s first added to the system.
-
-
Add Parts Data to IntelliDealer using one of these methods:
-
Manually Add Parts—you can create a new part, or quick add a part.
-
Parts Price Updates—download OEM parts catalog data, which is used add parts to the price file, update existing parts, and populate data into newly added parts.
-
-
Apply the Price Matrix— after a price update or a matrix change, configure how you want to apply the matrix and run it. Review the resulting price matrix report to review the updates. You will probably need to run this step several times if you are only applying specific matrices for specific vendors.
Screen Description
The sorting options on the Price Matrix listing screen are:
| Sort by | |
|---|---|
| Field | Description |
| Vendor | Sort the search results by vendor. |
| Matrix | Sort the search results by matrix. |
The search fields on the Price Matrix screen are:
| Field | Description |
|---|---|
| Select Vendor | Search for price matrix by entering a vendor. |
| Select Matrix | Search for price matrix by entering a matrix code. |
| Select Pricing Base | Search for price matrix by selecting a pricing base from the drop down list. |
| Include Inactive | If selected, includes inactive price matrices within the search results. |
The fields on the Price Matrix screen are:
| Field | Description |
|---|---|
| Vendor | The vendor name. |
| Matrix | The price matrix. The system uses this to determine the proper part price increase percentage. |
| Group |
The name of the group this matrix belongs to. Matrices with the same group name all update when any one matrix in the group is updated. You can have multiple groups for a single vendor. The group name must be the name of an existing matrix, however, the matrix that provides the group name is not updated along with the group, and has no group field. |
| Description | A brief description of the matrix. |
| Pricing Base | Whether the price matrix pricing base is list or cost. |
Move the cursor over a Vendor name and select Edit from the pop-up menu to edit a price matrix.
Move the cursor over a Vendor name and select Copy from the pop-up menu to open the Copy Price Matrix pop-up.
Click the Need to create a new matrix? Click here to add link to open the Add Price Martix pop-up.
Click the Print matrix reports link to print matrix reports.
Click the Apply new matrix(s) link to apply a new matrix.