Parts Profile: Edit
Use the Parts Profile tab to create a new parts profile, update a part profile, and search for parts.
To open the Parts Profile tab, click the Update/ View Profile link on the Parts Profile screen. Click the Previous, Change, or Next  icon to scroll to the previous part number on the list, search for a different part number, or scroll to the next part number on the list.
The search field on the Parts Profile tab is:
| Field | Description |
|---|---|
| Select Part Number | Entering another part number and clicking the Go >> link displays profile information on the selected part. If you have previously modified any information on the screen before clicking the Go >> link, you are automatically prompted to save prior changes. |
These fields appear on the Parts Profile tab:
Note: Field level-security assigned to your user profile (as defined on the Field - Work With Field Level Security screen) may change the appearance of or hide certain fields. For details, see the Field - Work With Field Level Security screen help topic.
| Field | Description |
|---|---|
| Part # | The unique identifier for the part within IntelliDealer. |
| Description |
A brief description of the part. The description for any particular part number that exists in several branch locations must be the same for all branches. If you want the description to be different at a second branch location, you must change the table CMBR. Enter a ? in the last position of the parts Description to prompt the user to enter a parts Description every time the part is sold. For example, used when adding a SUBLET part to the system. |
| Vendor |
The vendor number for the supplier of the part. If the Cost Code assigned to the selected vendor differs from the Cost Code associated to the selected part (as specified in the Cost Code field below and the Cost Code field on the Vendor Profile), the system uses specific logic to determine the Landed Cost of the part when it is ordered. For details, see the Cost Code Logic topic. |
| Bin |
The bin location where this part can be found. All bin numbers should be the same length and they should have no embedded blanks (e.g. A 123 should not be used, instead A123). The part's previous bin location appears in parentheses next to the Bin field. A bin location is required for all OFC codes except OFC 5. |
| Search | A search name for the part. The search name helps locate a part. |
| Machine | The unit the part can be used on. |
| Model | The model number on the unit. |
| Source |
The source of supply for the part. Usually this is used to break down the parts into different categories within each vendor. If the source of supply code starts with a zero and the vendor is DEERE (or begins with JD), the part is not automatically ordered on a stock order. Valid type codes are set up on the Source of Supply screen. |
| Class |
This field is used to categorize parts. Setting a class of $MP always prompts a user to enter the cost of this part every time it is sold. For example, a part of SUBLET. |
| Type |
The type of part. Valid type codes are set up on the Types screen. |
| Return | Whether the part is eligible for return or not. |
| Weight | The weight of the part. |
| Label | If a label is to be printed for this part number when it is receipted through the Parts Ordering screen. |
| Active |
Select the checkbox to indicate that this is an actively sold and stocked part. The status of the part can only be inactive (un-checked box) if the part has zero quantity on hand, zero quantity on order and zero quantity back ordered. A part marked as inactive cannot be ordered or sold. |
| Comment | A message about the part may be entered in this field. Every time this part is used at the parts counter, this message is displayed. The comment is also printed on the stock status and availability reports. This field is usually used as a reminder to the parts salesperson. |
| UPC |
The Universal Product Code of the part. This code is also displayed on the Cross Reference tab and is used for wireless inventory control. UPC numbers must be unique and cannot be shared among multiple parts. |
| List Price | The suggested list price of the part. |
| Increase % |
To be applied to the regular list or cost to calculate the selling price of the part. Select either the List or Cost button to determine which price the increase percentage should be applied to. For a decrease percentage, enter a negative number. |
| Sell |
The part's sell price is calculated by the system based on the value entered in the increase percent field. The parts sell price may be affected by the Parts/Package field. |
| Cost |
The net cost of the part. To the right of the cost field is the Cost Code field. This code determines the PO Cost and Landed Cost Only Order Creation cost codes can be entered in this field, however if there is a matching Order Update cost code, both codes are used on any applicable orders to calculate the Landed Cost of the part. If there is a Cost Code assigned to both the part and vendor on an order (or if the Cost Code is blank for either the part or vendor on the order), the system uses specific logic to calculate the Landed Cost of a part. For details, see the Cost Code Logic topic. |
| Average Cost |
See Parts Ordering: Order Correction's section on A part that currently has a quantity of at least 1 in inventory |
| Parts/Package |
The quantity of parts purchased from a vendor in a single package. The parts per package signifies how the system maintains inventory on this part. For example, a vendor may only sell you oil filters in cases of 12, but you can number and sell them individually from your store. When you receipt the part however, you would receipt it as a quantity of 12. The price and cost loaded on this part should be the list price of one whole package. When the part is sold, the selling price and cost is divided by the Parts/Package to calculate the selling price and cost for a single item. If the Use the same PPP for all locations switch is activated on the DIVTAB1 table and you change the value in this field, the system automatically updates the Parts/ Package value for this part number across all branches. |
| Level 1 |
The selling price for pricing level 1. Pricing levels usually refer to such things as wholesale price, fleet price, jobber price, etc. If no pricing levels apply to the part then leave these fields blank or zero. Note: Prices do not need to be entered for all four pricing levels, any combination of the four fields can be used. |
| Level 2 | The selling price for pricing level 2. Pricing levels usually refer to such things as wholesale price, fleet price, jobber price, etc. If no pricing levels apply to the part then leave these fields blank or zero. |
| Level 3 | The selling price for pricing level 3. Pricing levels usually refer to such things as wholesale price, fleet price, jobber price, etc. If no pricing levels apply to the part then leave these fields blank or zero. |
| Level 4 | The selling price for pricing level 4. Pricing levels usually refer to such things as wholesale price, fleet price, jobber price, etc. If no pricing levels apply to the part then leave these fields blank or zero. |
| Matrix |
The price matrix that is loaded for this part. The system uses this to determine the proper price increase percentage for the part. Depending on the setting of the Reclass Matrix Trigger parameter on the System Settings screen, this field may be automatically updated by the system if the Source, Class, Type, or Inventory Class fields are changed. See Naming a Price Matrix. |
| Update Type | Used to determine if a price update run should automatically update the parts master file or whether it is going to be maintained manually. |
| Category | Categorizes the part as a Wear part (indicating the part naturally wears and is not covered under warranty e.g. filter or brakes). This excludes the selected part from the warranty check on the Work Order Parts Requisition Details tab (parts highlighting/Warning icon indicating that the part has been sold to the same serial number within the last 12 months). Specific vendors and parts can now be excluded from cycle counts by selecting the No Cycle Count option. A cycle count must not already be in progress in the same division of the vendor or branch of the part if you attempt to change the exclusion status. |
| Suppress MyDealer Pricing | If activated, this switch suppresses the pricing for this part from this vendor in MyDealer. Instead, MyDealer displays: "Call for Pricing". |
| Sale Account | The part's general ledger sale account. |
| Tax 1 |
The normal TAX 1 code for the part is entered in this field. For example, code 1 may represent 6% federal tax. The percentage rates for tax 1 codes are set up on the Tax 1 screen. Note: If the tax calculated by the tax code entered in Tax 1 is included in the selling price, then the tax calculated for the tax code entered in Tax 2 is based on the resulting selling price. |
| Tax 2 |
The normal TAX 2 code for the part is entered in this field (e.g. code 2 may represent 7% provincial tax). |
| Tax 3 Applies | Indicates that the Tax 3 code as set up on the Tax 3 screen should be applied to this part. |
| Tax 4 Applies | Indicates that the Tax 4 code as set up on the Tax 4 screen should be applied to this part. |
| Maximum Discount |
The discount code applicable to this part is entered in this field. This option is to be used by dealers using Discount Codes rather than discounting options like Customer Pricing. The percentage rate for the discount code is set up on the Discount screen. The discount code specified in this field is the maximum discount allowed for the part. If a customer normally qualifies for a 20% discount, but the part being purchased is coded in the part master with a code indicating a maximum 10% discount, then the customer only receives a 10% discount. If the part has no discount code, the customer receives whatever discount that they may qualify for. |
| AvaTax Product Code | Identifies the type of item being sold. This code is typically based on a part classification (e.g. Source, Class, Type, Vendor, etc). |
| AvaTax Use Exemption | This field can be set to identify which parts are to ignore specified Entity Use Codes. See AvaTax Use Exemption Field. |
| Inventory | The number of parts currently in stock within the selected branch location. |
| Allocated |
The quantity of allocated parts. A part is considered allocated when:
Once parts are invoiced, they are cleared from this field after a rental billing run, and/or a regular billing run has been processed. |
| Reserved |
The quantity of parts that have been reserved. A part is considered reserved when:
The Reserved field is cleared out after a sales order billing run has been processed. Parts are no longer reserved after a sales order billing run has been processed. |
| On Hand | The quantity on hand. This includes any shipments that have been receipted using the inventory adjustments screen, or by the receipting of a purchase order, but has not been reduced by any parts sold since the last sales order billing run. |
| On Order |
The quantity of parts currently on order with the supplier. The On Order quantity on the main parts profile screen is the same as the stock order quantity. If the number present is hyperlinked then there are special orders (ie. Type MD) still outstanding. |
| In Transit | The term in transit means on the way. This value is determined by the pending order receipts system. |
Note: The Active for Parts checkbox must be selected on the Vendor Profile screen for the vendor number being used, or the vendor number is considered as invalid. John Deere parts should have a vendor number of DEERE, JDM, or JD1234 where 1234 is your dealer number. The vendor number for all other parts should be the same vendor number as is used in accounts payable.
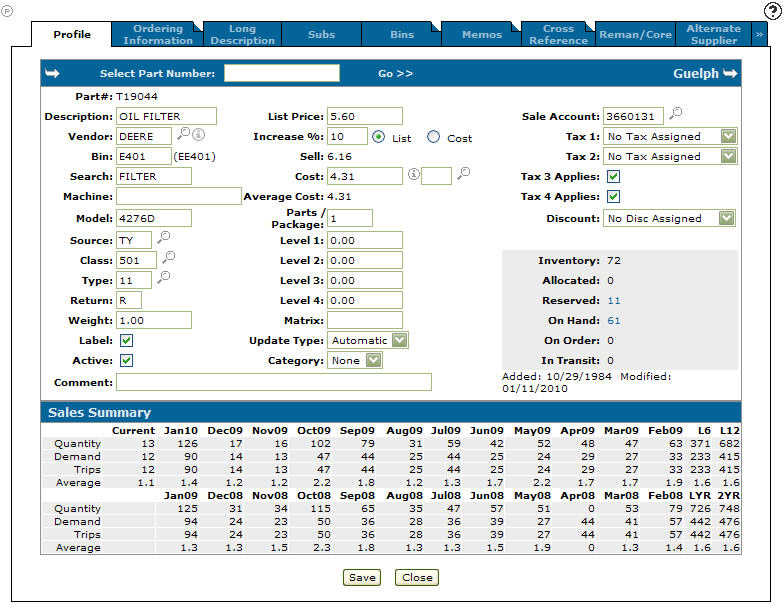
The Sales Summary section on the Parts Profile screen displays the part's sales summary.
These fields appear in the Sales Summary section of the Parts Profile screen:
| Sales Summary | |
|---|---|
| Field | Description |
| Quantity | The amount of parts sold. |
| Demand |
A single demand entry (1) is made by each sales order to a part's profile regardless of the number of times that part is sold on that one order. Also, only one credit demand entry (-1) is made by each sales order regardless of the number of times that part was returned on that one order. However, if a part is sold (1) and returned (-1) on the same sales order the demand entry is zero. Demand is calculated the same way for both sales orders and work order requisitions. |
| Trips | The number of physical trips to the part's bin location. |
| Average | The average between the quantity of the part and the number of bin trips. |
Valid return codes for John Deere parts are:
| John Deere Return Codes | |
|---|---|
| Code | Description |
| R | Returnable. |
| D | Last Year Returnable. |
| N | Non Returnable. |
| E | Non Returnable, part was on recall bulletin for non Deere parts, any code can be used for returnable and non returnable parts. |
The system displays a historical sales summary indicating the total sales quantity for this part number for this branch location.
Use these buttons to complete your work on the Parts Profile tab:
| Button | Function |
|---|---|
| Save | Saves changes made on the Parts Profile tab. |
| Delete |
Note: The Delete button only appears if the On Hand, Reserved, Allocated, On Order, and Back Order quantities for the selected part are all equal to 0. The Delete Part switch must also be activated on the Authorization List For Product Support - Parts Profile screen for the button to appear. If selected, these files are checked by the system:
If the part is found in any of these files it cannot be deleted. Additionally, this deletion logic applies:
If the part can be deleted based on the criteria noted above, it is removed from these files:
|
| Close | Closes the Parts Profile tab without saving and returns to the Parts Profile screen. |