Parts Profile: Kits
Use the Kits tab to specify the parts you want to include when creating a parts kit. Kits are groups of parts that are used to complete a specific service job or function.
Note: Once a part is added to a kit, it cannot be deleted from the system while it remains in the kit.
To open the Kits tab, click the Update/View Profile link on the Parts Profile screen.
Topics in this section are:
How to Create a Parts Kit
-
Create a special Customer Profile for the parts department to sell the parts for the kit and receipt in the kit when its been created (Example: PARTS001).
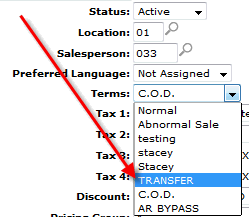
Make sure the Terms on the customer is set to TRANSFER. This tells the billing system that all parts sold to this customer should by default be taken out of inventory and no sale should be recorded.
-
Add the special customer in to the Kit Customer Number field on the System Settings, Location tab.
-
Create a Part Number for the Kits.
The cost on the part should be the cost of all the parts required to make the kit. That way when you sell the Parts to the parts department to make the kit and receive in the number of kits made, the invoice will net to zero.

-
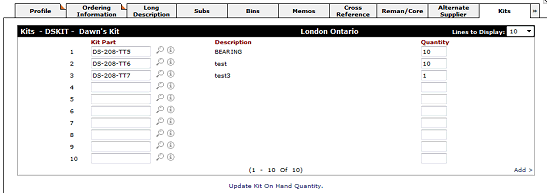
In the Part Profile, select the Kit tab and add the components of the kit.
-
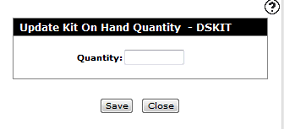
Click Update Kit On Hand Quantity then enter the Quantity of kits the parts make up.
-
Click Save.
The KITS tab on the profile is shown with a red box that indicates how many kits have been created and the sales order that was created for it.

Screen Description
Fields on the Kits tab are:
| Field | Description |
|---|---|
| Kit Part | The part number that is included in the kit. |
| Description |
A brief description of the kit part (e.g. the common name of the part). No Master appears in this field when the kit part is not loaded on the parts profile. An Add Part link appears in parenthesis next to the No Master description allowing the user to add the part to the parts profile. |
| Quantity | The quantity of the parts required for the kit. |
Click the Information  icon to open the associated Part Profile.
Click the Update Kit On Hand Quantity link to order and compile the kit using the Update Kit On Hand Quantity screen.
Note: The Update Kit On Hand Quantity link only appears after you have specified the parts you want to include in the kit.
Click Save to save changes made on the Kits tab.
Click Close to close the tab without saving and return to the Parts Profile screen.