Parts Profile: Add Part/Copy Part
Topics in this section are:
Copying a Part to Another Location
Note: System alerts are temporarily disabled during the part copy process to improve stability.
-
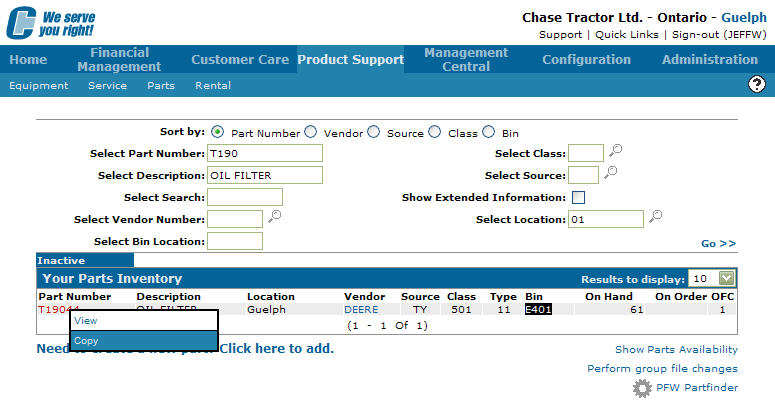
On the Parts Profile: Listing screen, hover the cursor over a Part Number and select Copy from the pop-up list.
-
Fill in the fields referring to the table below.
-
Click Save.
-
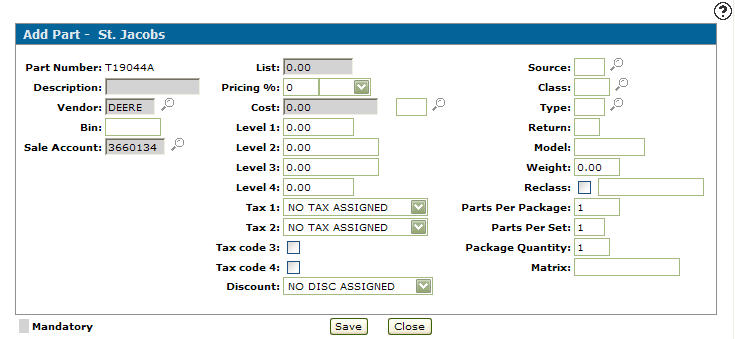
Fill out the remaining information fields and click Save.
The Parts Profile screen appears listing the new part profile in the location you previously selected.
Add Part screen
Use the Add Part screen to add a new part profile to the system.
To open the Add Part screen, click Create on the Parts Listing screen.
The fields appear on the Add Part screen are:
| Field | Description |
|---|---|
| Part Number | The identifying number of the part. The part number can be up to 15 digits consisting of alpha, numeric or blank characters. The part number cannot contain more than 10 special characters ('<', '>', '&' and " "). VitalEdge recommends that you do not use blanks in the part number. |
| Location | The location of the new part. |
Use these buttons to complete your work on the Add Part screen:
| Button | Function |
|---|---|
| Save | Opens the Add Part screen, allowing you to finish adding the new part to the system. |
| Close |
Closes the Add Part screen without saving and returns to the Your Parts Inventory screen. |
Copy Part screen
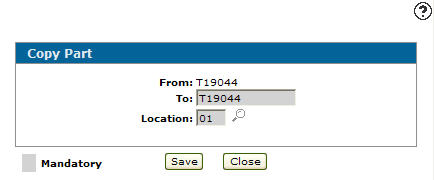
Use the Copy Part screen to copy an existing part to another branch location.
To open the Copy Part screen, on the Parts Profile: Listing screen, move the cursor over a Part Number and select Copy from the pop-up menu.
Note: System alerts are temporarily disabled during the part copy process to improve stability.
The fields on the Copy Part screen are:
| Field | Description |
|---|---|
| From | The original part number |
| To | The copied/new part number. The system defaults to the original part number displayed in the To field. |
| Location | The location of the new part. |
| Vendor | The vendor assigned to the copied part. The system automatically defaults to the vendor loaded to the part entered in the From field. |
Use these buttons to complete your work on the Copy Part screen:
| Button | Function |
|---|---|
| Save | Opens the Add Part screen, allowing you to finish copying the selected part number. |
| Close | Closes the Copy Part screen without creating a copied part and returns to the Your Parts Inventory screen. |