Parts Profile: Add Part/Part Quick Add
Use the Add Part screen to add a new part profile to the system, add a part to a quote, or quickly add a new part to the parts list of a purchase order.
To open the Add Part screen, fill out the appropriate fields and click the Save button on the Add Part screen.
Topics in this section include:
Parts Adds Table
You can use the Part Adds screen to configure how Part Profiles are added to your system, and the defaults that are automatically loaded to a profile when a new part is quick-added in IntelliDealer. Parts that are added through IntelliDealer are ones which are not in the Parts Master Maintenance file, and may or may not be in the Master Price file. The Master Price file is generated when a vendor’s price tape is loaded onto your system. The parts on the price tape(s) may or may not exist in your Parts Master Maintenance file.
If you are using the PartAdds table and setting Pricing Levels, make sure that if they are adding a level on Cost the factor is calculated in the Level fields and will now be a factor off of List. If List changes it will continue that same factor off of the new List value (factor is always off of the current parts list value). Dealers are better suited to use the customer parts pricing option as this gives them better control than the Pricing Level fields that store only a factor not a price. In IntelliDealer, the pricing levels are as you want them and it is stored as a factor of List.
For example, if a part has a list price of 1000.00 and the level 1 price is 7.00 , the level 1 value in the PARTMAST file would show as 99.3. (99.3 % below the list price or 0.7 % of the list).
Calculation: 7 / 1000 x 100 = 0.7 (100 - 0.7 = 99.3)
99.3 is how the factor is stored in the Pricing Levels field. Note that the calculation is adjusted by rounding.
Some dealers use pricing levels if they want the Sales Account to go to a different G/L account. Pricing Levels must be less than 2 times the list price.
Adding a New Parts Profile
-
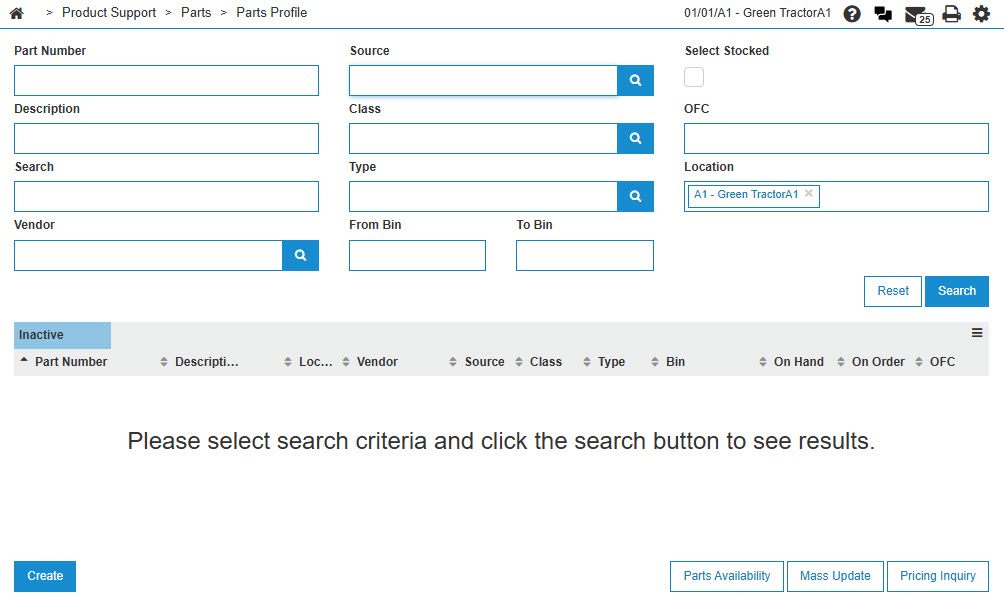
Navigate to Product Support > Parts > Parts Profile.
-
Click Create.
-
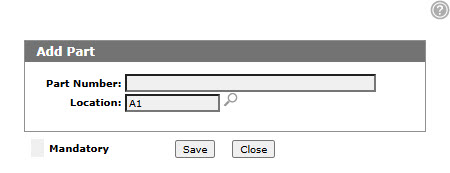
Enter a Part Number.
-
Enter a Location.
- or -
Click the Search icon to select a Location from the Location Selection screen.
 -
Click Save.
-
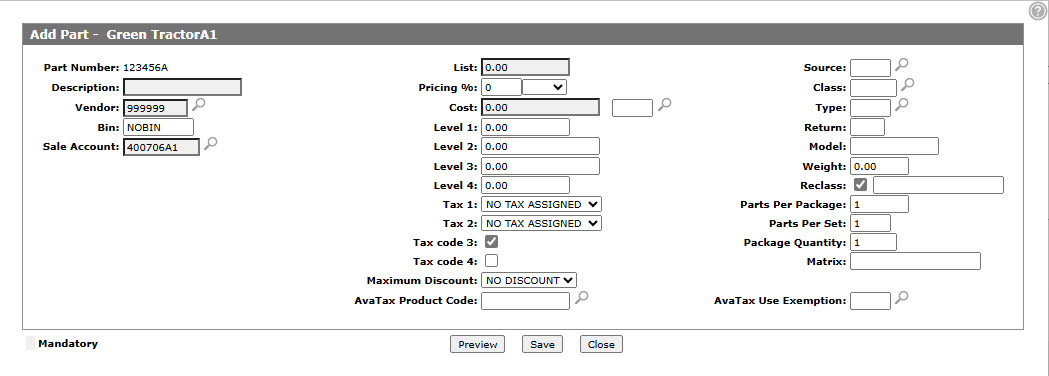
Fill in the fields, referring to the table below.
-
Click Save.
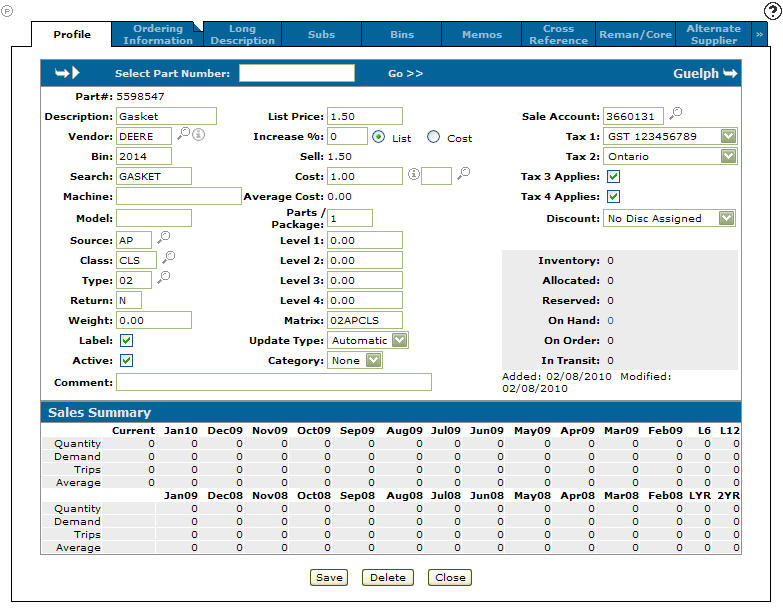
The Profile screen appears.
-
Click the Update/View Profile link.
-
Enter or select the appropriate information describing the part and its status.
The Sales Summary section of the Profile tab displays the sales summary of the part.
-
Complete the profile by adding additional information about the part to these tabs as required: Ordering Information, Long Description, Subs, Bins, Memos, Cross Reference, Reman/Core, Alternate Supplier, Kits, and Customized Tab Order.
-
Click Save button to record your part profile entry, or click Close to exit the Parts Profile tab without saving any of the information.
Adding a Miscellaneous Part
You can use the procedure described above to add a Miscellaneous Part to the system, but with some special inputs:
-
Refer to Special Part Numbers for setting the Part Number.
-
Vendor Number must be GL, as this is the only way to add a part with a 0 Cost and List. With these two fields set to 0, the system forces the price to be keyed in each time the part is sold.
-
Source of Supply should be set to 99.
-
Sale Account should be set to the expense or revenue account where this type of sale is posted.
-
Return Code can be left blank.
-
If you want the user to key in a description every time the part is sold, in the Description field put in a space and a "?". For example:
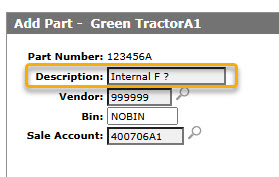
-
On the Ordering Information tab, set OFC to 5 and make sure the Reclass checkbox is NOT selected. This ensures that the OFC remains 5.
Post-Requisite: you must adjust the On Hand quantity so the new miscellaneous part can be sold on Invoices. See Increase Miscellaneous Part On Hand.
Creating a Promotional Part
You can use a promotional part to manually apply a discount to a Parts Invoice.
-
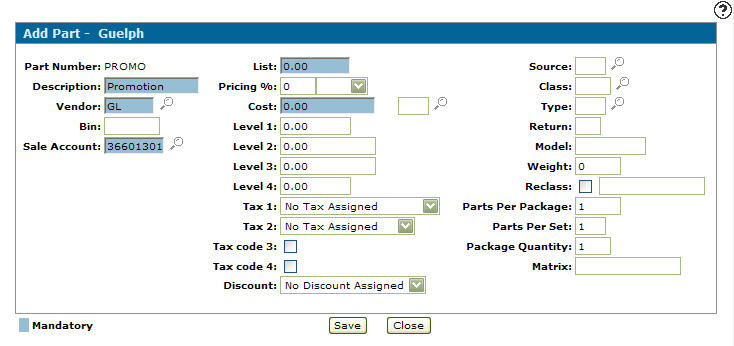
When creating a new part, on the Parts Add screen, enter PROMO in the Part Number field.
-
Enter PROMOTION in the Description field.
-
Enter GL in the Vendor field.
-
Enter an appropriate Sale Account or click the Search
 icon to search for an account on theAccount Lookup screen.
 -
Click Save.
An Update screen appears telling you that the vendor changed and new defaults have been loaded.
-
Click OK.
The Add Parts screen appears.
-
Click Save again to create the PROMO part profile.
-
Click Close.
You can now use the PROMO part when creating a Parts Invoice. See Adding a Promotional Discount to a Parts Invoice.
Screen Description
Note: Field level-security assigned to your user profile (as defined on the Field - Work With Field Level Security screen) may change the appearance of or hide certain fields. For details, see the Field - Work With Field Level Security screen help topic.
The fields on the Add Part/Part Quick Add screen are:
| Field | Description |
|---|---|
| Part Number |
The number used to locate the part within the IntelliDealer system. The part number can be up to 15 digits consisting of alpha, numeric or blank characters. The part number cannot not contain more than 10 special characters ('<', '>', '&' and '"'). VitalEdge recommends that you do not use blanks in the part number. |
| Description | A brief description of the new part. |
| Vendor |
The vendor number for the supplier of this part, as assigned in the accounts payable system. If the Vendor is manually changed , the system pulls vendor-related information from the PARTPRC file and any blank fields are populated with values loaded on the Part Adds screen for the corresponding vendor. However, if the new vendor number starts with JD and is not found on the Part Adds screen, values from John Deere are loaded. If no vendor is found on the Part Adds screen (including John Deere), values loaded for vendor *ALL on the PartAdds table are used. |
| Bin |
The bin location where this part is physically located. All bin numbers should be the same length and they should
have no embedded blanks. For example: When copying a part, the Bin value is pulled from the Part Adds screen for the corresponding company/division/branch/vendor. If no bin number is loaded the field remains blank. |
| Sale Account |
The default vendor sale account. When copying a part the Sale Account value is pulled from the Part Adds screen for the corresponding company/division/branch/vendor. |
| List | The suggested list price of the added part. |
| Pricing % | The pricing increase/decrease percent to be applied to the regular list or cost to calculate the selling price. |
| Cost | The net cost of the parts. |
| Level 1, 2, 3, 4 | The selling price for pricing level 1, 2, 3 or 4. Pricing levels usually refer to such things as wholesale price, fleet price, jobber price, etc. If no pricing levels apply to the part then leave these fields blank or zero. |
| Tax 1 | The normal TAX 1 code for the part is entered here. For example, code 1 may represent 6% federal tax. The percentage rates for the Tax 1 codes are set up on the Tax 1 screen. |
| Tax 2 | The normal TAX 2 code for the part is entered here. For example, code 2 may represent 7% provincial tax. The percentage rates for the Tax 2 codes are set up on the Tax 2 screen. |
| Tax Code 3 | Indicates that the Tax 3 code % as set up on the Tax 3 screen should be applied to this part. |
| Tax Code 4 | Indicates that the Tax 4 code % as set up set up on the Tax 4 screen should be applied to this part. |
| Discount | The discount value assigned to the part if applicable. The percentage rates for discount codes are set up on the Discounts screen. |
| Source | The source of supply for the part. Used to break down the parts into different categories within each vendor. |
| Class | This field is used to categorize parts. |
| Type | The type of part. |
| Return | Whether or not the part can be returned. |
| Model | The model number of the machine the part is used on. |
| Weight | The weight of the part rounded to the nearest pound or kilogram. |
| Reclass | The reclass code for the part, which affects the order quantity of the part. |
| Parts Per Package |
The parts per package signifies how the system will maintain inventory on this part. Defaults to 1 if left blank. An example of how the parts per package function works: consider a part number for a 100 foot roll of hydraulic hose. If you order 1 of that part number, 1 roll of hose, 100 feet of hose is received. The hose is sold by the foot so when the part is receipted, we want to receipt 100 rather than just 1. If the parts/pkg is set at 100, then 100 will be automatically receipted for each roll received. The sales history, total sales qty, special order qty, etc. would also be maintained by the foot. |
| Parts Per Set |
If the part is normally sold as a set, enter the number in the set in this field. Then if this part is a stocked part, the system will then reorder to maintain at least one complete set in inventory. If left blank, the Parts Per Set field defaults to 1. |
| Package Quantity | The minimum package quantity a supplier sells the part in. If the supplier sells the part in quantities of 10, the minimum quantity that can be ordered is 10, even if you only require 1. |
| Matrix | The parts price matrix code which determines the proper price increase % for the part. |
Use these buttons to complete your work on the Add Part/Part Quick Add screens:
| Button | Function |
|---|---|
| Save |
Saves changes made to the Add Part/Part Quick Add screens and adds the part. On the Part Quick Add screen, If more than one part on the parts invoice does not have a Part Master, clicking the Save button will bring up the next part that needs to be added. |
| Close | Closes the Add Part/Part Quick Add screens without saving and returns to the previous screen. |
Security: 820 - Parts Profile
Revision: 2026.03