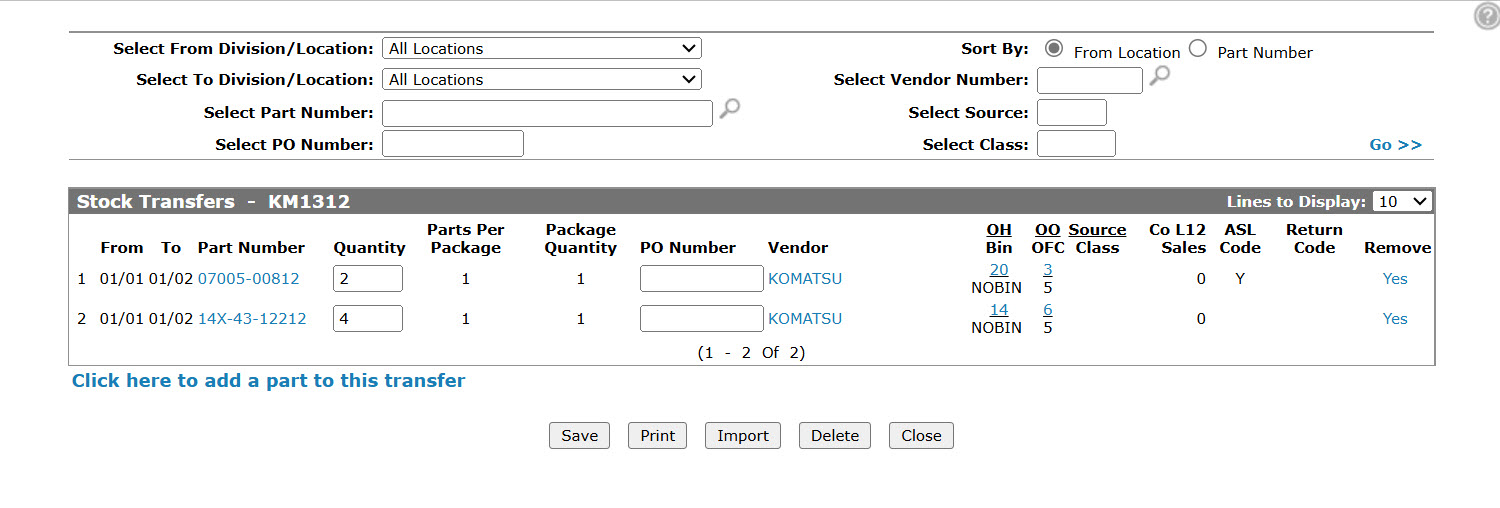
Stock Transfers
Use the Stock Transfers screen to transfer parts from one location to another.
To open the Stock Transfers screen, hover over a Transfer Number on the Stock Transfers listing screen and select View/Edit from the pop-up menu.
Topics in this section are:
Adding Parts to a Stock Transfer
-
From anywhere in IntelliDealer navigate to Product Support > Parts > Stock Transfers tab.
-
Search for the transfer you want to add parts to.
-
Move the cursor over a Transfer Number and select Edit from the pop-up menu.
-
Click the Click here to add a part to this transfer link.
The Add/Change Transfer screen appears.
-
Fill in the fields then click Save.
- or -
Click Save & Close to save the stock transfer and return to the Stock Transfer screen.
Removing Parts from a Stock Transfer
-
From anywhere in IntelliDealer navigate to Product Support > Parts > Stock Transfers tab.
-
Search for the transfer you want to remove parts from.
-
Move the cursor over a Transfer Number and select Edit from the pop-up menu.
-
Under the Remove column at the far right, click the Yes link for the part to remove from the stock transfer.
Tip: You cannot reverse the removal by clicking Close without saving.
Screen Description
The search fields on the Stock Transfers screen are:
| Field | Description |
|---|---|
| Select From Location | Search for stock transfers by selecting the location transferring the parts from the drop down list. |
| Select To Location | Search for stock transfers by selecting the location receiving the parts from the drop down list. |
| Select Part Number | Search for stock transfers by entering the number of the part being transferred. |
| Select PO Number | Search for stock transfers by entering the purchase order number. |
| Select Vendor Number | Search for stock transfer by entering a vendor number. |
| Select Source | Search for stock transfer by entering a part source of supply code. |
| Select Class | Search for stock transfer by entering a part class code. |
The fields on the Stock Transfers screen are:
| Field | Description |
|---|---|
| Line | The line item number on the stock transfer. |
| From | The division/location that is transferring the part. |
| To | The division/location receiving the part. |
| Part Number | The number of the part being transferred. |
| Quantity | The amount of parts being transferred. |
| Parts Per Package | The parts per package signifies how the system will maintain inventory on this part. For example, consider a part number for a 100 foot roll of hydraulic hose. By ordering 1 of that part number, 1 roll of hose (100 feet) is received. The hose is sold by the foot so when the part is receipted, we want to receipt 100 rather than just 1. |
| Package Quantity | The minimum package quantity that the supplier sells the part in. If the supplier sells the part in quantities of 10, then the minimum quantity that can be ordered is 10. |
| PO Number | The purchase order number. |
| Vendor | The vendor number. |
| OH/Bin |
The current on hand from the parts system for this part in the from location. The bin number indicates the part's physical location. Note:
|
| OO/OFC | The current on order/OFC from the parts system for this part in the from location. |
| Source | The source of supply for the part. Used to break down the parts into different categories within each vendor. |
| Class | This field is used to categorize parts. This field can be used with group file maintenance to put do not order codes, dates, pricing %, etc. on a class of parts, or to print a stock status for only a certain class of parts, etc. |
| Co L12 Sales | The number of times the selected part has been sold within the last 12 months across the entire company. |
| ASL Code | Deprecated. The authorized stocking list code. |
| Return Code | Indicates whether or not the part is returnable. |
| Remove | Click the Yes link to remove the part from the stock transfer. See Removing Parts from a Stock Transfer. |
Click on the Is there a part missing from the stock transfer list? Click here to add link to add a part to a stock transfer.
Use these buttons to complete your work on the Stock Transfers screen:
| Button | Function |
|---|---|
| Save | Saves changes made on the Stock Transfers screen and return to the previous screen. |
|
Prints the stock transfer. You can view the output on the Printer Output/PDF Viewer screen. |
|
| Import | Import stock transfer lines using the Import utility. |
| Delete | Deletes the stock transfer. |
| Close | Closes the Stock Transfers screen without saving and returns to the Stock Transfers listing screen. |


