Use the Scanned WIP Labor tab to search for all labor transactions (apart from labor transactions added in the Work Order > Parts & Labor Billed tab).
The Scanned WIP Labor tab can be accessed from the Product Support > Service > Supervisor screen.
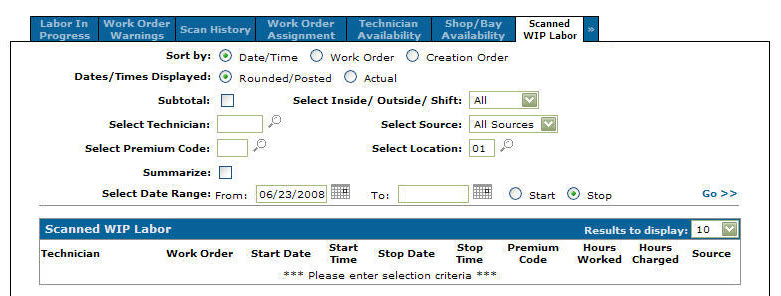
The sorting options on the Scanned WIP Labor tab are:
| Sort by | |
|---|---|
| Field | Description |
| Date/Time | Sort the search results by date/time. |
| Work Order | Sort the search results by work order number. |
| Creation Order | Sort the search results by the date the work order was created. |
The Display fields on the Scanned WIP Labor tab are:
| Display | |
|---|---|
| Field | Description |
| Dates/Times Displayed | Select whether the dates and times displayed will be displayed in the Rounded/Posted format or by the Actual dates and times entered. |
| Subtotal | Select the checkbox to have labor transactions subtotals (Hours Worked and Hours Charged) displayed in the search results. |
The search fields on the Scanned WIP Labor tab are:
| Field | Description |
|---|---|
| Subtotals | If selected, displays hours worked totals and hours charged totals. |
| Select Technician | Search for work in progress by entering a technician. |
| Select Premium Code | Search for work in progress by entering a premium code. |
| Summarize |
If selected, includes a summary within the search results. This is selected by default. |
| Select Date Range | Narrow the work in progress search results down by entering a date range to look for either the Start or Stop date of the labor transaction. |
| Select Inside/Outside Shift | Search for work in progress by selecting an inside/outside shift number, bay number or all from the drop down list. |
| Select Source | Search for work in progress by selecting a labor source from the drop down list. |
| Select Work Order | Search for work in progress by entering a work order number. |
| Select Location | Search for work in progress by entering a location. |
The fields on the Scanned WIP Labor tab are:
| Field | Description |
|---|---|
| Technician | The technician's name. |
| Work Order | The work order number (including the segment number). |
| Start Date | The date the repair work is to start. The format for the date is month, day, year. The start date is automatically loaded with the date of the first parts or labor transaction posted against the work order. If the work was started before the work order was created, then the correct start date should be entered. |
| Start Time | The time the technician started work on the repair. The format of the time is controlled by table CMBR1. More information on this table can be found in the legacy System Configuration manual. Decimal points should not be entered. If a start and stop time are entered correctly the HRS WORKED and HRS CHARGED are calculated and displayed. This eliminates the need to calculate and enter the hours worked and charged manually. |
| Stop Date | The date the labor entry stopped. The format for the date is month, day, year. |
| Stop Time |
The time the technician stopped work on this labor entry. The format of the time is controlled by table CMBR1. Decimal points should not be entered. |
| Premium Code | The work order premium code. |
| Hours Worked | The number of hours worked on the repair. |
| Hours Charged | The number of hours charged to the repair. |
| Source | The labor source of the work order information. |
Move the cursor over a Technician number and select View/Adjustment from the pop-up menu to view or make labor adjustments.
Move the cursor over a Technician number and select Copy from the pop-up menu to copy a labor entry.
Select the Click here to add labor hours link to open the Labor Entry screen to add labor to a selected segment.
Data Source: WOTTM
Security: 811 - Service Supervisor
Learning Resources: Supervisor - Adjusting a Labor Punch
Revision: 2025.02