
Configuration: Traffic
Use the Traffic screen to maintain the Traffic module parameters. One important reason this screen should be completed is for the effective use of corporate inventory. Equipment which has a Held status cannot be trafficked by other branches, parameters on the Traffic screen prevent branches from keeping their equipment on a Held status indefinitely.
Equipment that has a Held status can still be trafficked from within the same location.
The options on the Traffic tab are completely customizable allowing the user to setup only the functions that they wish to apply to their traffic system.
To open Traffic screen navigate to Configuration > Equipment > General > Traffic.
Topic in this section
Setting up Traffic Parameters
-
Navigate to Configuration > Equipment > General > Traffic.
-
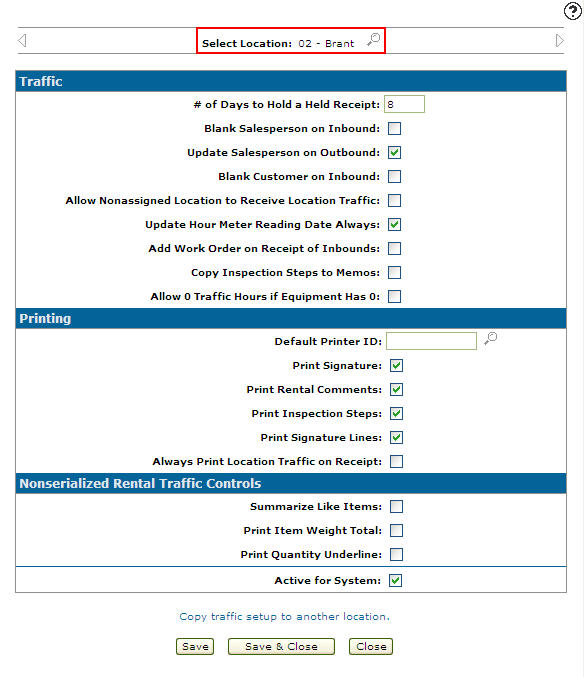
Select a Location by clicking on the Search
 icon.
Click the Previous
 or Next
 icon to scroll to the next location or back to a previous location.
-
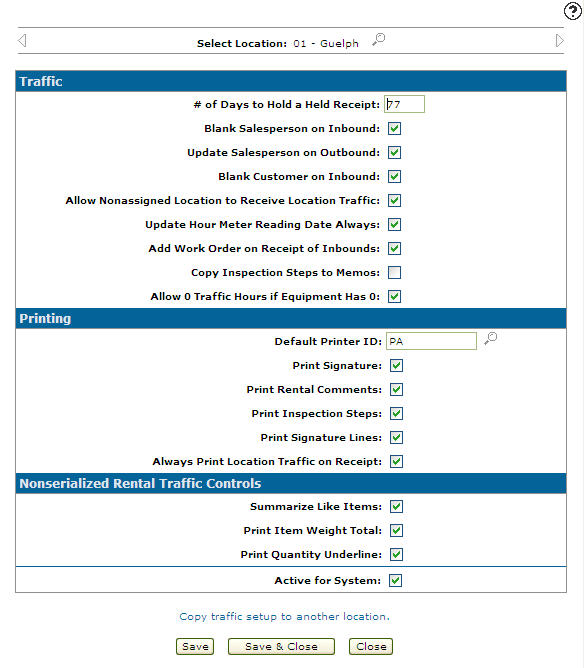
Fill in the fields, referring to the Screen Description below.
-
Click Save to the apply changes to the traffic system.
 The Traffic screen appears.
Copying Traffic Parameters From One Location to Another
-
Navigate to Configuration > Equipment > General > Traffic.
The Traffic screen appears.
-
Click the Copy traffic setup to another location link.
The Location Selection screen appears.
-
Select a location.
The Traffic screen appears and the traffic parameters are copied to the selected location.
-
Edit the desired fields, then click the Save button.
Deactivating Traffic Parameters
-
Navigate to Configuration > Equipment > General > Traffic.
The Traffic screen appears.
-
Select the location whose traffic parameters you want to deactivate.
-
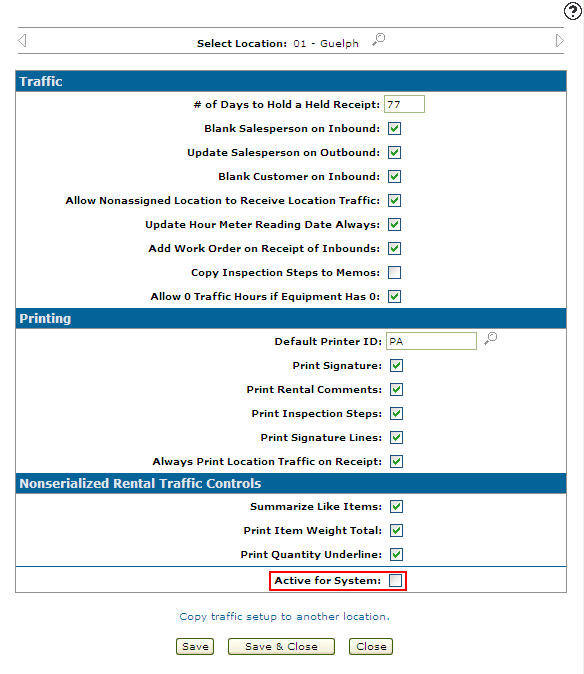
Clear the Active for System checkbox at the bottom of the Traffic section.
-
Click Save.
The system marks the location's traffic configuration as deactivated. That location no longer uses these traffic parameters until you select Active for System again and save.
Screen Description
The search field that appears on the Traffic screen are:
| Field | Description |
|---|---|
| Select Location | Setup traffic control parameters for the selected branch location. These parameters will be used throughout the traffic module for the selected location. |
Use the Previous and Next
 icons to switch between branch locations.
The fields that appear on the Traffic section on the Traffic screen are:
| Traffic | |
|---|---|
| Field | Description |
| # of Days to Hold a Held Receipt |
Indicates the number of days a held receipt is held until it is purged from the system. A receipt can be held for up to a maximum of 999 days in the system. After a held receipt is purged from the system the In/Out field on the Equipment Profile will changed to In making the unit available for trafficking from other branches. |
| Blank Salesperson on Inbound |
If selected, the system blanks out the salesperson code on the Equipment Profile when an inbound traffic receipt is created. If the checkbox is not selected, the system leave the existing salesperson's code on the equipment's Profile tab when an inbound traffic ticket is created. |
| Update Salesperson on Outbound |
If selected, the system updates the salesperson field on the equipment's Profile tab with the salesperson's code entered on the outbound traffic ticket. If the checkbox is not selected, the system leaves the existing salesperson's code on the equipment Profile tab, regardless of the salesperson's code entered on the outbound traffic ticket. |
| Blank Customer on Inbound |
If selected, the system blanks out the existing customer information (Customer Name and Customer Number) on the equipment's Profile tab, when an inbound receipt is created. The system updates the Customer Name and Customer Number fields with the customer information from on the traffic ticket. If the checkbox is not selected, the system leaves the existing customer information on the equipment's Profile tab until the next traffic ticket is created. |
| Allow Non-assigned Location to Receive Location Traffic | Allows a user to receive location transfers, for a location other than the user's default location. |
| Update Hour Meter Reading Date Always |
If selected, the system always updates the equipment's Hour meter reading datefield on the Profile tab, when a traffic ticket is shipped. The reading date field is updated even if there is no change to the equipment's hour reading. |
| Add Work Order on Receipt of Inbounds | If selected, allows the user to create a work order (Add Work Order screen) when a ticket is set to received status. |
| Copy Inspection Steps to Memos |
If selected, copies inspection steps into the traffic memos. Inspection steps appear on the printout twice, if both Copy Inspection Steps to Memos and Print Inspection Steps are selected. |
| Allow 0 Traffic Hours if Equipment has 0 |
If selected, allows a zero hour meter reading on a piece of equipment on a traffic ticket if the equipment's Profile tab also has a zero hour meter reading recorded on either the Hours or Hours 2 fields. |
| Active for System |
Controls whether the saved traffic parameters for the selected location are active. Shown only when the location already has a DELIVERY configuration record (not on first-time setup for that location).
|
The fields that appear on the Printing section on the Traffic screen are:
| Printing | |
|---|---|
| Field | Description |
| Default Print ID |
The default printer used to print inbound and outbound equipment delivery receipts. This can be overridden on a per-session basis when accessing the traffic system. |
| Print Signature |
If selected, a signature is included on the delivery receipt. |
| Print Rental Comments |
If selected, includes comments entered on the contract from within the rental system, on the delivery receipt. |
| Print Inspection Steps |
If selected, includes inspection steps enter on the unit from within the Used Equipment system, on the delivery receipt. Inspection steps appear on the printout twice, if both Copy Inspection Steps to Memos and Print Inspection Steps are selected. |
| Print Signature Lines |
If selected, the system prints a signature line on the delivery receipt including the Employee, Driver, and Customer involved with the transaction. Note: If using VESign, ensure this setting is NOT selected. |
| Always Print Location Traffic on Receipt |
If selected, the system automatically prints location transfer traffic tickets when they are received. If the checkbox is not selected, the system prompts the user asking whether to print the selected location transfer traffic ticket. |
The fields on the Non-serialized Rental Traffic Controls section on the Traffic screen are:
| Non-Serialized Rental Traffic Controls | |
|---|---|
| Field | Description |
| Summarize Like Items |
If selected, the system prints Non-Serialized Units |
| Print Item Weight Total |
If selected, the system prints the total weight of all non-serialized units on a traffic ticket on the delivery receipt. Used to ensure shipment weight for transporting. |
| Print Quantity Underline |
If selected, the system prints a blank line on delivery receipts used to record the quantity of non-serialized units being shipped. Used to ship multiple non-serialized units on separate shipments. |
Click on the Copy traffic setup to another location link to copy traffic parameters from one location to another.
The buttons complete your work on the Traffic screen are:
| Button | Function |
|---|---|
| Save | Saves changes made on the Traffic screen. |
| Save & Close | Saves changes made on the Traffic screen and returns to the Configuration Quick Links screen. |
| Close | Closes the Traffic screen without saving and returns to the Configuration Quick Links screen. |