Configuration: MyKomatsu Integration
The Komatsu MyKomatsu Integration allows users to access the MyKomatsu parts portal directly from MyDealer. Parts added to the shopping cart on the MyKomatsu website are transferred back to the MyDealer shopping cart after using the Punchout feature from the cart in MyKomatsu.
Komatsu's MyKomatsu portal can also create parts invoices directly in IntelliDealer.
To access the MyKomatsu Integration configuration screens, navigate to Configuration > Interfaces > Komatsu > MyKomatsu Integration.
Topics in this section are:
Setup Requirements
In IntelliDealer, Feature 6115 - Komatsu eParts Central.
Screen Description
This section describes the configuration tabs on the screen:
MyDealer Tab
Fields on the MyDealer tab are:
| Field | Description |
|---|---|
| Identity | Optional. You must obtain this value from Komatsu. |
| Shared Secret | Optional, unless you entered a value in the Identity field. You must obtain this value from Komatsu. |
| Auto-Fill Drop Ship Orders | When the customer orders parts using MyKomatsu, if the dealer has no inventory for those parts, the interface automatically creates a parts order using the customer data. When the Auto-Fill Drop Ship Orders checkbox enabled (the default) the Komatsu ecommerce ticket is sent as a drop ship order to the Komatsu New Parts System, the parts are receipted, and the purchase order is closed. If the checkbox is not enabled, the purchase order is created. You can make changes to the parts order (for example, adding freight) while you manually receipt the parts. Deselecting the Auto-Fill Drop Ship Orders checkbox also deselects the Ship Direct checkbox on the parts order. |
| Include On Order parts in Availability |
Whether on-order quantities are included in availability values sent to Komatsu in the Parts Price and Availability response. This checkbox is enabled by default. If you clear it, on-order quantities are excluded from the availability totals sent by the interface. |
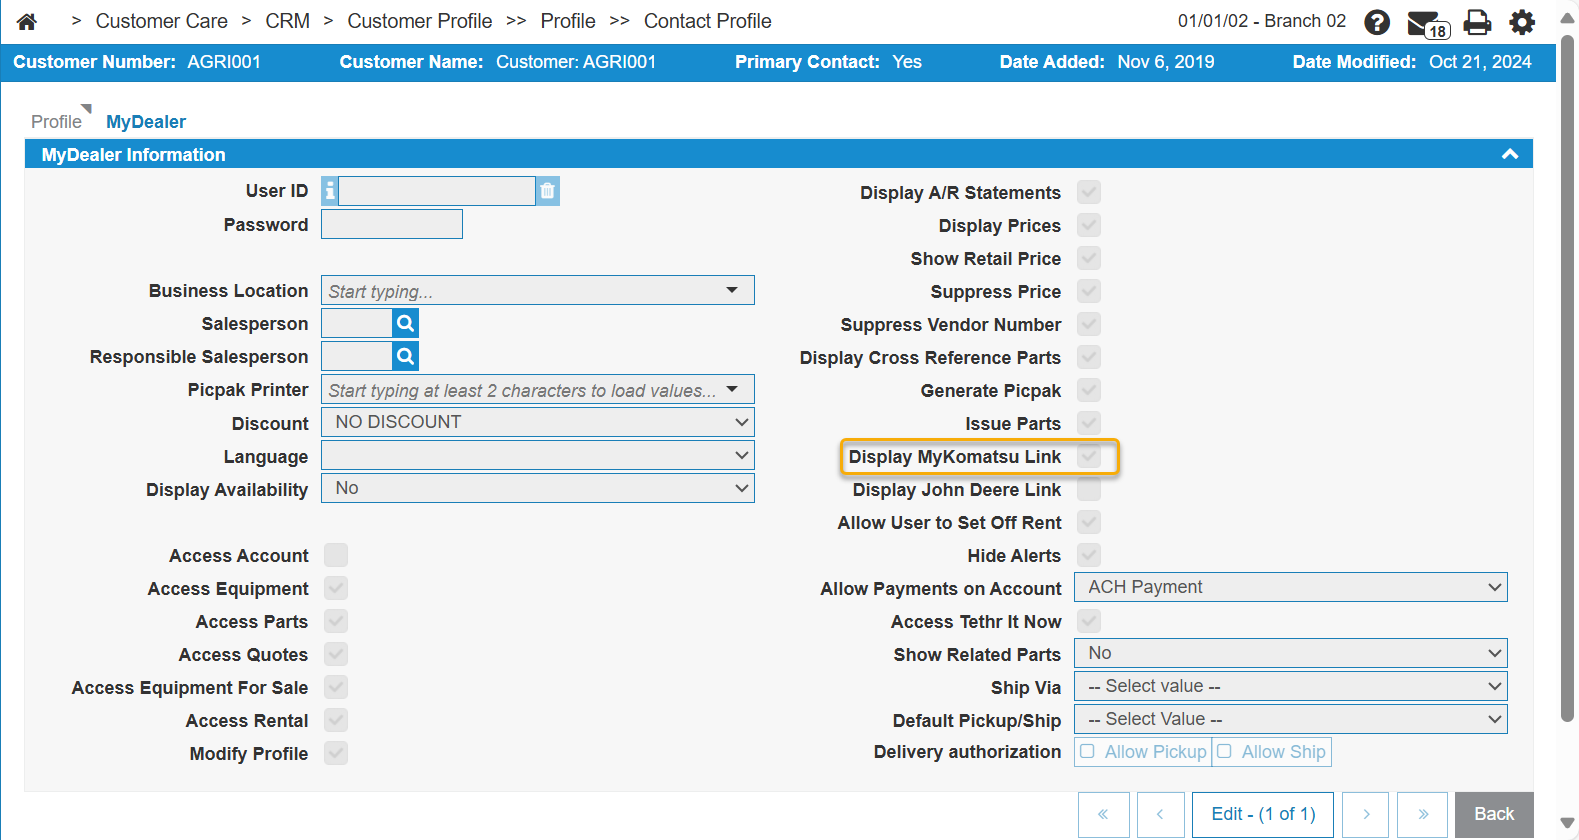
Once these are configured, for each customer you wish to enable the MyKomatsu integration in MyDealer:
-
Open the Customer Profile.
-
Click the Contact tab, then click on a contact to open it.
The Contact Profile screen opens.
-
Click the MyDealer tab, then click the Edit button to enable editing the MyDealer information.
-
Select the Display MyKomatsu Link checkbox.
-
Click Save.
Parts Invoicing Tab
You can use the Parts Invoicing tab to set up how IntelliDealer should handle MyKomatsu parts invoices.
The fields on this tab are:
| Field | Description |
|---|---|
| Salesperson | The salesperson code to use on invoices. |
| Use Mailing Address | If selected, the mailing address is used on the invoice. |
| To Email | When IntelliDealer has an issue creating a parts invoice, this is the email of the person to notify. |
| From Email | When IntelliDealer sends an error email, it will use this email address in the From field. |
| Comments | If you there are comments in the parts invoice, this selection indicates if they should be added to the Comments or the Memos tab. |
| Print Picpak | If selected, a Picpak is automatically created when an invoice is created. |
| Default Printer | The default printer to use for the Picpak. |
| CSO016 Printer | The printer to use for the CSO016 report, which is generated when there is an exception. |
| Disable Komatsu Invoice Return | If selected, the Komatsu Invoice return is disabled. |
Configure Printers Tab
Use the Configure Printers tab to configure a printer for each location. You can click on the row to edit, or click create to add a new location record.
You must enter the Company, Division and Location, then you can select a configured printer from the drop-down list.
Freight Carriers Tab
Use the Freight Carrier tab to maintain the Komatsu freight carrier codes stored within IntelliDealer. The fields on the Freight Carrier tab are:
| Field | Description |
|---|---|
| Komatsu Carrier Code | The freight or carrier code as it appears in IntelliDealer. |
| Freight Carrier | An expansion of the selected freight or carrier code. |
| Customer Pickup |
If yes, indicates that this freight carrier expects the customer to pick up the shipment. For Komatsu orders that use a Freight Carrier designated as Customer Pickup, IntelliDealer automatically transmits “Ready for Pickup”. Once the Customer Pickup order has been invoiced, IntelliDealer automatically transmits “Picked Up”. |
Click the Create button to add more freight or carrier codes.
Vendors Tab
Use the Vendors tab to configure the vendors IntelliDealer transfers dealer information to.
The search fields on the Vendor tab are:
| Field | Description |
|---|---|
| Search | Enter various search terms into this field and select the Search button to search available vendors. |
| Vendor Number | Search for vendors by their registered Vendor number, as supplied by the vendor. |
| Name | Search for vendors by their name. |
| Address | Search for vendors by their physical address. |
| Country | Search for vendors by their physical address. |
| Postal/Zip Code | Search for vendors by their postal code. |
| Status | Search for vendors by their activation status. You can specify filtering by Active, Deleted, or All vendors. |
The fields on the Vendor tab are:
| Field | Description |
|---|---|
| Vendor Number | The registered Vendor number, as supplied by the vendor. |
| Name | The vendor's name. |
| Address | The vendor's address. |
| Phone Number | The vendor's phone number. |
The Assign Manufacturer button opens a list of configured vendors that you can select to be assigned as an active Vendor.
Dealer Numbers Tab
Use the Dealer Numbers tab to assign a dealer number to each dealership location. These values must be obtained from the dealer. These dealer numbers identify which locations can access the vendor's interface. See also Dealer.
The search fields on the Dealer Numbers tab are:
| Field | Description |
|---|---|
| Location | Search for dealers by their location. |
| Dealer Number | Search for dealers by their identification number. |
| Vendor Number | Search for dealers by their vendor number. |
| Manufacturer | The dealer's original equipment manufacturer (OEM). Defaults to Komatsu. |
| Primary Dealer (Division) or (Location) |
Check which box applies to the dealer number. |
| Include Deactivated Vendors | Select this checkbox to include deactivated vendors in the search. |
The fields on the Dealer Numbers tab are:
| Field | Description |
|---|---|
| Dealer Number | The dealer's identification number. |
| Vendor Number | The dealer's vendor number. |
| Location | The dealer's location. |
| Description | |
| Division Primary Dealer | Whether the dealer is primary for the division. |
| Location Primary Dealer | Whether the dealer is primary for the location. |
Click Create to open a New window where a new Dealer entry can be made.
Processing a Drop Ship Order
All MyKomatsu orders are located in IntelliDealer at Product Support > Parts > eCommerce Orders.
To invoice the order:
-
On the eCommerce screen, enable the IntelliDealer Parts Order column.
The IntelliDealer Parts Order number is the key indicator that this MyKomatsu transaction is a drop ship order.
-
Click the IntelliDealer Parts Invoice number link.
The Parts Invoice opens.
-
On the Details tab, click the Invoice button.
The parts order is invoiced.
