Customer Profile: Contact
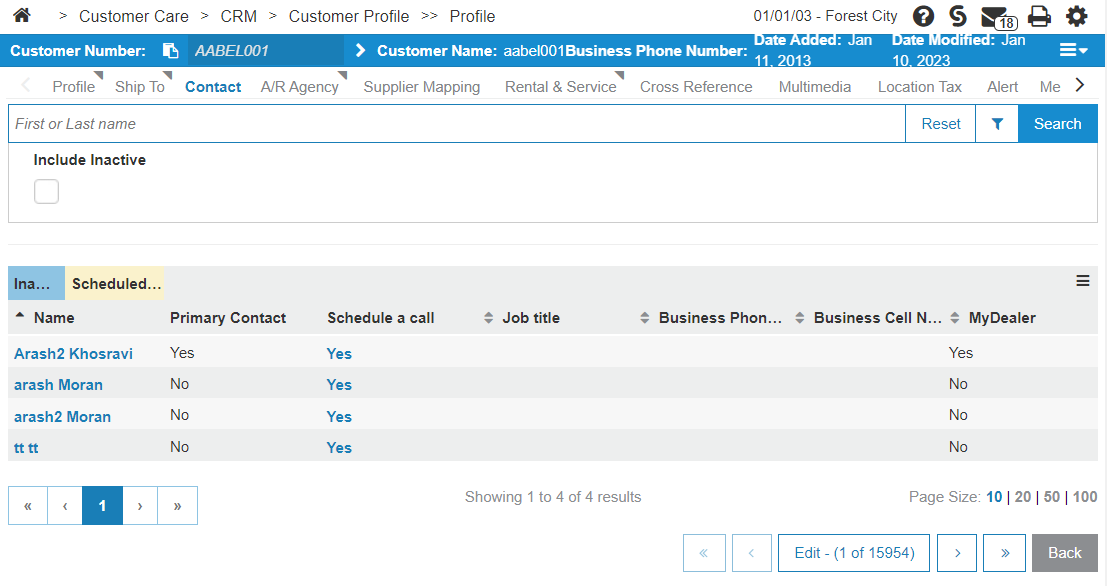
Use the Contact tab to load any number of contacts to the selected customer profile. Contacts can be arranged by selecting the Inactive and Scheduled Calls tabs.
The Memos section displays any pertinent notes on the contact.
The Scheduled Calls section displays any calls that are scheduled for the contact.
To open the Contact Profile, click on a Name in the list. From here you can also access the MyDealer Profile Configuration screen by clicking on the MyDealer tab.
Adding a Customer Contact
-
While viewing a Customer Profile, click the Contact tab.
-
If there is no Create button on the bottom left, click the Edit button on the bottom right so it says Lock. The Create button appears at the bottom right.
-
Click Create or Create Primary Contact.
The Contact Profile screen opens.
-
Fill in the fields, as required using this table as a reference.
-
Click Save to save your work, or click Back to exit without saving.
Modifying a Customer Contact
-
While viewing a Customer Profile, click the Contact tab.
-
If there is no Create button on the bottom left, click the Edit button on the bottom right so it says Lock. The Create button appears at the bottom right.
-
Click on a contact in the list.
The contact edit screen opens. You can modify any fields, Copy the contact, or click Delete to remove the contact from the Customer Profile.
Contact Screen Description
The fields on the Customer Profile Contact tab are:
| Field | Description |
|---|---|
| Customer Number | A number representing the customer profile. |
| Customer Name |
The name of the contact. If the contact's name appears highlighted, it means there is a scheduled call for that specific contact. Click the contact's name to open the that contact's details screen. Scroll down to locate the Scheduled Calls section. |
| Primary Contact |
Indicates whether the contact is the customer's Primary Contact. If there is already a Primary Contact assigned to the customer, this field does not appear on the Add Contact screen. |
| Schedule a Call | Adds the details of an unscheduled customer call to this contact. See Scheduling a Call. |
| Job Title | The contact's job title. |
| Phone Number | The contact's phone number. |
| Cell Number | The contact's cell phone number. |
| MyDealer | Indicates if the contact has a MyDealer account. A Yes link allows you to edit the existing MyDealer settings information. A No link allows you to create or configure a MyDealer user account for the selected contact. |
These fields are displayed on the Contact Profile screen:
| Field | Description |
|---|---|
| Active |
Indicates whether the contact is active, inactive, or the Primary Contact for the customer. The Active function is not available for MyDealer contacts. |
| Name | The name of the contact, including the contact's Title/Salutation, First Name, Middle Initial, and Last Name. |
| Birth Date | The contact's date of birth. |
| Job Title | The contact's job title. |
| Spouse Name | The name of the contact's spouse or significant other. |
| Areas |
Indicates the areas of responsibility for this contact. Valid areas can be added to the system on the Areas screen. |
|
A/R Statement email Parts Invoice email Work Order email Rental Invoice email |
Provided you have configured IntelliDealer for automatic emailing and specified a valid email address in the Business E-mail Address field below, selecting these checkboxes causes the system to automatically email a copy of the selected item(s) to the contact when certain conditions are met. See Email Header Configuration. |
| Mailing Codes | The customer's mailing code(s). |
| Comment | Any additional information you wish to add about the contact. |
| Email Campaigns |
Note: This field only appears if the Country code assigned to the selected customer has Responsible Marketing enabled. Responsible Marketing is mandatory for all Canadian customers. This field denotes whether the selected contact has agreed to receive marketing emails from your dealership. On the back end, this switch controls setting the CCTYP field in the CMASCON file, which has these possible values: If you are using the IntelliDealerCTI interface, only numbers are allowed in this field.
Note: As soon as this option is activated (set to E), you cannot revert the value to blank; only E or O are viable options, and as such, the Permission By and Method fields are always be mandatory. The default value for this field is based on the option selected in the Email Campaigns field of the Add Customer screen. The Do Not Contact switch on the Customer Profile overrides the value in the Email Campaigns/ CCTYP field. As such, if you want to send marketing emails to the selected contact, make sure the Do Not Contact field is not selected. For additional details regarding this field, see Responsible Marketing Overview. |
| Permission By |
Note: This field only appears if the Country code assigned to the selected customer has Responsible Marketing enabled. The name of the person who gave their explicit consent on behalf of the selected contact to receive or opt out of marketing emails sent from your dealership. The value in this field may be system generated depending on how the Email Campaigns switch was activated or deactivated (e.g. if the contact uses the Subscribe/ Unsubscribe option in a marketing email.) |
| Method |
Note: This field only appears if the Country code assigned to the selected customer has Responsible Marketing enabled. The method by which the person in the Permission By field informed the dealership that the selected contact was opting in or out of receiving marketing emails. The value in this field may be system generated depending on how the Email Campaigns switch was activated or deactivated (e.g. if the contact uses the Subscribe/ Unsubscribe option in a marketing email.) |
| Business Address | The contact's business address. |
| Home Address | The contact's home address. |
| Business Zip/Postal Code | The contact's business zip/postal code. |
| Home Zip/Postal Code | The contact's home zip/postal code. |
| Business Phone Number |
The contact's business phone number. |
| Home Phone number |
The contact's home phone number. If you are using the IntelliDealer CTI interface, only numbers are allowed in this field. |
| Business Cell Number |
The contact's business cell phone number. If you are using the IntelliDealer CTI interface, only numbers are allowed in this field. |
| Carrier |
The contact's business mobile phone carrier code. Valid carrier codes are configured on the Mobile Phone Carriers screen. |
| Home Cell Number |
The contact's personal cell phone number. If you are using the IntelliDealer CTI interface, only numbers are allowed in this field. |
| Business Fax | The contact's business fax number. |
| Home Fax | The contact's home fax number. |
| Business E-mail Address |
The contact's business e-mail address. If the selected contact has been configured to receive A/R Statements, Parts Invoices or Work Orders created for the associated customer profile (as specified in the E-mail field above) you must enter a valid email address in this field. See Email Header Configuration. If this field is left blank and an invoice or quote from any part of the system is emailed to the selected customer, if the Update primary contact email address option is activated on the Authorization List for User Security screen, the system automatically populates this field with the email address that the invoice/quote was sent to. If you want to configure a MyDealer Web user account for the selected contact, you must configure a Business E-mail Address for the contact. For details, see the Configuring Users for MyDealer Web overview topic. |
| Home E-mail Address | The contact's home e-mail address. |
| Business Web Address | The contact's business web site address. |
| Home Web Address | The contact's home web site address. |
| Alpha Field 1, 2, 3,4 and 5 | User defined. The field labels are customizable through Administration. |
| Numeric Field 1, 2 and 3 | User defined. The field labels are customizable through Administration. |
| Date Field 1 and 2 | User defined. The field labels are customizable through Administration. |
| Salesperson |
The salesperson(s) assigned to the contact. |
|
The parts salesperson assigned to the contact. |
|
The equipment salesperson assigned to the contact. |
|
The service salesperson assigned to the contact. |
|
The rental salesperson assigned to the contact. |
|
The general salesperson assigned to the contact. |
|
The salesperson assigned as the administration dealership contact for the selected contact. |
| Last Call/ Next Call |
Note: These fields only appear if the Call Scheduling switch in the Division Settings screen is deactivated (this switch is also located in the BRWVAL1 table of the green screen application) . VitalEdge strongly recommends activating this switch to begin using the Call Scheduling application instead of these fields. These fields allow you to record the last date and next date on which the selected contact was (or will be) called. Call dates recorded in these fields are saved in the green screen application but not displayed anywhere within IntelliDealer. As such, it is recommended that you activate the Call Scheduling switch in the Division Settings screen (table BRWVAL1 table of the green screen application) in order to begin using the Call Scheduling application. |
| Call Frequency |
Note: This field only appears if the Call Scheduling switch in the Division Settings screen is deactivated (this switch is also located in the BRWVAL1 table of the green screen application) . VitalEdge strongly recommends activating this switch in order to begin using the Call Scheduling application instead of this field. This field allows you to specify the months in which the selected customer should be called. Calls scheduled using this field are scheduled for the first day of the selected month and are not displayed anywhere within the system (to view the calls, you must create a Data Miner report for the selected customer). As such, it is strongly recommended that you activate the Call Scheduling switch in the Division Settings screen (table BRWVAL1 table of the green screen application) in order to begin using the Call Scheduling application. |
Data Source: CMASCON
Security Switch: 996 - Customer Profile
Learning Resources: Adding Contacts
Revision: 2026.05