Parts Invoicing Details, Ship Confirm Details, or Work Order Parts Requisitions Details
Parts Invoicing Details Tab
To access the Parts Invoicing Details tab:
-
Navigate to Product Support > Parts > Parts Invoicing.
-
Search for orders, then click on an order number. A window pops up with the order information.
-
Click the Details tab.
From this tab you can:
-
create a purchase order by moving the cursor over the Purchase Order link and selecting Create from the pop-up menu. The Purchase Order link only appears when there is insufficient stock on hand to fill an order.
Note: The Parts Ordering screen only appears if the Advanced Ordering Screen switch has been activated on the Authorization List For Product Support - Parts Invoicing screen and if there are parts on the invoice where the order quantity minus the issued quantity is greater than zero. If the switch is deactivated, the Create Purchase Order screen appears instead.
-
cancel a purchase order by moving the cursor over the Purchase Order link and selecting Cancel from the pop-up menu.
-
see a history of all of the parts that have been purchased by the customer on the invoice, by clicking on the Customer Parts Purchases link.
The Information fields on the Parts Invoicing Details tab are:
| Field | Description |
|---|---|
| Order Number | The order number assigned to the associated parts invoice. |
| Customer |
The customer on the selected parts invoice. Click the Information |
| Location | The branch location where the parts invoice was created. |
 icon to open the
 The fields on the Parts Invoicing Details tab are:
| Field | Description |
|---|---|
| Cash Code |
Specifies the terms of the transaction. If the code is changed after the invoice has been authorized the user will have to re-authorize the transaction. These cash codes are predefined by the IntelliDealer:
These cash codes are defined by the IntelliDealer for A/R:
You can use any other alpha character as a cash code to define an A/R agency. You can also use a cash code to record a warranty or lost sale on the invoice. When using cash code 4 (to denote a Lost Sale), if the Record Lost Sale Reasons switch is activated on the Authorization List For Product Support - Parts Invoicing screen, you are required to select a Parts Lost Sale reason code for the invoice. For third-party A/R agency card payments (Worldpay, Versapay, CNH Productivity Plus, or FreedomPay), use Customer Profile: A/R Agency and branch A/R agency setup so the correct cash code and charge account apply before you invoice. |
| Part Number |
The part numbers being sold. A highlighted part number indicates that a specific condition has been found as set up on the Parts Highlighting screen. Move the cursor over the part number to see a text description of the condition. Wear parts are excluded from parts highlighting logic. Click on the Information If the selected part(s) have related parts associated to them, the Add Related Parts screen appears when you click Save or open a different tab within the parts invoice. If you create a purchase order for the selected invoice and then create a Pending Order Receipt for the PO, if the part that is receipted into the system is a substitute of the part originally entered in this field, the substitute number is added to the invoice using the original part's quantities and the original part number will have blank Ord, Iss and Ship quantities. For details, see the Pending Order Receipt. |
| Ord |
The quantity of parts being ordered. If parts are being returned the quantity must be entered as a negative number. The allowable range is -99,999 to 99,999. |
| Iss |
The quantity of parts that the system can issue to fulfill the need of the parts invoice. If the Iss field appears Red, the branch location you are currently in does not have enough stock to fulfill the parts invoice. The allowable range is -99,999 to 99,999. If the Allow Ship Confirm switch is activated on the Authorization List For Product Support - Parts Invoicing screen, entering a value less than the Ord quantity in this field automatically creates additional detail lines for the remaining parts. |
| Ship | The quantity shipped when the sales order is invoiced or shipping is confirmed. |
| Inv | Indicates the quantity of the part that will be processed by the next sales order billing run. |
| Unit |
The part can be used on the unit number listed in this field. |
|
Description
|
A brief description of the part. The system populates the Description field if the part number is loaded on the part master file. If the part is not found, the system loads the description from the master price file (if loaded). Click the More |
|
OH Bin
|
The part's current on hand quantity (OH) from the parts system for this part in your branch location. The bin number indicates the part's physical location. The letter 'I' beside the OH amount means a single location cannot fill the order and the net on hand for all locations in the locations store priority table is greater than zero. This field is highlight Red when there is not enough parts in stock to fill the order. A reverse image Bin number indicates that alternate bins exist. Move the cursor over the Bin number to view alternate Bin location numbers. |
| OO OFC | On Order/Order Formula Code (OFC) displays the number of parts that are on order and the order formula code for the selected part. |
| Price |
The price of the part. The Price field defaults to the selling price currently loaded on the part master. If the part selling price is different than the MSRP (Manufacturer Suggested Retail Price), the Price field will appear in reverse color. This may happen if a customer parts discount applies. If you wish to see the MSRP, move your cursor over the price and a pop-up screen will appear. This field will be highlight Red when there is not enough quantity to fill the order. Also note that the customer pricing feature is the first source checked for price. Note: You can only change a part price if the Modify Part Prices switch is activated in security system 823. |
| LDTTTTN |
The Level, Discounts,Taxes and Non Stocking Code that apply to the selected part. To view or modify these values using the Tax, Discount & Level screen, click the LDTTTTN code that is displayed. |
| Extended Price |
The unit price multiplied by the quantity. The Extended Price field shows other important information about the part including:
|
| Total Charge |
The total chargeable amount on the invoice. The Total Charge field can hold up to nine digits (including two decimals places), with a maximum total charge amount of $9,999, 999.99. |

Use these buttons to complete your work on the Parts Invoicing Details tab:
| Button | Function |
|---|---|
| Credit Number |
Allows you to assign a credit reference number to a credit invoice by opening the Credit Number screen. This button only appears on credit invoices. |
| Send VESign Invoice |
Clicking this button invoices the sales order, bypassing the legacy signature process, and displays the finalized invoice in a pop-up to initiate and then complete the VESign process. See VESign Process Notes. You must be licensed for VESign(Electronic Document Signing, feature number 6519) to see the Send VESign Invoice button on the Details tab. |
| Invoice |
Clicking the Invoice button causes these actions to occur:
Note: If the selected order is related to a parts location transfer, you cannot change the part number or order quantity, and you cannot delete any of the line items listed on the invoice. If the Cash Code on the invoice is 2 (representing a cash sale) and the Open Change Window on Cash Invoice switch is activated on the Authorization List for Product Support - Parts Invoicing screen, clicking the invoice button opens the Change Calculator window, allowing you to calculate the change due amount. If the Display Totals/ Charge Code Before Invoicing switch is activated on the Authorization List for Product Support - Parts Invoicing screen, the Parts Invoicing Totals screen will appear unless all the line items on the invoice are using *, blanks, 3 or 4 for the Cash Code. |
| Display Invoice | Appears after an invoice is created. Click to view the finalized invoice (VESign or legacy). |
| Reprint |
Reprints the invoice. The Reprint button only appears when the parts invoice has previously been invoiced. |
| PICPAK |
Prints a PICPAK according to the parameters set up on the Printing Parameters screen. This is used if the order is not invoiced immediately. The PICPAK button appears Red if a PICPAK has already been generated for the selected invoice. When using the electronic picking ticket system, clicking this button presents you with the option to either print a PicPak or mark the parts on the invoice as Ready To Be Picked. See the Electronic Picking Ticket System Overview. When using a point-of-sale device, you will be prompted for a signature when issuing a PICPAK. This is configured on the System Settings: Location screen. |
| Batch |
Tells the system to produce the final invoice during the billing run at night and prints a PICPAK for shipping purposes before running the batch. You may be prompted for a signature after clicking the Batch button, if it has not already been captured with a PICPAK. During the billing run, batched invoices are printed, emailed or both depending on the option configured in the Print Parts Invoices field of the Customer Profile. |
| Deposit |
Allows you to add a deposit to the invoice. A Cash Code is required when the deposit button opens the Deposits screen. The amount entered is applied to the total amount of the invoice. |
| Import | Allows you to import a parts list from either a PC, equipment parts list, job code parts list, or a special terms file. |
| Gift Card |
Opens the Gift Card screen which allows you to use a valid gift card to fully or partially pay for an invoice, load credit onto a gift card, or check the current balance on a gift card. The Gift Card button only appears if:
|
| Adjust LDTTN |
Opens the Tax, Discount & Level screen, allowing you to change the tax codes, discounts, pricing level or non-stock codes being applied to the selected part(s). Only parts that have been selected using the checkbox in the LDTTTTN field are updated when using the Adjust LDTTN button. |
| Save |
Saves the changes made on the Parts Invoicing Details tab. If a part with related parts is entered in the Part Number field, after selecting the Save button the Add Related Parts screen appears, allowing you to add a related part onto a sales order. |
| Apply Promotional Pricing | When selected, applies promotional pricing to parts if they are available at the user's location. |
| Update JD eCommerce |
Parts Invoices that have been created using the John Deere eCommerce interface can have their status updated here. If the order has been canceled, a comment or memo is added with a warning indicating the order was transmitted as cancelled. The comment and memo settings configured on the Parts Invoicing configuration screen are respected when adding the warning message. |
| Add'I MyKomatsu Info | When using this option, ensure that Freight Carrier and Tracking Number is filled in. These fields are mandatory when using MyKomatsu parts information. |
| Update Komatsu Shipment | Click to open a pop-up on which you can provide freight carrier and tracking number information to send to Komatsu. If you do not provide shipment information before invoicing, the pop-up automatically appears after clicking the Invoice button. Shipment information must be provided to Komatsu to allow the order to be invoiced. |
| Save/Close | Saves changes made on the Parts Invoicing Details tab and closes the screen. |
| Close | Closes the Parts Invoicing Details tab without saving and returns to the previous screen. |
| Totals | Displays charges, cash, warranty, tax and discount totals for both the sales order and the next invoice. |
Note: When you click Invoice and the order pays through a third-party A/R agency card program (Worldpay, Versapay, CNH Productivity Plus, or FreedomPay), complete authorization in the A/R Agency flow if IntelliDealer prompts you. IntelliDealer captures the authorized payment as part of invoicing, and the capture posts without waiting for nightly processing.
Ship Confirm Details Tab
To access the Ship Confirm Details tab:
-
Navigate to Product Support > Parts > Parts Invoicing.
-
Search for orders, then hover on an order number. A menu pops up with the options View/Edit or Ship Confirm.
-
Click Ship Confirm.
Note: The Ship Confirm option only appears if the Allow Ship Confirm switch is activated on the Authorization List For Product Support - Parts Invoicing screen.
The Ship Confirm Details tab allows you to confirm the shipment of a specific number of parts (as opposed to all of them at once) and mark them as ready to be processed. During the next billing run, an invoice will be created for any parts with an Inv quantity on this screen.
If you confirm the shipment of a part on this screen and perform a Parts Billing Run before the rest of the parts are shipped/invoiced, multiple invoices will be created for the same order number, denoting the two separate shipments.
For example, if the selected invoice has 50 parts on it but you enter 40 in the Inv quantity field, the system automatically creates a separate line item for the remaining 10 parts upon clicking Save. If a billing run is then performed before the remaining 10 parts are shipped/ invoiced, the invoice that is created will only be for 40 parts. The remaining 10 parts will have a separate invoice created when they are invoiced and another billing run is performed.
Note: Certain fields such as Ord, Iss, Ship and Price are locked on the Ship Confirm Details tab. To edit these fields, open the invoice in edit mode and use the Parts Invoicing Details tab.
Click the Set All Invoice Quantities link to automatically populate the Inv amount fields with the values from the Ship field.
The fields on the Ship Confirm Details tab are:
| Field | Description |
|---|---|
| Cash Code |
Specifies the terms of the transaction, if the code is changed after the invoice has been authorized the user will have to re-authorize the transaction. You can also use a cash code to record a warranty or lost sale on the invoice. These cash codes are predefined by the IntelliDealer:
These cash codes are defined by the IntelliDealer for A/R:
You can use any other alpha character as a cash code to define an A/R agency. When using cash code 4 (to denote a Lost Sale), if the Record Lost Sale Reasons switch is activated on the Authorization List For Product Support - Parts Invoicing screen, you be required to select a Parts Lost Sale reason code for the invoice. |
| Part Number |
The part numbers being sold. A highlighted part number indicates that a specific condition has been found as set up on the Parts Highlighting screen. Move the cursor over the part number to see a text description of the condition. Wear parts are excluded from parts highlighting logic. |
| Ord |
The quantity of parts being ordered. If parts are being returned the quantity must be entered as a negative number. The allowable range is -99,999 to 99,999. |
| Iss |
The quantity of parts that the system can issue to fulfill the need of the parts invoice. If the Iss field appears Red, the branch location you are currently in does not have enough stock to fulfill the parts invoice. The allowable range is -99,999 to 99,999. |
| Ship | The quantity shipped when the sales order is invoiced or shipping is confirmed. |
| Inv |
Indicates the quantity of the part that will be processed by the next sales order billing run. If you enter an Inv value less than the quantity in the Ship field, the system automatically creates an additional detail line item for the remaining parts that have yet to be shipped/ invoiced. |
| Description |
A brief description of the part. The system populates the Description field if the part number is loaded on the part master file. If the part is not found, the system loads the description from the master price file (if loaded). |
| OH/ Bin |
The part's current on hand quantity (OH) from the parts system for this part in your branch location, and the bin number (physical location) of the part. If another branch location has the desired parts currently in stock the Company/Division/Branch code will appear under the OH field (e.g F010102) where 01 - Company 01 - Division 02 - Branch. If a particular location can't fill the request for quantity, but the Company(all locations) can fill the request it will show an I followed by the quantity that can be filled. For example, I5 indicates that across the company there are 5 on hand. This field is highlighted Red when there are not enough parts in stock to fill the order. A reverse image Bin number indicates that alternate bins exist. Move the cursor over the Bin number to view alternate Bin location numbers. |
| OO/ OFC | The number of parts that are on order and the Order Formula Code (OFC) for the selected part. |
| Price |
The price of the part. The Price field defaults to the selling price currently loaded on the part master. If the part selling price is different than the MSRP (Manufacturer Suggested Retail Price), the Price field appears in reverse color. This may happen if a customer parts discount applies. If you wish to see the MSRP, move your cursor over the price and a pop-up screen will appear. This field is highlighted Red when there is not enough quantity to fill the order. Also note that the customer pricing feature is the first source checked for price. Note: You can only change a part price if the Modify Part Prices switch is activated in security system 823. |
| LDTTTTN |
The Level, Discounts,Taxes and Non Stocking Code that apply to the selected part, as specified on the Tax, Discount & Level screen. |
| Extended Price |
The unit price multiplied by the quantity. The Extended Price field shows other important information about the part including:
|
| Total Charge |
The total chargeable amount on the invoice. The Total Charge field can hold up to nine digits (including two decimals places), with a maximum total charge amount of $9,999,999.99. |
Use these buttons to complete your work on the Ship Confirm Details tab:
| Button | Function |
|---|---|
| Save |
Saves the changes made on the Parts Invoicing Details tab. If authorization is required, the A/R Agency tab will appear. If a billing run is performed and any of the parts listed on this screen have disparate Ship and Inv quantities, an invoice will be created for only the parts that have equal Shipped and Invoiced quantities. |
| Save/Close | Saves changes made on the Parts Invoicing Details tab and close the screen. |
| Close | Closes the Parts Invoicing Details tab without saving and returns to the previous screen. |
| Totals | Displays charges, cash, warranty, tax and discount totals for both the sales order and the next invoice. |
Work Order Parts Requisitions Details Tab
The Work Order Parts Requisitions Details tab can be accessed from the Work Order Parts Requisitions screen by clicking on an Order Number.
To access the Work Order Parts Requisitions Details tab:
-
Navigate to Product Support > Parts > Parts Invoicing.
-
Click the Switch to parts requisitions button at the bottom of the screen.
-
Search for work order requisitions, then click on an requisition number. A window pops up with the work order requisition information.
The Work Order Parts Requisitions Details tab allows you:
-
to open the Customer Profile screen, click on the Work Order Number.
-
to open the Consignment Inventory screen, click on the Search
 icon next to the Consignment field.
 -
to create a purchase order, hover over the Purchase Order link and select Create from the pop-up menu.
-
to cancel a purchase order, hover over the Purchase Order link and select Cancel from the pop-up menu.
-
to see a history of all of the parts that have been purchased by the customer on the work order parts requisition, click the Customer Parts Purchases link.
The Information fields on the Work Order Parts Requisitions Details tab are:
| Information | |
|---|---|
| Field | Description |
| Order Number | The order number assigned to the associated work order parts requisition. |
| Customer |
The customer on the selected work order parts requisition. Clicking on the Information |
| Location | The branch location where the work order parts requisition was created. |
The fields on the Parts Invoicing Details/Work Order Parts Requisitions Details tab are:
| Field | Description |
|---|---|
| Work Order Number | The work order number. |
| Unit |
A brief description of the unit on the work order parts requisition. Click the Information |
| Salesperson | The salesperson associated with the corresponding work order parts requisition. |
| Freight Terms |
If selected, allows you to enter the freight terms in the available field. If this field is left blank, freight terms do not appear on the picpak or invoice when printed. Note: This radio button appears only if the security switch Allow Requisition of Consignment Inventory is turned off in the Authorization List for Product Support - Parts Invoicing screen. |
| Consignment |
If selected, allows you to enter the consignment inventory customer number in the available field. If a consignment inventory customer number has already been assigned to the requisition, it will appear in the Consignment field and the Consignment button will be locked. Note: This radio button only appears if the security switch Allow Requisition Of Consignment Inventory is turned on in theAuthorization List for Product Support - Parts Invoicingscreen. |
| Hide Completed |
If selected, this hides completed line items on the work order parts requisition. When you change the Hide Completed field setting, the screen automatically refreshes and saves your changes. This field only appears on the Work Order Parts Requisition Details tab. Note: By default, this switch is always deactivated on work order adjustments, regardless of whether the Default Hide Complete in Requisition switch is activated in security system 823. |
| Cash Code |
Specifies the terms of the transaction. If the code is changed after the invoice has been authorized the user will have to re-authorize the transaction. You can also use a cash code to record a warranty or lost sale on the invoice. When using cash codes 0 or 6 (to denote an Internal Shop Lost Sale or a Customer Shop Lost Sale), if the Record Requisitions Lost Sale Reasons switch is activated on the Authorization List For Product Support - Parts Invoicing screen, you will be required to select a Parts Requisition Lost Sale reason code for the invoice. |
| Part Number |
The number of parts being sold. On the Parts Requisition tab, a highlighted part number indicates that the part has been sold to the same serial number within the last 12 months. A Warning icon (flashing triangle) will appear next to the highlighted part number field allowing you to view the Part History screen. Vendor G/L parts, units marked as Internal, and Wear parts are omitted. Click the Information If the selected part(s) have related parts associated to them, the Add Related Parts screen appears when you click Save or open a different tab within the requisition. |
| Ord |
The quantity of parts being ordered. If parts are being returned the quantity must be entered as a negative number. The allowable range is - 99,999 to 99,999. |
| Iss |
The quantity of parts that the system can issue to fulfill the need of the work order parts requisition. If the Iss field appears Red the branch location you are currently in, does not have enough stock to fulfill the work order parts requisition. The allowable range is - 99,999 to 99,999. |
| Shp | The quantity shipped when the sales order is invoiced or shipping is confirmed. |
| Inv | Indicates the quantity of the part that will be processed by the next sales order billing run. |
| Unit |
The part can be used on the unit number listed in this field. |
| Description |
A brief description of the part. The system populates the Description field if the part number is loaded on the part master file. If the part is not found, the system loads the description from the master price file (if loaded). Click the More |
| OH Bin |
The part's current on hand quantity (OH) from the parts system for this part in your branch location. The bin number indicates the part's physical location. This field will be highlighted Red when there is not enough parts in stock to fill the order. A reverse image Bin number indicates that alternate bins exist. Move the cursor over the Bin number to view alternate Bin location numbers. |
| OO OFC | On Order/Order Formula Code (OFC) displays the number of parts that are on order and the order formula code for the selected part. |
| Price |
The price of the part. The Price field defaults to the selling price currently loaded on the part master. If the part selling price is different than the MSRP (Manufacturer Suggested Retail Price), the Price field appears in reverse color. This may happen if a customer parts discount applies. If you wish to see the MSRP, move your cursor over the price and a pop-up screen will appear. This field will be highlight Red when there is not enough quantity to fill the order. Note that the customer pricing feature is the first source checked for price. Note: You can only change a part price if the Modify Part Prices switch is activated in security system 823. |
| LDTTTTN |
The Level, Discounts,Taxes and Non Stocking Code that apply to the selected part. To view or modify these values using the Tax, Discount & Level screen, click the LDTTTTN code that is displayed. |
| Extended Price |
The unit price multiplied by the quantity. The Extended Price field shows other important information about the part including:
|
| Total Charge |
The total chargeable amount on the invoice. The Total Charge field can hold up to nine digits (including two decimals places), with a maximum total charge amount of $9,999,999.99. |
Use these buttons to complete your work on theWork Order Parts Requisitions Details tab:
| Button | Function |
|---|---|
| Credit Number |
Allows you to assign a credit reference number to a credit work order parts requisition. This button only appears on credit invoices. |
| Invoice | Will print a work order parts requisition according to the parameters set up on the Printing Parameters screen. |
| Reprint |
Reprints the work order parts requisition. The Reprint button only appears when the parts invoice has previously been invoiced. |
| PICPAK |
Prints a PICPAK according to the parameters set up on the Printing Parameters screen. This is used if the order is not invoiced immediately. When using a point-of-sale device, you will be prompted for a signature when issuing a PICPAK. This is configured on the System Settings: Location screen. The PICPAK button appears Red if a picpak has already been generated for the selected invoice. |
| Batch |
Tells the system to produce the final invoice during the billing run at night and prints a PICPAK for shipping purposes before running the batch. You may be prompted for a signature after clicking the Batch button, if it has not already been captured with a PICPAK. During the billing run, batched invoices will be printed, emailed, or both, depending on the option configured in the Print Parts Invoices field of the Customer Profile. |
| Import | Allows you to import a parts list from either a PC, equipment parts list, job code parts list, or special terms file. |
| Gift Card |
Opens the Gift Card screen which allows you to use a valid gift card to fully or partially pay for an invoice, load credit onto a gift card, or check the current balance on a gift card. The Gift Card button only appears if the following has occurred:
|
| Adjust LDTTN |
Opens the Tax, Discount & Level screen, allowing you to change the tax codes, discounts, pricing level or non-stock codes being applied to the selected part(s). Only parts that have been selected using the checkbox in the LDTTTTN field are updated when using the Adjust LDTTN button. |
| Save |
Saves the changes made on the Work Order Parts Requisition Details screen. If a part with related parts is entered in the Part Number field, the Add Related Parts screen will appear, after selecting the Save button, allowing you to add a related part onto a sales order. |
| Save/Close | Saves changes made on the Work Order Parts Requisition Details screen and close the screen. |
| Close | Closes the Work Order Parts Requisitions Details tab without saving and returns to the previous screen. |
| Totals | Displays charges, cash, warranty, tax and discount totals for both the sales order and the next work order parts requisition. |
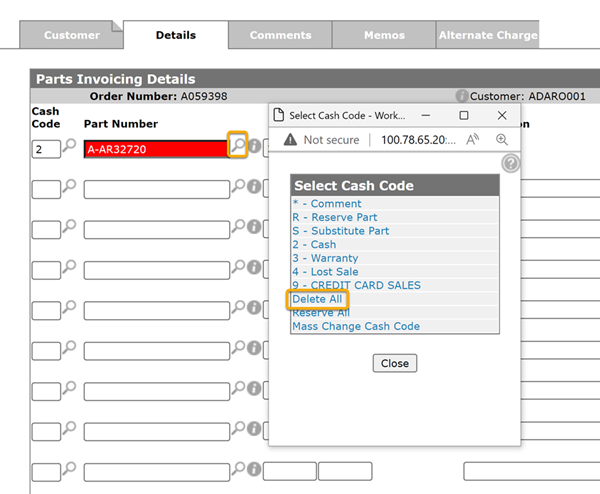
Deleting all lines on a parts invoice at once
To delete all lines on an invoice at once, instead on removing the parts line by line, click the magnifier icon next to the cash code. In the Cash Code window, select the delete all option.
Data Source: SALDET
Security: 823 - Product Support - Parts Invoicing
Revision: 2026.04