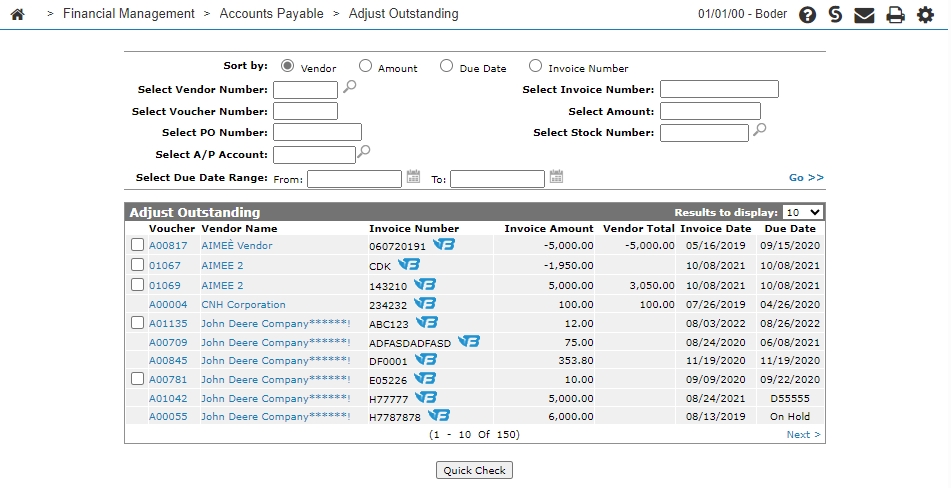
Adjust Outstanding
The Adjust Outstanding screen allows you to adjust an outstanding voucher.
To open the Adjust Outstanding screen, navigate to Financial Management > Accounts Payable > Adjust Outstanding.
Topics in this section include:
See also: How to Reverse a Check in IntelliDealer.
Adjusting An Outstanding Voucher
-
Navigate to Financial Management > Accounts Payable > Adjust Outstanding.
-
Enter your search criteria in the appropriate fields and click Go >> link to begin the search.
Outstanding vouchers matching your search criteria appears.
-
Select the checkbox next to one or more vouchers, then click Quick Check.
-
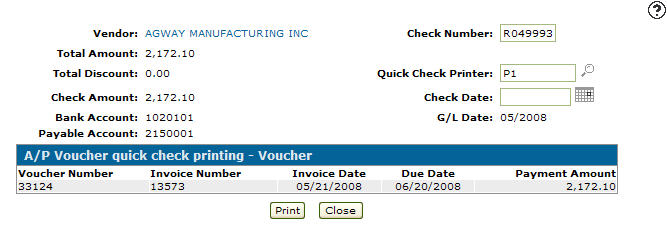
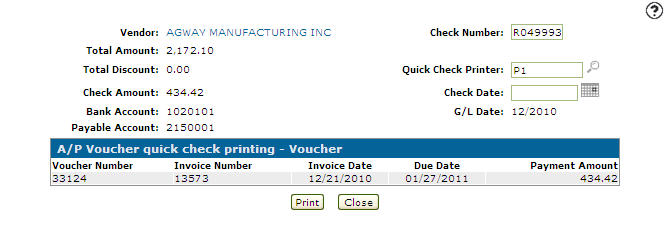
On the A/P Voucher Quick Check Printing screen:
-
Enter the Check Number.
-
Select the desired Quick Check Printer.
-
Select a Check Date. This batch will be posted to the G/L on the selected date.
-
-
Click Print to generate the quick check and adjust the outstanding A/P voucher.
- or -
Click Close to exit the screen without adjusting the voucher or printing a check.
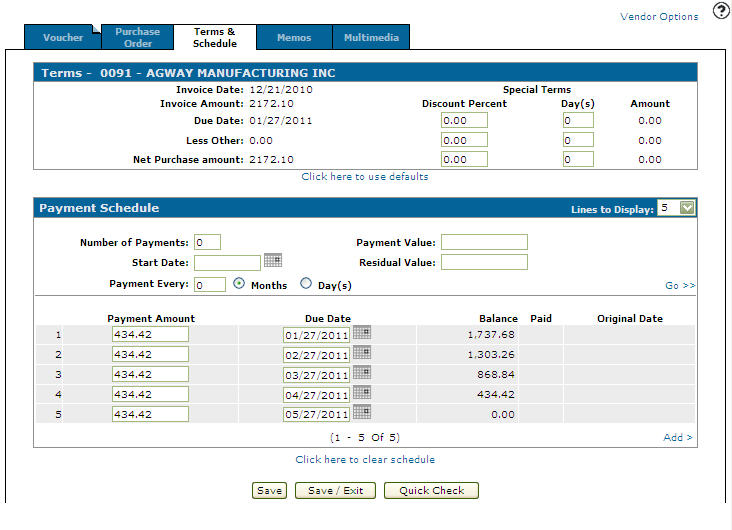
Adjusting an Outstanding Voucher with a Payment Schedule
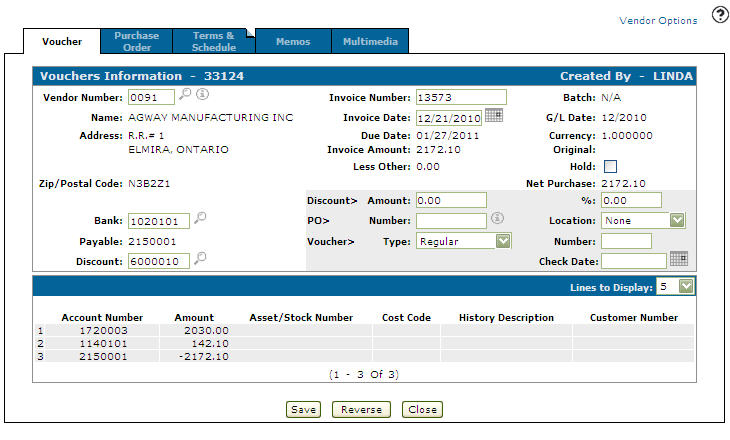
If a payment schedule is set up on the voucher you must access the Terms & Payment Schedule tab to print the Quick Check.
-
From on the Adjust Outstanding screen, search for and select a Voucher.
The Vouchers Information screen appears. -
Click the Term & Schedule tab.
-
Click the Quick Check button.
-
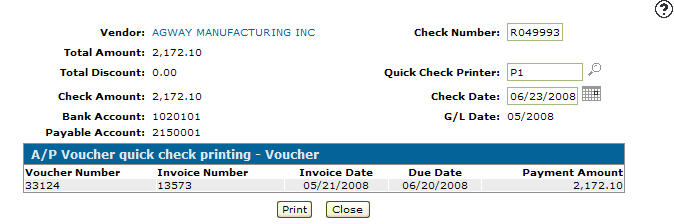
On the A/P Quick Check Printing - Voucher screen, enter a Check Date.
-
Click on the Print button to print the quick check. For example: AP6000F.
Screen Description
The sorting options on the Adjust Outstanding screen are:
| Sort by | |
|---|---|
| Field | Description |
| Vendor | Sort the search results by vendor name. |
| Amount | Sort the search results by invoice amount. |
| Due Date | Sort the search results by due date. |
| Invoice Number | Sort the search results by invoice number. |
The search fields on the Adjust Outstanding screen are:
| Field | Description |
|---|---|
| Select Vendor Number | Search for outstanding vouchers by entering a vendor number. |
| Select Voucher Number | Search for outstanding vouchers by entering a voucher number. |
| Select PO Number | Search for outstanding vouchers by entering a purchase order number. |
| Select A/P Account | Search for outstanding vouchers by entering an accounts payable account. |
| Select Due Date Range |
Narrow down the outstanding vouchers search results by selecting a due date range. |
| Select Invoice Number | Search for outstanding vouchers by entering an invoice number. |
| Select Amount | Search for outstanding vouchers by entering an invoice amount. |
| Select Stock Number | Search for outstanding vouchers by entering a stock number. |
The fields on the Adjust Outstanding screen are:
| Field | Description |
|---|---|

|
Allows you to select the corresponding voucher, for use with the Quick Check button. Vouchers may not have a checkbox if:
|
| Voucher | The voucher number assigned by the system during the voucher creation process. |
| Vendor Name | The vendor name. |
| Invoice Number | The invoice number. |
| Invoice Amount |
The net invoice amount. The net invoice amount equals the Invoice Amount minus Discount. - OR - If a Payment Schedule exists, the net invoice amount equals Partial Payment minus Discount. |
| Vendor Total | The total amount owed by the vendor. |
| Invoice Date | The original date that the invoice being adjusted was issued by the supplier. |
| Due Date | The date that a check is to be printed for this voucher. |
Click on a Voucher number to open the Vouchers Information tab.
Click on a Vendor Name to open the Vendor Profile screen.
Click the FileBound icon to view the selected invoice from within FileBound.
Note: The FileBound icon only appears if your dealership is licensed for feature number 6211 and the Display FileBound Invoice Details switch is activated (995 - User Security).
To complete your work, select one or more vouchers and click the Quick Check button. The A/P Vouchers Quick Check Printing screen opens.