Campaign
The Campaign screen allows you to create a list of customers for the purpose of marketing. There are many different ways to select the customers and many different marketing methods available. However, customers for whom the Do Not Contact switch is activated in their Customer Profiles cannot be targeted for marketing campaign emails.
The options for opening the Campaign screen are:
-
Hover over a Name on the Campaigns screen and select Edit from the pop-up menu. Form here, you have the option to select multiple customers using specific criteria.
-
Click the Target
 icon on the Customer Profile screen. From here, you only have the option to send a campaign to the selected customer. If Responsible Marketing has been enabled for the Country code assigned to the customer, you may not be able to send the customer a campaign email.
Note: As of July 1st 2014, the Canadian government has implemented Canadian Anti-Spam Legislation (CASL) requiring any Canadian customers that you do business with to explicitly consent to receiving marketing emails. For details on how this impacts the functionality of marketing campaigns generated from IntelliDealer, see the Responsible Marketing Overview.
Topics in this section are:
Creating a Marketing Campaign
Prerequisites: Responsible Marketing is mandatory for all Canadian customers and requires that you configure a Marketing Footer before sending any marketing emails.
-
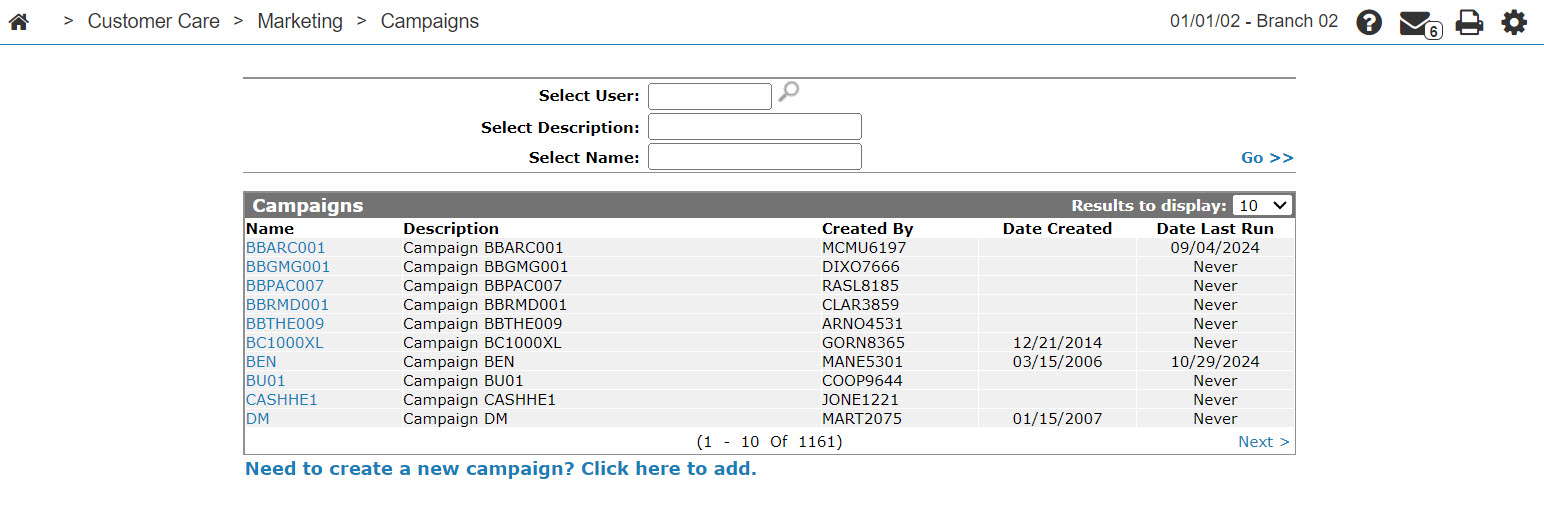
Navigate to Customer Care > Marketing > Campaigns.
-
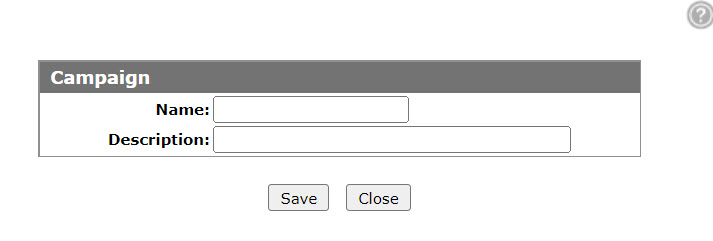
Click on the Need to create a new campaign? Click here to add link.
-
Enter a Name for the campaign (you cannot change the name once the campaign is created) and a brief Description outlining the campaign, then click Save.
-
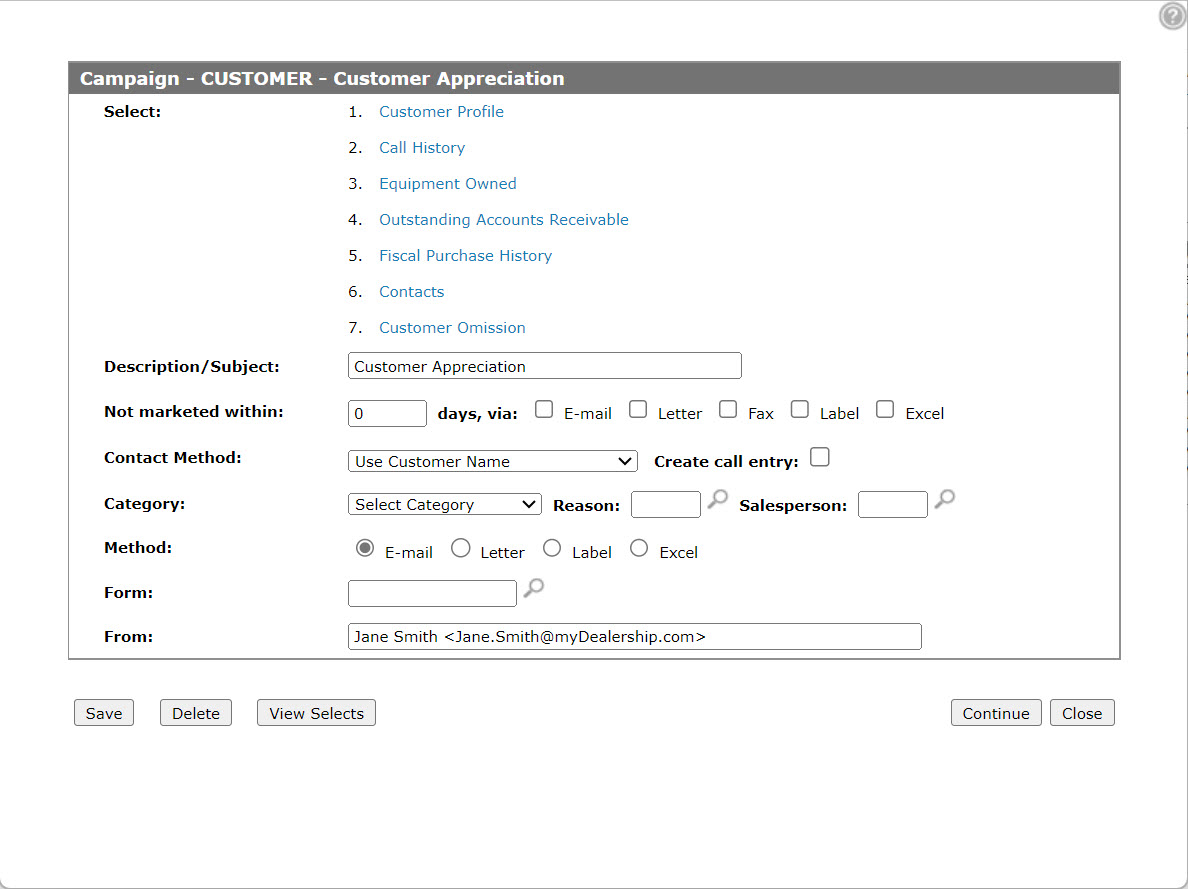
Use the Select links at the top of the Campaign screen to set up which customers will receive the new marketing campaign by creating selection criteria within the listed areas.
The Customer Profile, Call History, Equipment Owned, and Contacts links use the Selection Criteria tab to select the customers to be included in the marketing campaign.
-
After you have configured your selection, click the Save Query button to save the selected selection criteria.
-
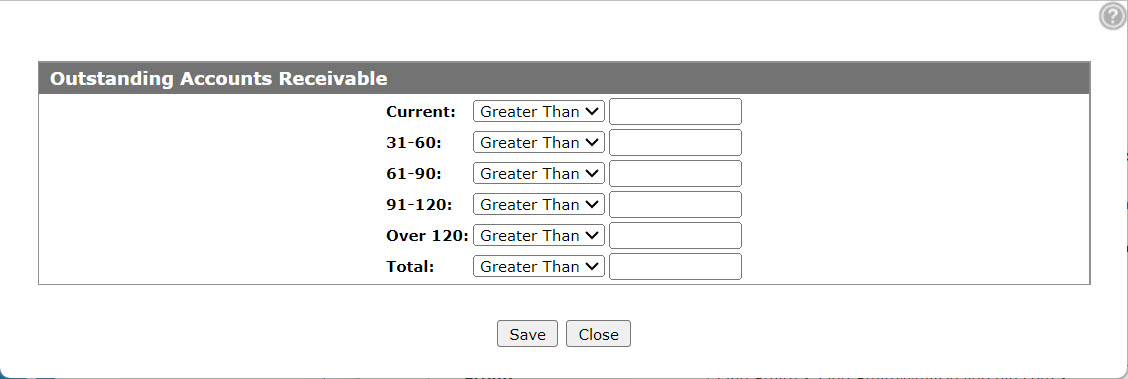
The Outstanding Accounts Receivable link opens the screen that displays data representing the aged outstanding accounts receivable balances and allows you to select a customer based on the amount owing in a particular bucket.
-
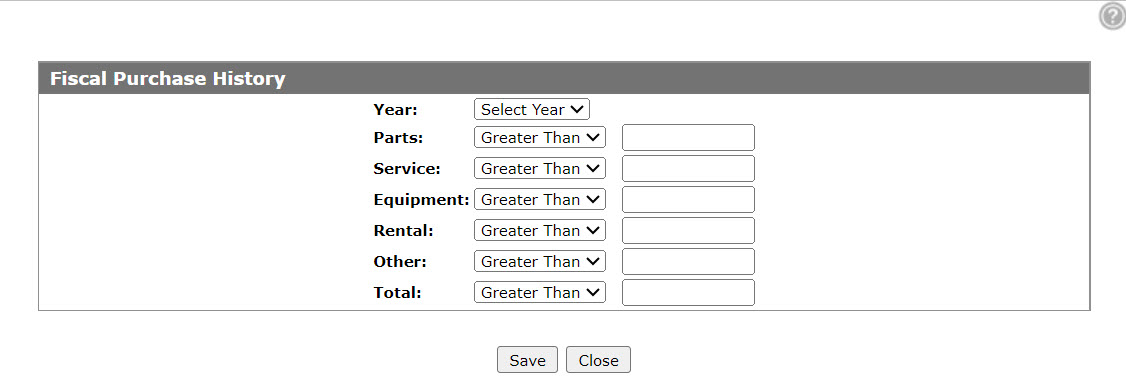
The Fiscal Purchase History link allows you to select customers based on their yearly purchasing totals broken down by systems.
-
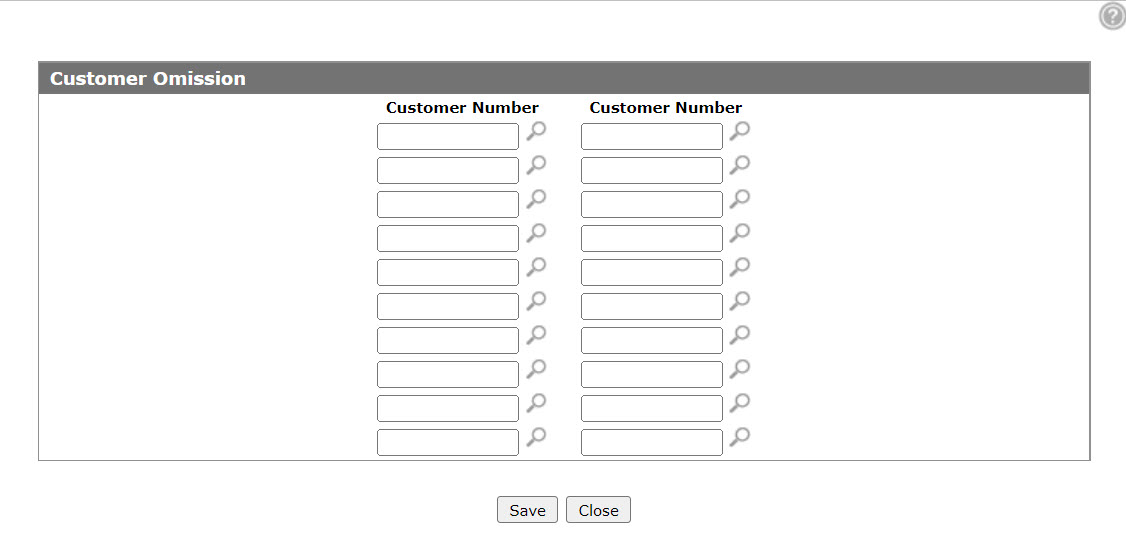
The Customer Omission link allows you to specify selected customers to be omitted from the final marketing list.
-
On the Campaign screen, fill in the remaining fields referring to the table below.
-
Click Save.
Previewing the Campaign
You can send the campaign e-mail to one recipient for the purpose of testing, prior to sending the mass e-mail.
-
With the campaign open for edit, click the Continue button.
-
Click the Preview button.
-
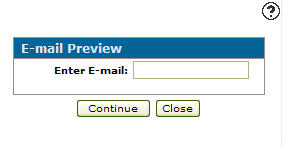
Enter an e-mail address in the Enter E-mail field.
-
Click the Continue button to send the marketing campaign e-mail.
The Campaign screen appears stating that the report has been submitted.
Sending the Campaign
-
Click on the Continue button.
-
Click the Run button to run the marketing campaign.
Screen Description
The fields on the Campaign screen are:
| Field | Description |
|---|---|
| Select |
The various selection links. You can set up selection criteria for campaign purposes within these areas, by clicking on the associated link:
This field only appears when accessing the Campaign screen from the Campaigns screen. |
| Description/Subject | Used as a descriptive reference for the campaign. It is also used as the "subject" when an e-mail is sent using the e-mail method. |
| Not marketed within |
Used to select only customers who have not been marketed to within the last XXX days. This field only appears when accessing the Campaign screen from the Campaigns screen. |
| Via |
Used to select only customers who have not been marketed to within the last XXX days by the selected method (for example, E-Mail or Letter). Fax is not available. This field only appears when accessing the Campaign screen from the Campaigns screen. |
| Contact Method |
Select the method of locating the contact(s) for inclusion in this campaign. Options include:
If Responsible Marketing applies to one of the customers eligible for the selected campaign and you select Use Contacts Only or Use Customer & Contacts, the system loops through the customer's contacts and sends the campaign to contacts who have either explicitly given their consent to receive marketing emails, or who have yet to decide whether they want to subscribe or opt of receiving marketing emails (specified in the Email Campaigns field on the Customer Profile: Contact screen). See the Responsible Marketing Overview . Regardless of the option selected in this field, if Responsible Marketing applies to any of the customers eligible to receive the campaign and E-mail is selected in the Method field below, you must configure a Marketing Footer before running the campaign. |
| Create Call Entry |
Whether an entry is added to the customer's call profile. To enable the call entry feature, values must be loaded in the Customer Care - CRM configuration screen. |
| Category | Used to identify the category for the campaign. The category is used if a call record is created. |
| Reason |
The reason for the campaign. The reason is recorded on the call record that is created when the campaign is run. |
| Salesperson | Used to identify who is running this campaign. The salesperson is recorded on the call record that is created when the campaign is run. |
| Method |
Determines how marketing campaigns to the customers are run. See the method table below for a list of options. After you select a method, the screen refreshes and shows additional parameters specific to the chosen method. The fields that may appear are described below. If you have accessed the Campaigns screen through the Customer Profile and the Country code assigned to the customer has Responsible Marketing enabled, the Email method option may not appear. If Responsible Marketing applies to any of the customers eligible to receive this campaign and you select E-mail in this field, you must configure a Marketing Footer before running the campaign. |
| Form |
Identifies which form should be applied to this campaign. This field only appears when the E-Mail or Letter methods are selected. |
| Margin Lines |
The size of the header, left margin and width. This field only appears when the Letter method is selected. |
| From |
The name and e-mail address from which the campaign form will be sent. By default, the name and email address of the user creating the campaign is used, however you can change this if desired. This field only appears when the E-Mail method is selected. |
| Font |
The font used on the letter. This field only appears when the Letter method is selected. |
| Overlay |
The overlay to apply to the campaign output. This field only appears when the Letter method is selected. |
The available Method options are:
| Method | |
|---|---|
| Option | Description |
|
E-mails the form using the IBM server e-mail. If you have accessed the Campaign screen through the Customer Profile, the E-mail method option only appears if one the following is true:
|
|
| Letter | Creates the form in an IBM server Spool File |
| Label |
Creates multiple page labels, 4 x 1 inch (2 x 10) or a 2.625 x 1 inch (3 x 10) size page label or an individual label. 20 page labels are generated per page if using the 2 x 10 label dimensions or 30 page labels per page if using the 3 x 10 label dimensions. The laser page labels tested were Avery # 05261 (2 x 10) and 05260 (3 x 10). Note: Page labels are not the only option, review the Report Options help topic for more details. |
| Excel |
Allows customer data to be downloaded to your computer as an Excel worksheet. When running an Excel marketing campaign, customers who have opted out of marketing campaigns are still downloaded. When you run the campaign, you are presented with the matching list of customers. If any of the customers in the list have opted out of marketing campaigns, you will see a message at the top of the screen to remind you that the list contains customers that have opted out, and to check the Consent to Email column in Excel. If you are using the list for marketing campaigns then you can remove the customers with Opted out. |
Note: Although it is not specifically listed as a method, the list of customers produced when the Continue button is pressed can be used as a "Call List" for cold calling them regarding this marketing campaign.
When using Times Roman and Helvetica fonts for the campaign output, use the following Margin Lines a guideline. You will find that the Left value is relatively consistent but the Width may need to be adjusted slightly depending on the characters being printed.
| Font | Left | Width |
|---|---|---|
| Times Roman 10 pt | 22 | 110 |
| Times Roman 10 pt (Bold) | 22 | 100 |
| Times Roman 12 pt | 15 | 90 |
| Times Roman 12 pt (Bold) | 15 | 85 |
| Helvetica 10 pt | 22 | 100 |
| Helvetica 10 pt (Bold) | 22 | 90 |
| Helvetica 12 pt | 17 | 82 |
| Helvetica 12 pt (Bold) | 17 | 77 |
Use these buttons to complete your work on the Campaign screen:
| Button | Function |
|---|---|
| Save | Saves changes made to the Campaign screen. |
| Delete | Deletes the selected campaign from the Campaigns screen. |
| View Selects | View all of your selection criteria on the Selection Criteria screen. |
| Continue |
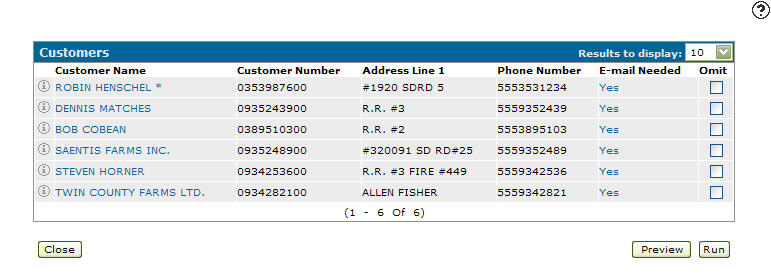
Opens the Customers screen and displays the customers that have met the selection criteria. If you have accessed the Campaign screen through the Customer Profile, the Continue button will not appear if the Do Not Contact switch has been activated on the Customer Profile. Note: Contacts for whom Responsible Marketing applies may be omitted from the Customers screen if they have opted out of receiving marketing emails (specified in the Email Campaigns field on the Customer Profile: Contact screen). See the Responsible Marketing Overview . |
| Close | Closes the Campaign screen without saving and returns to the Campaigns screen. |