Configuration: Vendor EFT
Use the Vendor EFT screen to configure the information required by the system to properly generate the EFT payment file from the Check Run Batches screen by clicking the Vendor EFT link.
To open the Vendor EFT screen, from anywhere within IntelliDealer navigate to Configuration > General Ledger > Accounts Payable > Vendor EFT.
Topics in this section are:
See also:
Set Up Vendor EFT Configuration
-
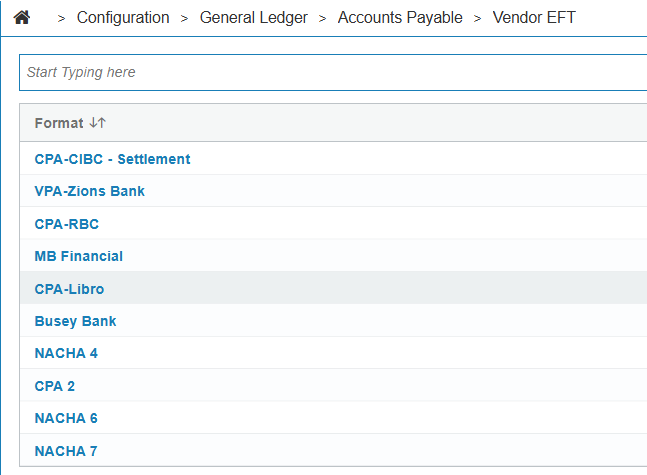
Navigate to Configuration > General Ledger > Accounts Payable >Vendor EFT.
-
Search for and select the format you want to edit, or if you are setting up a new format, click the link at the bottom of the table to create a new format and select the format you want to create.
-
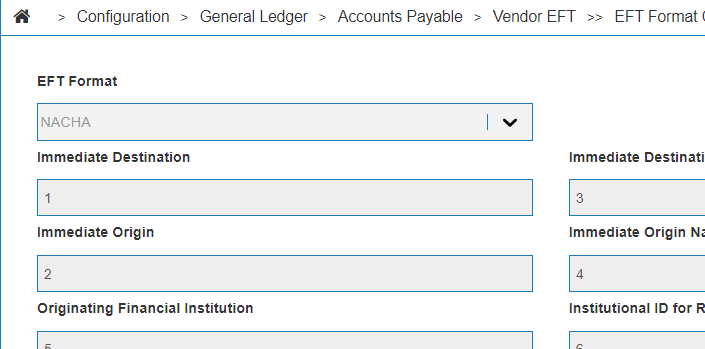
When you select or add a new format, you are taken to a configuration screen. The appearance of this screen may vary depending on the requirements of the selected format.
-
Fill each of the mandatory fields out with the required information, referring to one of the tables below.
-
Click Save.
Renamed Formats
Note that these formats have been renamed (see Supported Formats) :
| Formerly | Currently |
|---|---|
| New NACHA | NACHA 1, NACHA 2, up to NACHA 10 |
| New CPA | CPA 1, CPA 2, up to CPA 10 |
| Active Pay | Legacy Active Pay |
Screen Description
The EFT format NACHA is considered the default EFT format. Other formats include options found in NACHA.
The standard available formats are:
NACHA Format
Using the NACHA format results in a TXT file. The NACHA fields on the Vendor EFT screen are:
| Field | Description |
|---|---|
| EFT Format |
The financial institution to which the EFT payments will be made. You can have up to 10 configurations for NACHA, named NACHA 1 up to NACHA 10. |
| Immediate Destination |
The account number being paid with this EFT. Typically this is a bank's transit number and is supplied by the bank. |
| Immediate Destination Name |
The name of the vendor being paid with this EFT. (i.e. the bank's name.) |
| Immediate Origin | The routing/transit number for the dealership. This number is supplied by the bank. |
| Immediate Origin Name | The name of the company or person making the EFT payment. |
| Originating Financial Institution | The banking number of the depositing financial institution. |
| Institutional ID for Returns | The ID of the financial institution that will receive EFT payment returns. |
| Account Number for Returns | The account number at the selected financial institution that EFT payment returns will be deposited to. Typically this entry is the same as Immediate Origin. |
| Company Name | The name of the company that originally created the EFT. |
| Select "From" Line for PDF Attachment | Select what should display in the From line of the PDF attachment. |
| Line-Break Type |
If Line-Break on Last Line checkbox is selected, specify the type of line break. Options are:
|
| Line-Break on Last Line | The default is unselected. If selected, IntelliDealer adds a line-break to the last line of the file and you must specify a Line-Break Type. |
| Company Discretionary Data | Optional. Data that a financial institution might need to process an EFT. Consult your financial institution. |
| Priority Code | Optional priority code to send EFT payments using a selected format. The default value for this field is "01" and should not be changed without prior consideration. |
| Format Code | Optional format code to send EFT payments using a selected format. The default value for this field is "1" and should not be changed without prior consideration. |
| Standard Entry Class | The standard 3-digit entry class code required to send EFT payments using ACH. This code must be in upper-case letters. |
| Transaction Code |
The transaction code that appears with each Entry Detail within the EFT file. If the Balance File box is checked then this field can only be one of these values: 22, 27, 32, 37 |
| Print Addenda Records (Addenda Record Indicator) | Select this checkbox to include Addenda records (header and footer information) in the NACHA EFT file. Clear this checkbox to remove the Addenda Header/Footer and generate the EFT file without Addenda records. Addenda records are optional, free-form additional data for each Entry Detail. |
| Remove Addenda Header/Footer | Select this checkbox to remove the Addenda Header and Addenda Footer records from the EFT file. |
| Display Descriptive Date as Alphanumeric |
Select this checkbox to display the Descriptive Date value as alphanumeric text in the EFT file. The date is written in a 'MMM - DD' format. Ex. 'SEP 15' |
| Service Class Code |
This code identifies whether the EFT contains debits, credits, or both. The options are:
|
| Sum As | Select whether the EFT should be summarized as a debit or as a credit. |
| Nine Filler | Selecting this checkbox adds nine blank spaces to the file. This is used if there are errors regarding "invalid number of records" from certain banks. |
| Use Record Count as Block Count | When checked, position 8-13 in the File Control Record block count is calculated as the total number of records. If it is unchecked then the block count is calculated as (10 records = 1 block) including 9 filled lines. |
| Include Addenda Count in Detail Records position 55-58 | Select this checkbox to add the number of Addenda entries into the detail records. |
| Balance File | Selecting this checkbox adds an Entry Detail in the EFT called a "Balance Offset". This also opens additional options for Balance Source, Dealer Transit Number, Check Digit, and Dealer Bank Account. |
| Balance Source |
Only available when Balance File is selected. Choose one of:
|
| File Qualifier |
Selecting this checkbox ensures that a File Qualifier is required to define the nature of the payment transactions in the file. Once selected, a text box will open where you can enter the File Qualifier. Types of File Qualifiers:
|
| Dealer Bank Transit Number | Only available when Balance File is selected. The dealer's banking transit number can be entered here. |
| Check Digit |
Only available when Balance File is selected AND if Dealer Bank Account is selected as the Balance Source. Certain EFT transmissions are rejected if a routing number uses the wrong digit to validate the transfer. This field changes which digit is used to check for a confirmation of a valid EFT transmission. |
| Dealer Bank Account | Used with the Balance Source dropdown list. Enter the specific dealer bank account number here. |
CPA Format
Using the CPA format results in a TXT file. The CPA fields on the Vendor EFT screen are:
| Field | Description |
|---|---|
| EFT Format |
The financial institution to which the EFT payments will be made. You can have up to 10 configurations for CPA , named CPA 1 up to CPA10. |
| Immediate Destination |
Identifies the originator of the file, either the Destination Data Center or the Processing Center. |
| Immediate Destination Name |
Optionally use this field for a description. |
| Immediate Origin | The routing/transit number for the dealership. This number is supplied by the bank. |
| Immediate Origin Name | The name of the company or person making the EFT payment. |
| Originating Financial Institution | The banking number of the depositing financial institution. |
| Institutional ID for Returns | The ID of the financial institution that will receive EFT payment returns. |
| Account Number for Returns | The account number at the selected financial institution that EFT payment returns will be deposited to. Typically this entry is the same as Immediate Origin. |
| Line-Break Type |
If Line-Break on Last Line checkbox is selected, specify the type of line break. Options are:
|
| Line-Break on Last Line | The default is unselected. If selected, IntelliDealer adds a line-break to the last line of the file and you must specify a Line-Break Type. |
| Currency Indicator | Optional. The three-character currency code. |
| Error Correction Totals |
Unused error correction fields can be filled with one of these options:
|
| Trailer Record Filter |
The last 1352 characters of the Trailer Record can be filled with one of these options:
|
| Transaction Count |
Indicates how the total number of transactions is calculated. Choose one of:
|
Active Pay Format
Using the Active Pay format results in a CSV file. The Active Pay fields on the Vendor EFT screen are:
| Field | Description |
|---|---|
| EFT Format |
The financial institution to which the EFT payments are made. |
| Include Purchase Order Number as Client Reference Number |
Select this checkbox to include the Purchase Order Number in the file. Leave this box unchecked and set User Defined Field 1 Label to Gross amount to match the behavior of Legacy Active Pay format. |
| User Defined Field 1 Label | Set this field to Gross amount and leave Include Purchase Order Number as Client Reference Number unchecked to match the behavior of Legacy Active Pay format. Choose Voucher to include voucher number information in place of Gross Amount. |
Click Create to add configuration for a format.
Click a format to open it for viewing. To edit it, click the Edit button which unlocks it. To remove it from the list of available formats, click Delete.