InspectionPlus Assign Service
Return to the InspectionPlus Homepage.
The Assign Service screen is for determining and then assigning services after a completed inspection.
When an inspection is completed or in progress and a service is required as a result then the related Job Code populates and the option to add a service appears on this screen.
For example, if an inspection determines a tire is defective the Assign Service screen populates a tire change Job Code and allow you to attach that job to a Work Order Quote.
Topics in this section include
Screen Description
The main Assign Service screen displays a table with these columns:
| Column | Description |
|---|---|
| Step Name | The name of the inspection step. |
| Result | The inspection result for the step. |
| Status | Shows whether the service is Not Started, In Progress, or Completed. |
| Assign Service Tab | Shows the quote number or "Service Declined" if the service has been assigned. |
| Added By | The user who added the service to the quote or resolved/declined list. |
| Timestamp | The date and time when the service was added. |
Adding a Service to a Work Order Quote
-
Select from the listed steps what to add to a work order and click the Create Quote Group button. This creates a separate Quote tab.
-
The Quote tab is used to modify the service and determine the correct Job Code.
The Apply first row choice ribbon toggles whether to apply choices made in the first row to all rows in that column of the quote. This is used to apply mass updates to a quote if required. The bulk actions toggle is available for the Type, Technician, Reason, Rate Code, and Extended Description fields.
Each step in the quote tab displays the step name, inspection result, and any instruction notes or comments associated with the inspection step. Use the multimedia button to view images or other media files associated with the inspection step. Use the unlink button to remove a step from the quote group before the quote is finalized.
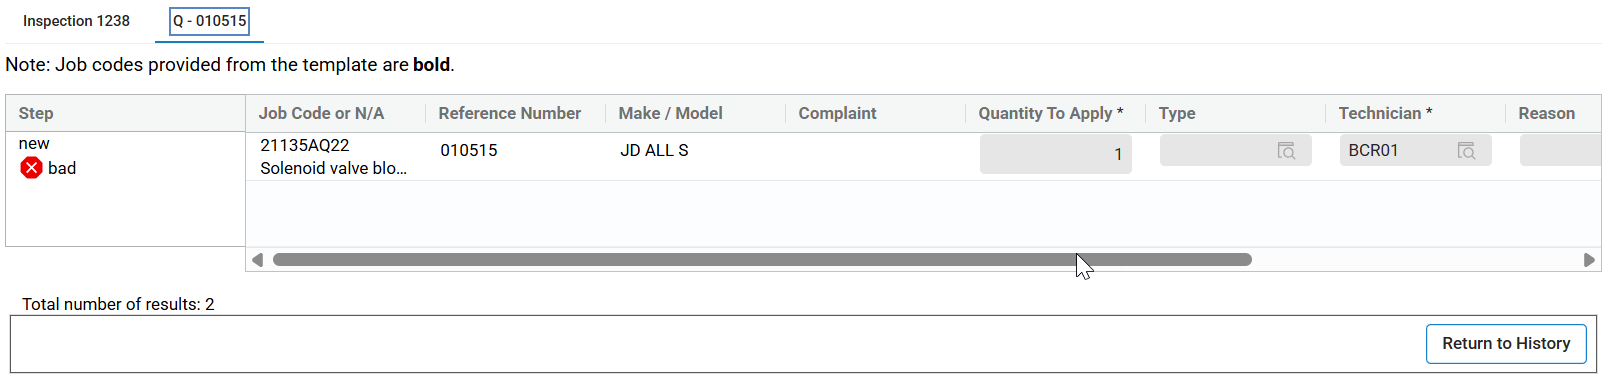
These fields are displayed on a New Quote tab:
Field Description Step Displays the step name, inspection result, and any instruction notes or comments. Use the multimedia button to view images or other media files associated with the inspection step. Use the unlink button to remove the step from the quote group before the quote is finalized. Job Code or N/A
Displays the Job Code for the service or a Not Applicable (N/A) entry for the service.
Use the Add N/A option to add a 'Not Available' condition. An N/A option would be used to indicate a condition where a service would not apply.
Use the Add Job Code option to add a specific Job Code from within the system.
Reference Number Displays the work order quote number after the quote is created. This field is hidden for new quotes that have not been finalized. When All Steps In One Segment is On and the quote reference appears in segment details, this column is hidden. See All Steps In One Segment on the Quote Tab. Make/Model Displays any applicable Make/Model numbers involved in the service. Complaint Displays text describing the issue requiring the service. Quantity To Apply* The number in this field indicates the number of times the service is required. Type Displays the type of service. See below. Technician* The user ID for the technician involved in the service. Reason Displays the reason code for the service. See below. Rate Code Displays the rate code for the service. See below. This field may be required based on security configuration. Extended Des. Clicking this checkbox includes the Extended Description of the service. * - Required fields. All Steps In One Segment on the Quote Tab
Use the All Steps In One Segment toggle on the Quote tab to roll multiple failed inspection steps into one work order quote segment. Step-level information remains in the inspection; the segment uses one job code or N/A definition and shared service details for the combined segment.
When the toggle is Off, behavior matches the standard Quote tab: checkboxes appear beside job codes so you can select multiple rows, the footer shows Add Segments, and you use the Apply first row choice ribbon toggles and the Add icon in the Step column as described above.
When the toggle is On:
-
The footer primary button label is Add Segment (singular) instead of Add Segments.
-
Use Edit Segment Details to open the Segment Details modal and define the single segment.
-
The table hides the job code checkboxes, disables the mass-update toggles and the Add icon in the Step column, and limits row editing to the Complaint field so you can still record complaints per step.
-
After you save segment details, a Segment Details: line shows a short summary (for example job code, make and model, quantity, type, technician, reason, rate code, and whether extended description is included). Empty values are omitted from the summary. When this mode is on, the Reference Number column is hidden if the quote reference appears in the segment details.
In the Segment Details window, select Job Code or N/A.
-
For Job Code, select a job code from the look-up (required).
-
For N/A, enter a required N/A Description. Make and Model are required and populate from the form.
Note: Quantity To Apply defaults to 1 and is required.
Use the look-ups for Type, Technician, Reason, and Rate Code.
Click Save <Inspection Name> Changes to save the toggle setting, complaint text, and quote row data before you add segments to a work order quote.
-
-
When All Steps In One Segment is Off, click Add Segments after you save to add the selected services to a Work Order Quote. When the toggle is On, click Add Segment after you save. The primary button stays disabled until you make the required selections (job codes when the toggle is Off, or saved segment details when the toggle is On).
-
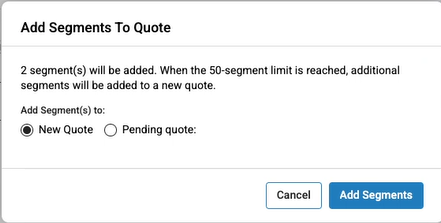
Before clicking Save Segment confirm if the new segment is for a New Quote or for a Pending Quote from within the Work Order Quoting system.
When New Quote is selected, a Salesperson field appears in the Add Segments modal. A salesperson is required for a quote.
The field is filled automatically in this order:
-
Salesperson from the Equipment Profile for the stock number.
-
If blank, the salesperson from your user profile.
-
If still blank, the field is empty.
You can use the Salesperson look-up (
 )to view or change the salesperson before adding segments—for example, when the unit is not in inventory yet or your profile has no salesperson assigned.
 When Pending Quote is selected, the Salesperson field is not available because the existing quote already has a salesperson.
-
-
When all segments are applied, click Return to History to be brought back to the inspection list.
-
If you opened the Assign Service screen from the home page Required Restart(s) list, a Close button is shown instead of Return to History. Click Close to close the window; the Required Restart(s) list on the home page refreshes automatically.
Configuration Areas for Fields on the Assign Service Screen.
This screen requires configuration data for various parts of IntelliDealer.
The following fields require configuration to provide options in the Assign Service screen:
| Option/Field | Configuration Area |
|---|---|
| Add Row | Service - Job Codes |
| Reason for Service | Work Orders - Reasons |
| Type of Service | Work Orders - Types |
| Technician Name | Configuration - General Ledger - Employee - Classes |
| Rate Codes | Configuration - Service - General Ledger - Rates |
| Assign Approver Roles | Administration - Settings - User Profiles - Evaluation/Inspection Area drop-down. |
The Add Row option opens the Job Code Search screen. From here the assigned service uses configured Job Codes from the Service - Job Codes screen.
Note: If 'NA' appears under the Job Code field it means there is no Job Code currently configured for that task.
Once the Select box is checked for the row the Assign Service button appends the Job(s) to whichever option is selected via the Segment dropdown menu on the left.