
Customer Pricing Import - NextGen
This NextGen IntelliDealer screen is being introduced through the controlled rollout. NextGen modernizes the screen experience while preserving the core business behavior dealers rely on today. During the rollout period, related legacy help content may remain available for users who have not yet moved to the NextGen experience or who need to compare familiar workflows. Help content for this screen will continue to be updated as the screen progresses through the rollout phases.
If you are using this NextGen screen today, refer to the guidance on this page first. If you need help with a related legacy workflow, use the linked legacy help content where available. For an overview of the project see NextGen Overview. To determine which phase this screen is in see NextGen Configuration.
Use Customer Pricing Import to import a CSV file and create or update Customer Pricing Records (customer special pricing). The process uses two windows: first you upload and validate the CSV file, then you map each field to a column in the file or enter custom values on screen. For most fields, mapped CSV column values are used when you select CSV Column for that field.
IntelliDealer can insert new customer pricing records or update existing records during an import, depending on the data in the CSV file and your column mapping. Running import multiple times for the same customer and part combination can still create duplicate or overlapping records when the import adds new rows rather than matching an existing record. The software does not automatically prevent duplicates. In practice, the pricing engine evaluates all applicable customer pricing records and applies the best (lowest) price or any designated special price when making a sale. Duplicate or overlapping records can cause confusion and may require clean-up.
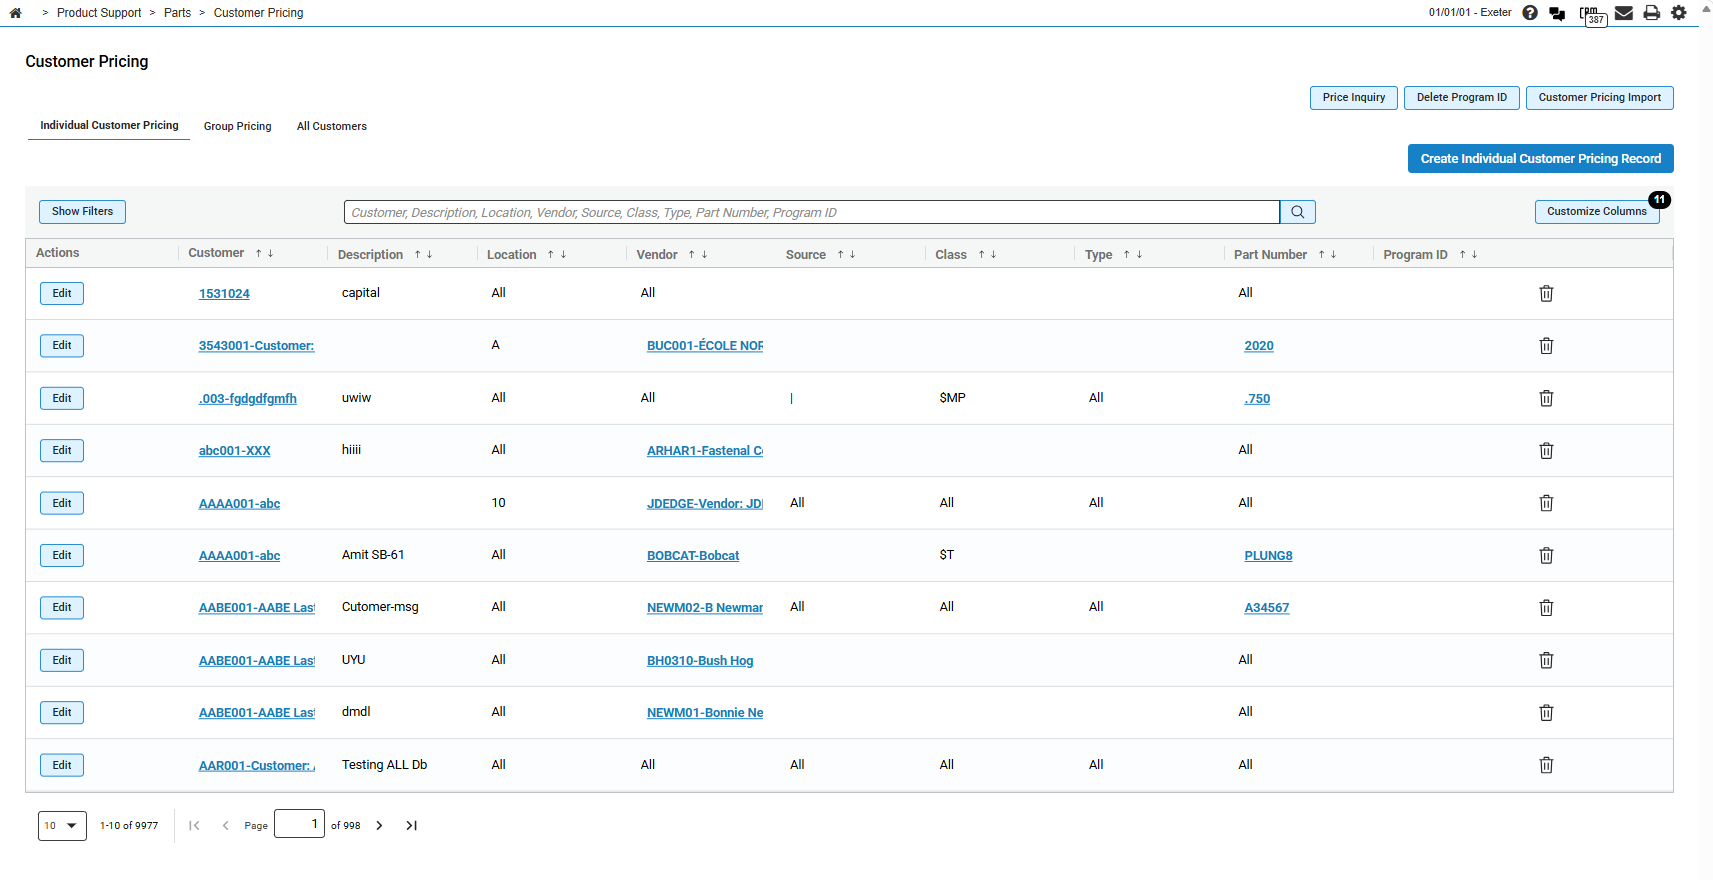
To start an import, click the Customer Pricing Import button on the Customer Pricing screen.
Topics in this section are:
Formatting an Import CSV File for Upload
Before you can import a Customer Pricing file, you must first create a CSV file containing the pricing information using the format requirements outlined below. The steps outlined in this procedure may vary depending on the version of Microsoft Excel you are currently using. For details regarding your specific version of Excel, see the Microsoft Excel help documentation.
-
Open Microsoft Excel to a blank spreadsheet.
-
Click File, then select Save As and save the file as a CSV (Comma delimited) (*.csv) file.
-
Open a blank worksheet in Exceland select Data> From Text, then open the CSV file you created in step 2.
-
Right-click each column heading you plan to use and select Format Cells from the pop-up menu, then select Text in the Category field of the Number tab and click OK.
-
Click File and select Save As, then save the worksheet as a CSV file.
-
Enter the required data using the following layout.
You cannot have a header row in the CSV file. The upload will not work if there is a header row. Any field longer than 260 characters will cause an interface error with the CSV file.
Field Data Description Location A valid two-character location, or *A for all Customer/Group A valid customer or *ALL for all Vendor A valid vendor or *ALL for all Source A valid source code or *A for all Class A valid class or *A for all Type A valid type or *A for all Part Number A valid part number or *ALL for all Pricing Code A valid two-character pricing code. Codes are:
- CP—cost plus %
- CM—cost minus %
- LP—list plus %
- LM—list minus %
- SP—sell plus %
- SM—sell minus %
- FP—fixed price %
- AP—average cost plus %
- AM—average cost minus %
- NP—landed Cost plus %
- NM—landed Cost minus %
Quantity You can enter up to seven Quantity and Price pairs.
Percentage / Price You can enter up to seven Quantity and Price pairs. Start/End Date Dates must be formatted as mm/dd/yyyy. Special Price Indicates if this is a Special Price. Must be one of:
- Y—the price is special
- N—the price is not special
Comment Optional text. Applies To Must be one of: Shop, Counter or Both.
See Applies To.
-
After entering the appropriate data, select a column heading, then open the Data tab and click Text to Columns.
-
Make sure Delimited is selected in the Original Data Type field, then click Next.
-
In the Delimiters field, uncheck the Tab option and select Comma, then click Next.
-
In the Column Data Format field, select Text then click Finish.
-
Repeat steps 7-10 for each data column in the spreadsheet and save the file.
 A new blank spreadsheet.


Importing a Customer Pricing File
Prerequisites: Before you import, prepare the CSV file using Formatting an Import CSV File for Upload. Only .csv files are accepted.
-
Navigate to Product Support > Parts > Customer Pricing.
-
Click Customer Pricing Import.
-
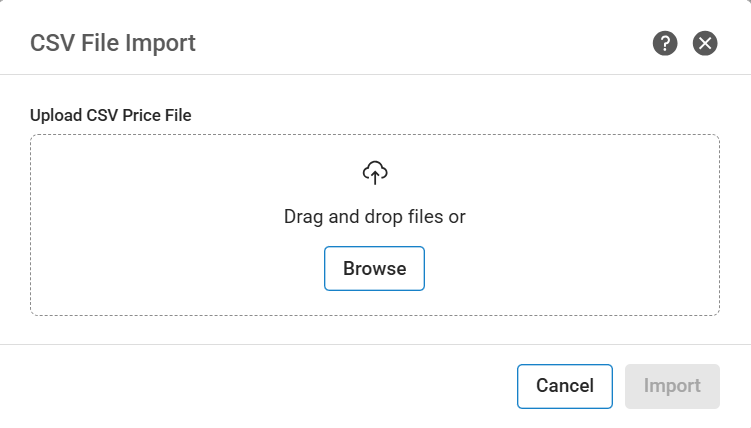
Click Browse, then select the CSV file to import.
Note: If you select a file that is not a CSV, an error message displays and you cannot continue until you choose a valid file.
-
Click Import.
IntelliDealer validates the file. When validation succeeds, a confirmation message displays and the Customer Pricing Import mapping window opens.
-
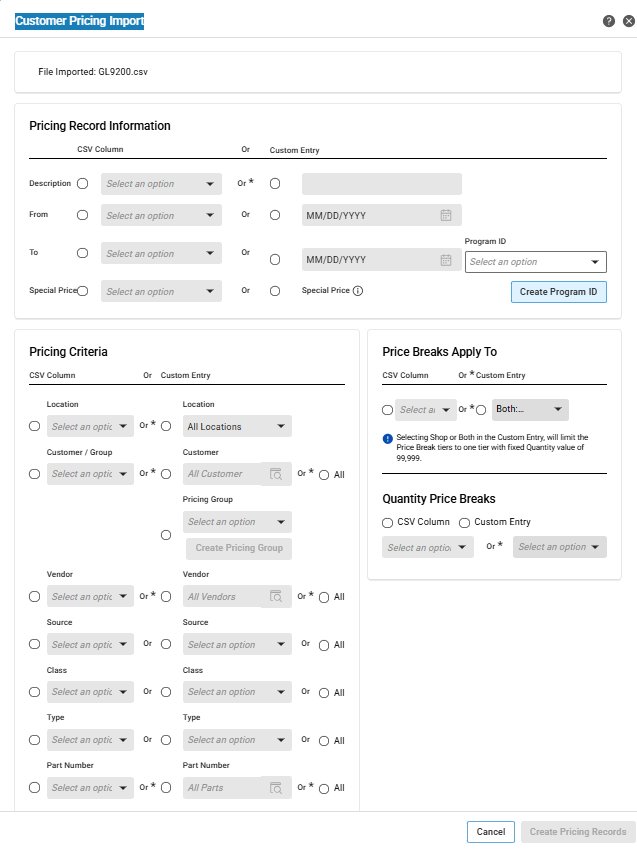
Confirm that the file name at the top of the mapping window matches the CSV you uploaded.
-
Map fields to your CSV file or enter custom values. For each field, select CSV Column and choose the column letter (A, B, C, and so on) that contains the data, or select Custom Entry and enter the value on screen. Column A is the first column in the CSV file (the leftmost column when the sheet is saved as CSV).
You can download this sample Price Import CSV file.
Complete these areas of the mapping window. See Screen Description for field details:
-
Pricing Record Information
-
Pricing Criteria—Location, customer or group, Vendor, and Part Number are required for each import.
-
Price Breaks Apply To and Quantity Price Breaks
Note: Each CSV column letter can be assigned to only one field. If a column is already mapped, choose a different column or use Custom Entry for the other field.
-
-
Click Create Pricing Records.
IntelliDealer creates or updates customer pricing records from the file using your mappings. When the import completes successfully, a confirmation message displays, the mapping window closes, and the Customer Pricing list refreshes.
-
If the import fails or stops with errors:
-
Correct any messages shown on the mapping window (for example, required fields or quantity break rules), then click Create Pricing Records again.
-
If a row in the CSV file cannot be imported, a message identifies the problem row. Fix the CSV file or your column mapping, then start again from step 2 and reselect the file.
-
Click Cancel on either window to close without creating pricing records.
-

Screen Description
For most fields, select a CSV Column to map a column from the uploaded file, or select Custom Entry to use a value you enter on this screen. When both mapping types are available for a field, the value from the CSV file is used when a CSV column is selected.
The fields in the Pricing Record Information section are:
| Field | Description |
|---|---|
| Description |
Description for the customer pricing records created by the import. Select CSV Column choose the column that contains the description, or select Custom Entry and enter a description (up to 30 characters). |
| From |
Start date for the pricing record. Select CSV Column and choose the column that contains the from date, or select Custom Entry and enter a date. |
| To |
End date for the pricing record. Select CSV Column and choose the column that contains the to date, or select Custom Entry and enter a date. Select Program ID from the drop-down list to associate the imported pricing records with an existing program. This field is optional. See Customer Pricing Record. |
| Special Price |
Indicates whether imported pricing records are flagged as special price. Select CSV Column and choose the column that indicates special price, or select Custom Entry to flag all imported records from this run as special price. When special price applies, that pricing record takes precedence over other customer pricing records for the customer. Click Create Program ID to add a new program ID of up to 8 characters. After you create a program ID, it is available in the Program ID drop-down list on the To row. |
The fields in the Pricing Criteria section are:
| Field | Description |
|---|---|
| Location |
Location the pricing record applies to. Select CSV Column and choose the column that contains the location, or select Custom Entry and choose a location from the drop-down list. |
| Customer / Group |
Customer or pricing group the record applies to. Use one of these options:
|
| Vendor |
Vendor the pricing record applies to. Select CSV Column and choose the column that contains the vendor, select Custom Entry and use the vendor lookup, or select All for all vendors. |
| Source |
Source of supply code the pricing record applies to. Select CSV Column and choose the column that contains the source code, select Custom Entry and choose a source from the drop-down list, or select All for all sources. |
| Class |
Part class the pricing record applies to. Select CSV Column and choose the column that contains the class, select Custom Entry and choose a class from the drop-down list, or select All for all classes. |
| Type |
Part type (stocking type) the pricing record applies to. Select CSV Column and choose the column that contains the type, select Custom Entry and choose a type from the drop-down list, or select All for all types. |
| Part Number |
Part number the pricing record applies to. Select CSV Column and choose the column that contains the part number, select Custom Entry and use the part lookup or enter a part number, or select All for all parts. |
The fields in the Price Breaks Apply To section are:
| Field | Description |
|---|---|
| Applies To |
Under Price Breaks Apply To, indicates where the imported pricing applies. Select CSV Column and choose the column that contains the applies-to value, or select Custom Entry and choose an option from the drop-down list. Custom entry options are:
See Applies To. Note: When you select Shop: Parts Requisition for Work Orders or Both: Counter and Shop as a custom entry, quantity price breaks are limited to one tier with a fixed quantity of 99,999. |
| Quantity Price Breaks |
Defines the pricing code and quantity tiers for the import. If you select CSV Column:
If you select Custom Entry:
How many tiers you can use depends on Applies To:
|
Use these buttons to complete your work on the Customer Pricing Import mapping screen:
| Button | Function |
|---|---|
| Cancel | Closes the mapping screen without creating pricing records. |
| Create Pricing Records | Creates customer pricing records from the uploaded CSV file using the column mappings and custom entries you configured. |
Security: 824 - Product Support - Parts Customer Pricing
Revision: 2026.10