
Chart Of Accounts - NextGen
This NextGen IntelliDealer screen is being introduced through the controlled rollout. NextGen modernizes the screen experience while preserving the core business behavior dealers rely on today. During the rollout period, related legacy help content may remain available for users who have not yet moved to the NextGen experience or who need to compare familiar workflows. Help content for this screen will continue to be updated as the screen progresses through the rollout phases.
If you are using this NextGen screen today, refer to the guidance on this page first. If you need help with a related legacy workflow, use the linked legacy help content where available. For an overview of the project see NextGen Overview. To determine which phase this screen is in see NextGen Configuration.
Chart of Accounts records are the basis for OEM alias mapping. Use Alias Account Management to view and edit alias values for those accounts, or use Alias Account Upload to load alias mappings from a CSV file.
Use the Chart of Accounts screen to:
-
view account history
-
view account options
-
set up a chart of accounts
-
print a chart of accounts
To open the Chart of Accounts screen, navigate to Financial Management > General Ledger > Chart of Accounts. The tabs available are:
Account Master and Chart of Accounts
IntelliDealer stores G/L account information at two levels that are related, but not the same record.
-
Account master—Listed on the Account Profile tab, this is the base account number for your company (for example, 50000). One master record holds the account name, type, and other settings shared across profit centers. Use the Account Profile tab to add or maintain account masters.
-
Chart of accounts—Listed on the Chart of Accounts tab, this is the account used when you post transactions: the account number plus a profit center (department and location). For example, 50000401 combines master 50000 with profit center 401. Click Edit on a row to open the Chart of Accounts Profile and code how the system uses that account when posting (application type, corresponding accounts, subledger settings, and so on). You cannot create a chart of accounts without a profit center.
One account master can have many chart of account accounts—one for each profit center in use. When you Create Account, you can attach an existing master to a new profit center or create a new master and chart of accounts account together.
Chart of Accounts
Data Source: COACMAST
 Chart of Accounts screen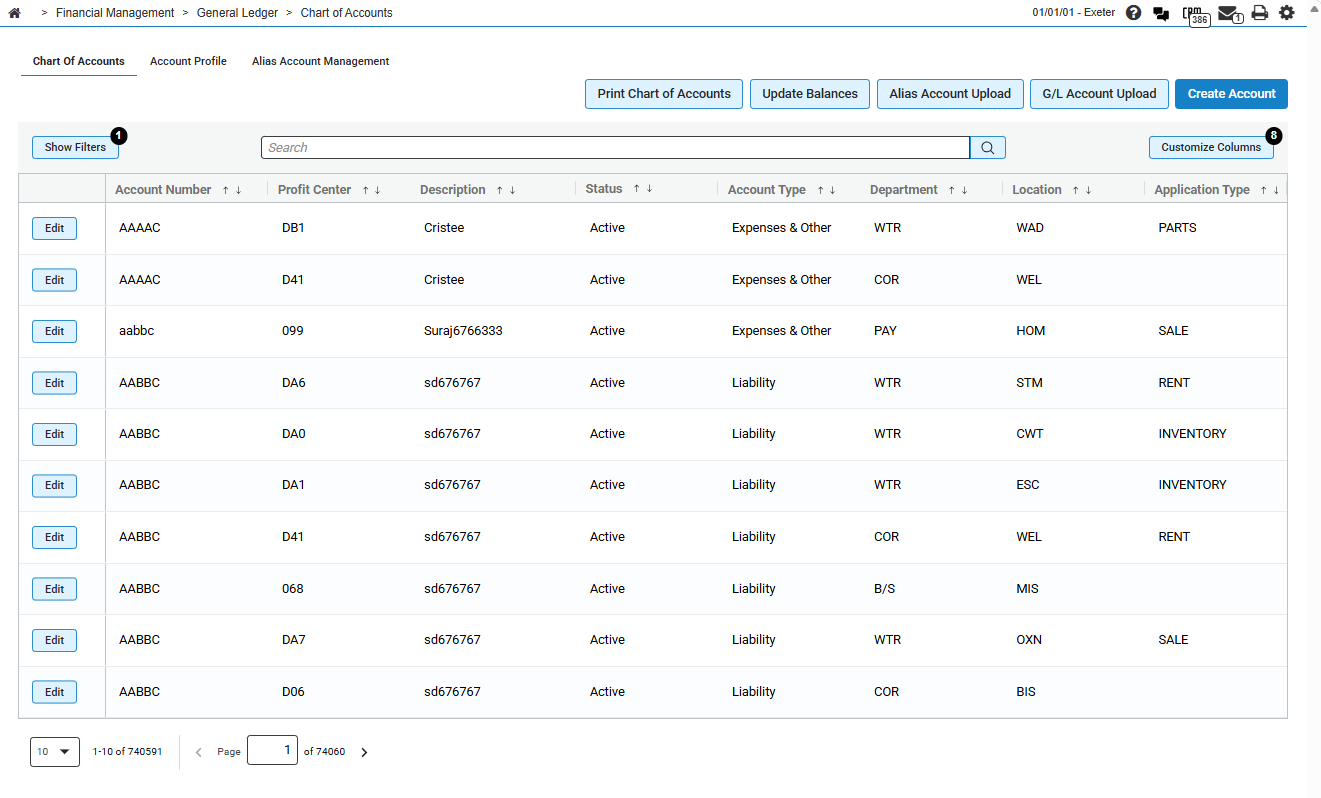
The fields on the Chart of Accounts screen are:
| Field | Description |
|---|---|
| Account Number | The base account number used when entering your chart of account numbers. |
| Profit Center | The department and location of the account. |
| Description | A brief description of the account. |
| Status | The status of the account. Can be one of: Active, or Inactive. |
| Account Type | Where the account shows on financial reports. |
| Department |
A department used for calculating KPI (Key Performance Indicators). |
| Location | The location group for the account. |
| Application Type |
Controls how the system functions when posting to certain general ledger accounts. Application subtypes for History and Equipment Inventory application types are set up on the History Sub-Type screen. |
Click the Edit button next to an account to open the Chart of Accounts Profile.
Click Show Filters to display the filters you can use to narrow down the search results. Click Hide Filters to close the filters.
Click Customize Columns to specify which columns are displayed or hidden. You can also drag and drop columns to change their presentation order.
Click Print Chart of Accounts to print a Chart of Accounts report (WFMGL02).
Click Update Balances to update the G/L account balances.
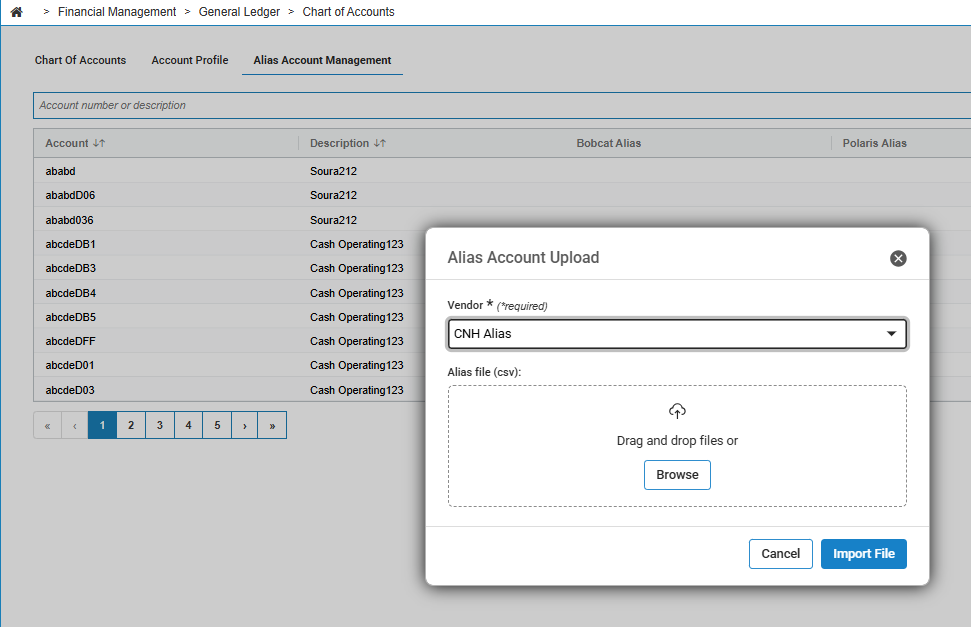
Click Alias Account Upload to open the Alias Account Upload screen and load OEM alias mappings from a CSV file.
Click G/L Account Upload to create a new G/L account by uploading the associated CSV file.
Note: The G/L Account Upload link appears only if the Access G/L Account Upload switch is activated on the Authorization List For Financial Management - General Ledger screen.
Click Create Account to open the Create Account Profile modal and add a new account.
Account Profile
Data Source: ACCMAST
Use the Account Profile tab to search for, create, and maintain account masters (base account numbers for your company). Accounts added here can be linked to profit centers on the Chart of Accounts tab.
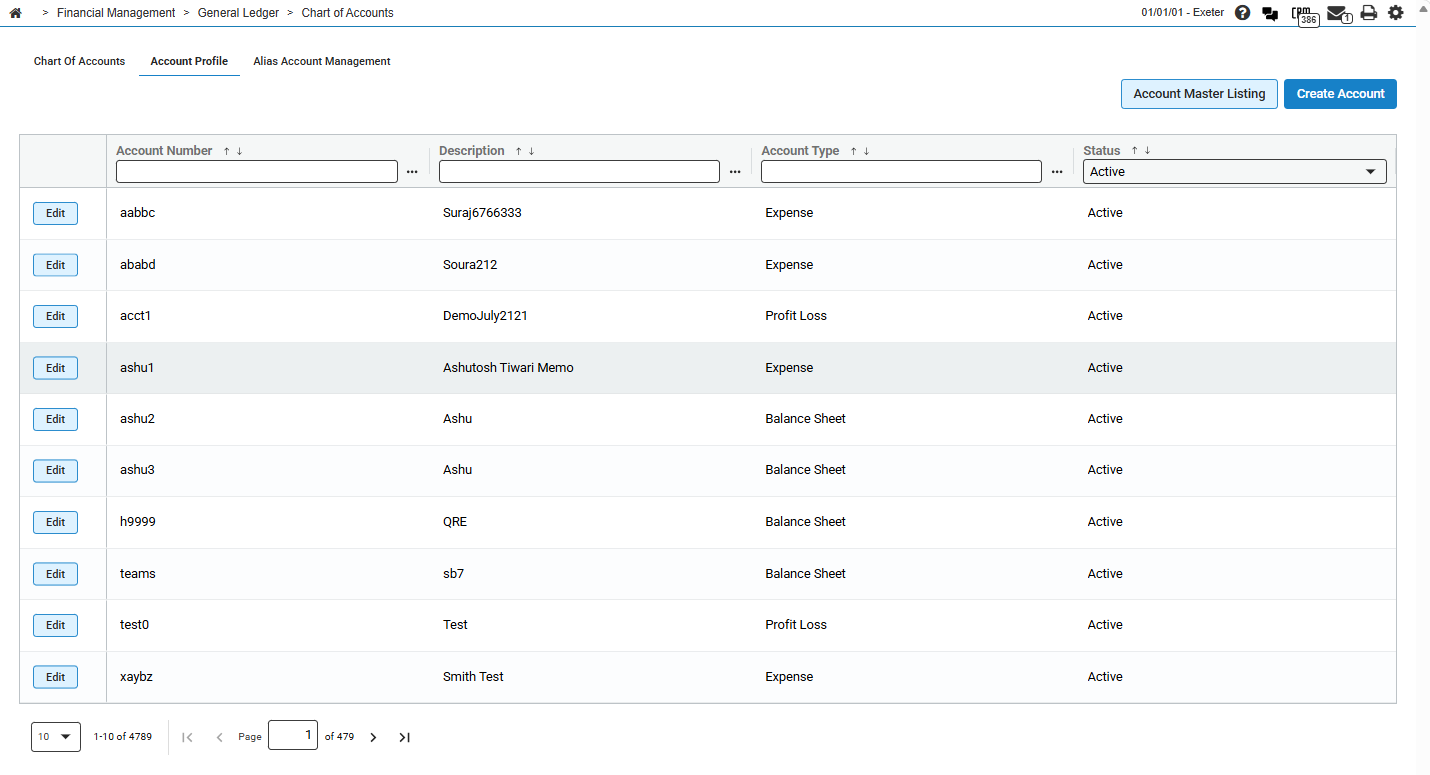
The fields on the Account Profile tab are:
| Field | Description |
|---|---|
| Account Number |
The base G/L account number for the account master. Filter defaults to Starts With. |
| Description | The account name. This name appears throughout the system and on reports where the G/L number is shown. |
| Account Type | Where the account appears on financial reports. Can be one of: Balance Sheet, Profit or Loss, or Expense. |
| Status |
Whether the account master is active or inactive. Can be one of: Active, or Inactive. The listing filter defaults to Active. |
Click the Edit button next to an account to open the Account Profile modal and update account master settings.
Use the column header filters to narrow the listing. The Account Number filter defaults to Starts With, and the Status filter defaults to Active.
Click Account Master Listing to run the Account Master Listing report (WCFGL02).
Click Create Account to open the Create New Account Profile modal and add a new account master.
Account Profile Modal
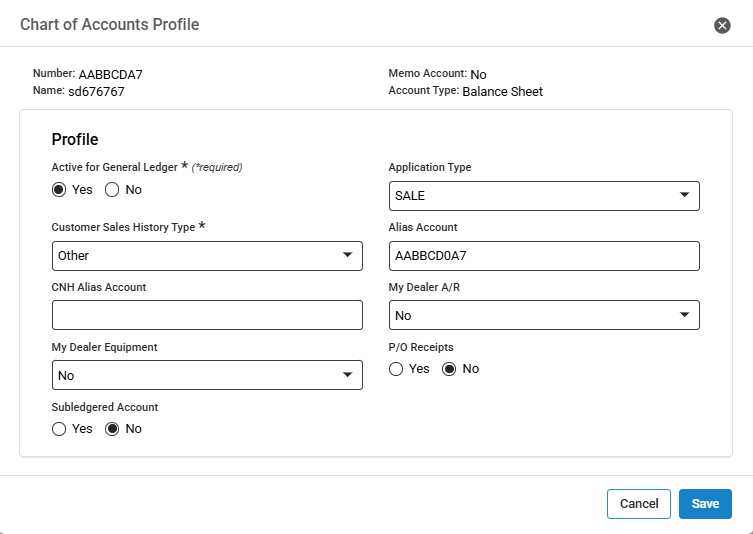
The modal fields when creating a new account are:
| Field | Description |
|---|---|
| Account Number |
The five-character G/L account number for the new account master. Required. The account number must be unique. If you enter a duplicate number, the system displays an inline error. |
| Name | The account name. Required. Up to 30 alphanumeric characters. |
| Type |
The account type. Required. Determines where the account appears on financial reports. Can be one of:
|
| Asset or Liability |
Indicates which side of the balance sheet the account appears on. Enabled and required only when Type is set to Balance Sheet. Not editable for other account types. |
| Subledgered Account |
Specifies whether this account is subledgered in the business system. The subledger is a detail listing of all items that reconcile to the total amount in that account. Select Yes or No. Defaults to No. Do not select Yes for accounts receivable or accounts payable accounts; those accounts have their own dedicated subledger systems. |
Click Save to create the account master and close the modal. Click Save & Create Another to create the account master and open a blank modal to add another account. Click Cancel to close the modal without saving.
The fields on the Account Profile modal (opened from Edit) are:
| Field | Description |
|---|---|
| Account Number | The base G/L account number. Display only. |
| Memo Account | Indicates whether this account is a memo account. Memo accounts print only on financial statements and do not affect the G/L balancing procedure. Display only. |
| Name | The account name. Required. Up to 30 alphanumeric characters. |
| Account Type | Where the account appears on financial reports. Can be one of: Balance Sheet, Profit or Loss, or Expense. |
| Asset or Liability |
Indicates which side of the balance sheet the account appears on. Enabled and required only when Account Type is set to Balance Sheet. Not editable for other account types. |
| Cash Type | The balance sheet cash type used on the Statement of Changes in Financial Position Preliminary report (DE1171). |
| Expense Type | Used for grouping similar account expense types to calculate Key Performance Indicators (KPIs) for the dealership. |
| Labor Type | The type of labor on this account. |
| Group Code |
The report grouping code assigned to the account. This code dictates the statement on which the account appears when you generate the Summarized Financials report. Enter a code directly, or click the lookup icon to search and select from the report grouping code list. Group codes are created and maintained on the Group Codes screen. |
| Active for General Ledger |
Controls whether the account is active for use within the general ledger system. Select Yes to activate or reactivate the account. Select No to deactivate the account. Note: If you deactivate an account, it still appears on financial reports for up to two years. |
| Code 1–4 | Ratio codes used to identify the account type for Financial Ratios generated in Management Central. An account can be coded with up to four separate codes. |
| Memo | Free-form notes for the account master. |
Click Save Account Profile to save your changes and close the modal. Click Cancel to close the modal without saving.
Note: Saving account profile changes requires the 999 - Configuration, General Ledger - Access G/L Accounts and 602 _General Ledger, Change Account security switches to be activated.
Alias Account Management
Data Source: COACMAST, COACALIS
Use the Alias Account Management tab to align IntelliDealer chart of accounts entries with the account numbers used by each OEM. Accurate alias mapping is required to transmit financial data to the OEM (for example, through the CNH Financial Transmit / Bobcat Financial Transmit screen).
The listing displays accounts from the chart of accounts for your company and division. You can edit OEM alias values for those accounts; you cannot create or delete chart of accounts records on this tab. Use the Chart of Accounts tab to maintain the chart itself, or use Alias Account Upload to load alias mappings from a CSV file.
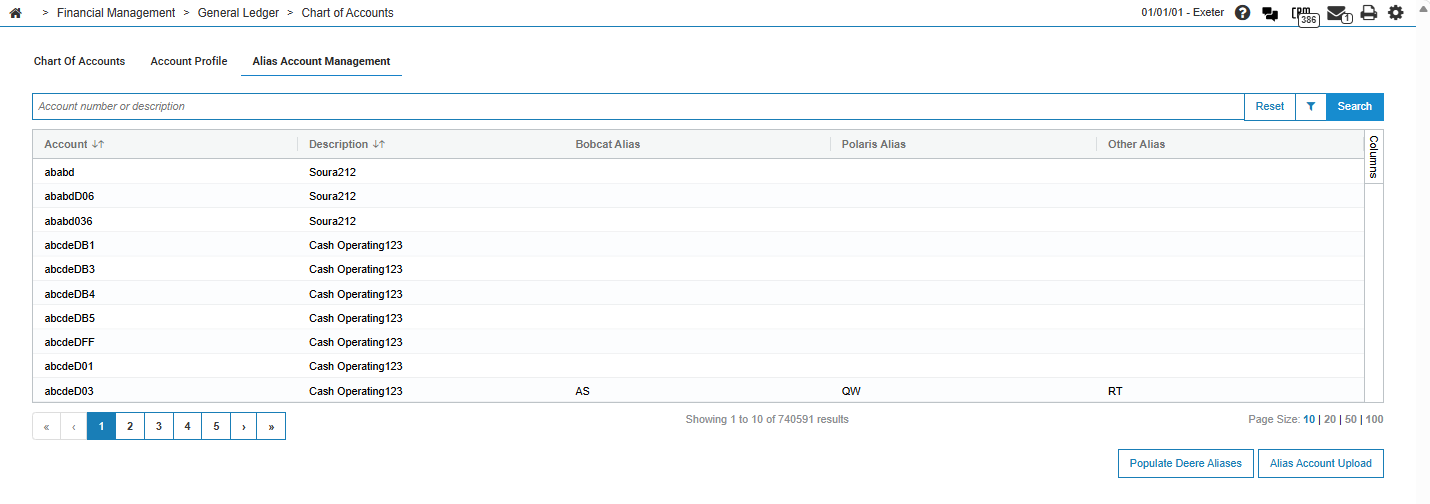
The fields on the Alias Account Management tab are:
| Field | Description |
|---|---|
| Account | The account number and cost center as they appear in the chart of accounts. This value is display only. |
| Description | The purpose of the account (for example, Petty Cash). This value is display only. |
|
Deere Alias CNH Alias Bobcat Alias Polaris Alias Other Alias |
The account number as it appears for each OEM. Edit these values to map the chart of accounts entry to the OEM chart. OEM columns appear based on available licensing:
|
Use these buttons to complete your work on the Alias Account Management screen:
| Button | Description |
|---|---|
| Populate Deere Aliases |
Updates all John Deere aliases with default values. This only updates values that do NOT already have John Deere alias values. IntelliDealer adds a "0" digit to aliases when needed to comply with a 9-digit maximum. This logic also adds a "0" in the second (or possibly third) position of the Profit Center section of the alias. For example:
If the Profit Center section is blank, the system generates an entry of "0000". |
| Alias Account Upload |
Opens the import dialog so you can select a vendor and a .csv file of OEM aliases. See Formatting CSV Files for Import. |
Formatting CSV Files for Import
Click Alias Account Upload to load OEM aliases from a CSV file for a vendor you select from the dropdown. The first row of the file is treated as a header and is skipped. Company and division are taken from your session; they are not columns in the import file.
Imported .csv files must be formatted as follows:
| Description | Maximum Length | Type | Example |
|---|---|---|---|
| IntelliDealer Account Number | 5 | Character | 32001 |
| IntelliDealer Cost Center | 3 | Character | 020 |
| Alias Account | Character |
Example entries for the Alias field are:
| Description | Maximum Length | Type | Example |
|---|---|---|---|
| Alias Account | John Deere - 9 | Character | 003210020 |
| Alias Account | CNH - 6 | Character | 522363 |
| Alias Account | Bobcat - 16 | Character | 85966342 |
| Alias Account | Polaris - 16 | Character | 48856 |
| Alias Account | Other - 16 | Character | 48856 |
Note: The CSV layout for Alias Account Upload from Chart of Accounts is different. That upload includes company, division, account name, cost center, account number, and alias columns. See Alias Account Upload for that format.
Data Source: COACMAST, COACALIS
Security: 602 - Financial Management - General Ledger
Revision: 2026.09