Description: How to take 2 (or more) types of payment for one invoice
Solution: Use deposit button (the deposit feature set up in configuration - parts - general - deposit)
Create invoice with one cash code
Example: Cash
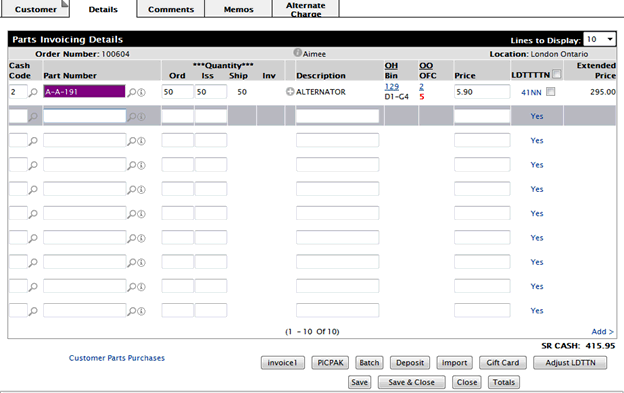
You will get 2 invoices - 1 for the deposit (credit card payment) and 1 for the remainder (cash payment)
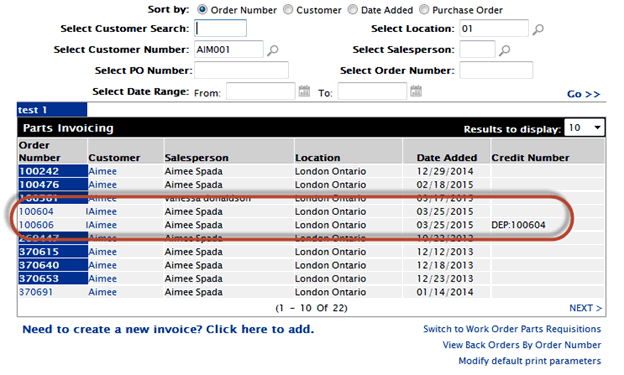
Parts Invoicing/Parts Invoice - By Customer Number/Work Order Parts Requisition/Work Order Parts Requisition - Back Orders by Work Order Number
Data Source: SALORD
Note: Invoices that are considered "complete" will only be listed on the following screens if the Sales Order Invoice History retention period is set to 0 in the RETNHIS table of the green screen application, the status of the invoice is A in the SOSTA field of the SALORD file, and any of the following is true:
- There is a detail line for the invoice in the SALDET file where the total quantity ordered is not equal to the total quantity issued (SDTORD ≠ SDTINV)
- There are no detail lines for the invoice in the SALDET file
- The customer PO number (CUPO) is "$STOCK$" and a detail line has an open PO (SDPO in PURORD)
- There is an outstanding deposit in the SALORD file (SORDA ≠ 0)
To open the Parts Invoicing screen, hover over the Product Support link from anywhere within IntelliDealer and select Parts> Parts Invoicing from the drop down list.
The Parts Invoicing screen allow you to view parts invoices, create a parts invoice, switch to work order parts requisition, confirm partial shipment of a parts invoice, view parts invoices by customer name and change default print parameters.
The following sorting options appear on the Parts Invoicing screen:
| Sort by | |
|---|---|
| Field | Description |
| Order Number | Sort the search results by order number. |
| Customer | Sort the search results by customer number. |
| Date Added | Sort the search results by the date the invoice was added. |
| Purchase Order | Sort the search results by purchase order. |
The following search fields appear on the Parts Invoicing screen:
| Field | Description |
|---|---|
| Select Customer Search | Search for parts invoices by entering a customer search word. |
| Select Customer Number | Search for parts invoices by entering a customer number. |
| Select PO Number | Search for part invoices by entering a purchase order number. |
| Select Date Range | Narrow down the parts invoice search results by selecting a date range. |
| Select Location | Search for part invoices by entering a branch location. |
| Select Salesperson | Search for part invoices by entering a salesperson. |
| Select Order Number | Search for part invoices by entering an order number. |
The following fields appear on the Part Invoicing screen:
| Field | Description |
|---|---|
| Order Number |
The order number associated with the parts invoice. Note: A reverse highlight on the order number indicates that a part, or parts, have been issued or reserved for this order but the order itself has not yet been invoiced. Note: An I at the end of an Order Number indicates that the order has been invoiced but not yet cleared by a billing run. Note: The characters INQ at the beginning of an order number indicates that the invoice is an Inquiry Invoice (INQ) |
| Customer | The customer number associated with the parts invoice. |
| Salesperson | The salesperson assigned or who created the parts invoice. |
| Location | The branch location of the parts invoice. |
| Date Added | The day the parts invoice was created. |
| PO Number |
The purchase order number on the parts invoice. Note: A PO number with the prefix "CRF" at the beginning of the PO Number indicates that a credit has occurred on the specific invoice and a credit reference number has been applied. |
Note: Field level-security assigned to your user profile (as defined on the Field - Work With Field Level Security screen) may change the appearance of or hide certain fields. For details, see the Field - Work With Field Level Security screen help topic.
Click or hover over an Order Number and select View/Edit from the pop up menu to open the Details tab.
Hover over an Order Number and select Ship Confirm from the pop up menu to confirm partial shipment of the parts on the invoice using the Ship Confirm Details tab.
Note: The Ship Confirm option will only appear if the Allow Ship Confirm switch is activated on the Authorization List For Product Support - Parts Invoicing screen
Click on a customer name on the Customer field to open the Customer Profile screen.
Click on the Need to create an invoice? Click here to add link to create an invoice.
Click on the Switch to work order parts requisitions link to switch to work order parts requisitions.
Click on the View by customer number link to view parts invoices by customer number.
Click on the Modify default print parameters link to modify default print parameters.
The Parts Invoicing - By Customer Number screen can be accessed from the Parts Invoicing screen by clicking on the View by Customer Number link.
The Parts Invoicing - By Customer Number screen allows you to view parts invoicing information by customer number, create a parts invoice, switch to work order parts requisition, view parts invoices by customer name and change default print parameters.
The following is a description of the search fields that appear on the Parts Invoicing screen:
| Field | Description |
|---|---|
| Select Customer Number | Search for parts invoices by entering a customer number. |
| Select Order Number | Search for part invoices by entering an order number. |
| Select Part Number | Search for part invoices by entering a part number. |
| Select Bin Location | Search for part invoices by entering a part's bin location. |
| Select Salesperson | Search for part invoices by entering a salesperson. |
| Select PO Number | Search for part invoices by entering a purchase order number. |
| Select Location | Search for part invoices by entering a branch location. |
The following is a description of the fields that appear on the Part Invoicing screen:
| Field | Description |
|---|---|
| Order Number |
The order number associated with the parts invoice. Note:
Note:
Note:
|
| Part Number | The number of the part on the corresponding invoice. |
| Description | A brief description of the part on the invoice. |
| Shipped | The number of parts shipped when the sales order is invoiced or shipping is confirmed. |
| Back Order | The number of parts on back order. |
| Bin | The bin number indicates the part's physical location. |
| PO Number |
The purchase order number on the parts invoice. Note:
|
Click on the Order Number field to open the Customer - Parts Invoicing Header tab to view or edit an invoice.
Click on the Need to create a new invoice? Click here to add link to create an invoice.
Click on the Switch to Work Order Parts Requisitions link to switch to work order parts requisitions.
Click on the Default View link to switch to the parts invoicing default view.
Click on the Modify default print parameters link to modify default print parameters.
The Work Order Parts Requisition screen can be accessed from the Parts Invoicing screen by clicking on the Switch to work order part requisition link.
Note:
The Switch to work order part requisition link will only appear if the Access Requisition security switch in system 823 is activated.
The Work Order Parts Requisition screen allow you to view work order parts requisitions, create work order parts requisitions, switch to parts invoicing, and change default print parameters.
The following is a description of the sorting option available on the Work Order Parts Requisition screen:
| Sort by | |
|---|---|
| Field | Description |
| Order Number | Sort the search results by order number. |
| Customer | Sort the search results by customer number. |
| Date Added | Sort the search results by the date the invoice was added. |
| Work Order | Sort the search results by work order number. |
The following is a description of the search fields that appear on the Work Order Parts Requisition screen:
| Field | Description |
|---|---|
| Select Customer Search | Search for work order requisitions by entering a customer search word. |
| Select Customer Number | Search for work order requisitions by entering a customer number. |
| Select W/O Number | Search for work order requisitions by entering a purchase order/work order number. |
| Select Date Range | Narrow down the work order requisitions search results by selecting a date range. |
| Select Location | Search for work order requisitions by entering a branch location. |
| Select Salesperson | Search for work order requisitions by entering a salesperson. |
| Select Order Number | Search for work order requisitions by entering an order number. |
| Include Adjustments | If selected, will include work order adjustments in the search results. |
The following fields appear on the Work Order Requisition screen:
| Field | Description |
|---|---|
| Order Number |
The order number associated with the work order requisition. Note: The characters INQ at the beginning of an order number indicates that the invoice is an Inquiry Invoice (INQ) Note: Reverse-highlighted order numbers denote that the selected item is an adjustment. |
| Customer | The customer name associated with the work order requisition. |
| Salesperson | The salesperson assigned or who created the work order requisition. |
| Location | The branch location of the work order requisition . |
| Date Added | The day the work order requisition was created. |
| WO Number |
The work order number associated with the work order requisition. Note: The characters INQ indicates that the invoice is an Inquiry Invoice (INQ) |
Click on the Order Number field to open the Details tab to view or edit an invoice.
Click on a customer name on the Customer field to open the Customer Profile screen.
Click on the Need to create a requisition? Click here to add link to create a parts requisition.
Click on the Switch to parts invoicing link to switch to parts invoicing.
Click on the View back orders by work order number link to view work order parts requisitions back order by work order number.
Click on the Modify default print parameters link to modify default print parameters.
The Work Order Parts Requisition - Back Orders by Work Order Number screen can be accessed from the Work Order Parts Requisition screen by clicking on the View Back Orders by Work Order Number link.
The Work Order Parts Requisition - Back Orders by Work Order Number screen allow you to view work order parts requisitions, create work order parts requisitions, switch to work order parts requisition and change default print parameters.
The following is a description of the search fields that appear on the Work Order Parts Requisition - Back Orders by Work Order Number screen:
| Field | Description |
|---|---|
| Select W/O Number | Search for work order requisitions by entering a work order number. |
| Select Order Number | Search for work order requisitions by entering an order number. |
| Select Part Number | Search for work order requisitions by entering a part number. |
| Select Bin Location | Search for work order requisitions by entering a bin location. |
| Select Salesperson | Search for work order requisitions by entering a salesperson. |
| Select PO Number | Search for work order requisitions by entering a purchase order number. |
| Select Location | Search for work order requisition by entering a branch location. |
The following is a description of the fields that appear on the Work Order Parts Requisition - Back Orders by Work Order Number screen:
| Field | Description |
|---|---|
| Order Number |
The order number associated with the work order requisition. Note:
Note:
Note:
|
| Part Number | The number of the part on the work order. |
| Description | A brief description of the part. |
| Shipped | The amount of parts shipped on the selected work order. |
| Back Order | The amount of parts on back order for the selected work order. |
| Bin | The bin location where the ordered part is located. |
| PO Number |
The work order number on the work order parts requisition. Note:
|
Click on the Order Number field to open the Details tab to view or edit an invoice.
Click on a customer name on the Customer field to open the Customer Profile screen.
Click on an Order Number to open the Work Order Parts Requisitions Details tab.
Click on the Need to create a requisition? Click here to add link to create a parts requisition.
Click on the Switch to parts invoicing link to switch to parts invoicing.
Click on the Default View link to switch to the parts requisition default view.
Click on the Modify default print parameters link to modify default print parameters.