Your Parts Inventory
The best way to handle parts inventory in service trucks is to treat them as consignment parts.
Setup each truck in customer master maintenance. Then in the Consignment system, add each truck customer number and the appropriate parts and quantities.
In order for this feature to work properly, the following conditions must apply:
- This feature applies only to sales order requisitions (not sales order invoicing).
- Negative quantities are ignored (and will not increase consignment).
- An error message will be issued if a part that is being keyed is not in consignment.
- No back ordering of parts is allowed
Steps To Follow
In IntelliDealer the consignment customer is set at the time the requisition is opened and CANNOT be removed afterward:
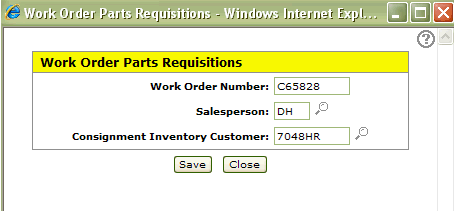
You can see that the ticket is for consignment on the details screen. All parts on this requisition will try to pull from the consignment listing for this customer so if a new part needs to be added that is not a consignment part, a new requisition must be opened. This process does not today handle the credits this same way.

To relieve inventory in green screen
To use this feature, enter C: followed by the consignment customer# in the FRT TERMS field on the sales order requisitions screen:
ZSO01 W/O PARTS REQUISITIONS 01 01 01 CHG
PARTIAL
CUS #: 0395229300 WAYNE LOWRY CURRENT: .00
ORD #: Q00005 R.R.# 1 31-60: .00
SALESMAN: WL KINCARDINE, ONTARIO 61-90: .00
N0G2G0 91-120: .00
SHIP TO: OVER120: .00
TOTAL: .00
FUT: .00
CR LIMIT: 0
PHONE: 519 3952293
P/O #: C66059 TAX1: 1 .07000 OPENED: 010899
SHIP VIA: TAX2: MODIFIED: 043099 B6
FRT TERMS: C:TRUCK001 TAX3»: SHIP CFM:
TAX4»: INVOICED: 111198
DISC: Q00005
Data Source: PARTMAST
To open the Your Parts Inventory screen, hover over the Product Support or Management Central links from anywhere within IntelliDealer and select Parts> Parts Profile from the drop down list.
The Your Parts Inventory screen allows you to view, edit, copy, check part availability, add a new part to the system or search for parts.
Note: When searching for a parts profile and only one profile entry is found, the system will automatically open the Parts Profile screen displaying the corresponding profile.
The following sorting options appear on the Your Parts Inventory screen:
| Field | Description |
|---|---|
| Part Number | Sort the search results by part number. |
| Vendor | Sort the search results by vendor number. |
| Source | Sort the search results by source code. |
| Class | Sort the search results by class. |
| Bin | Sort the search results by bin location. |
The following search fields appear on the Your Parts Inventory screen:
| Field | Description |
|---|---|
| Select Part Number |
Search for parts by entering a part number. Note: If the Include Cross Reference Parts In Parts Search switch is activated in the CMBR5 table, any parts that have been cross-referenced to the selected part will also be displayed in the search results. |
| Select Description | Search for parts by entering a part description. |
| Select Search | Search for parts by entering a search option. The search field is normally the key word that the part can be searched by. |
| Select Vendor Number | Search for parts by entering a vendor number. |
| Select Bin Location |
Search for parts by entering a part bin location. Note: Search results will always display the primary bin number even if a secondary bin number matches the selection criteria. |
| Select OFC | Search for parts by entering an OFC code. |
| Select Source | Search for parts by entering a source code. |
| Select Class | Search for parts by entering a class code. |
| Select Type | Search for parts by entering the associated type code. |
| Show Extended Information | If selected, includes extended information (machine description and model number) within the parts inventory search results. |
| Select Stocked | If selected, includes only parts that are in stock (parts with an On Hand value of at least 1) within the parts inventory search results. |
| Select Location | Search for parts by entering a specific branch location. |
 icon to search for parts using a
 The following fields appear on the Your Parts Inventory screen:
| Field | Description |
|---|---|
| Part Number | The part number(s) that best represent the search criteria entered in the search fields above. |
| Description |
A brief description of the part. Note: If the Include Cross Reference Parts In Parts Search switch is activated in the CMBR5 table, this field will appear highlighted for any parts that have a cross referenced part (as specified on the Cross Reference tab). Hover over the description to see the cross referenced part number. |
| Location | The branch location where the part is currently in stock. |
| Vendor | The vendor number for the supplier of this part. |
| Source |
The part's source of supply code. This typically represents the part's originating warehouse location. Note: Valid source of supply codes are configured and listed on the Source of Supply screen. |
| Class |
The class code of the selected part.In conjunction with the Type code, the class code is used to group similar parts together. Note: Valid class codes are configured and listed on the Classes screen. |
| Type |
The type code of the selected part. In conjunction with the Class code, the type code is used to group similar parts together. Note: Valid type codes are configured and listed on the Types screen. |
| Bin |
The bin number of the selected part, indicating its physical location. Note: If this field appears highlighted, alternate bins exist. Move the cursor over the Bin number to view alternate Bin location numbers. |
| On Hand | The on hand quantity of the selected part. This value includes any shipments that have been receipted as part of an inventory adjustment or purchase order, but does not include any parts sold since the last sales order billing run. |
| On Order | The quantity currently on order with the supplier. |
| OFC |
The order formula code for this part. This code determines the method to be used in computing the order quantity for a part. Note: For more information regarding order formula codes, see the Order Formula Codes Summary. |
Move the cursor over a Part Number and select View from the pop-up menu to view or edit a part.
Move the cursor over a Part Number and select Copy from the pop-up menu to copy a part.
Click a Vendor Name to open the Vendor Profile screen.
Click the Need to create a new part? Click here to add link to add a new part profile.
Click the Show parts availability link to show parts availability.
Click the Perform group files changes link to perform a group file change.