
Rental Counter
The Rental Counter screen allows you to view rental contracts, add rental contracts, add reservations or requests or modify print parameters.
To open the Rental Counter screen, from anywhere within IntelliDealer, navigate to Product Support > Rental > Rental Counter.
Note: Field level-security assigned to your user profile (as defined on the Field - Work With Field Level Security screen) may change the appearance of or hide certain fields. For details, see Field - Work With Field Level Security.
Topics in this section are:
Creating a New Rental Contract
-
Navigate to Product Support > Rental > Rental Counter.
-
Click the Need to create a new contract? Click here to add link.
The Customer tab opens in a new browser window.
-
Enter the customer number in the Customer field, or click the Search
 icon to open the Your Customers screen in a new browser window and locate the appropriate customer.
The Customer tab refreshes and adds any customer information found in the customer's profile.
-
Fill in the Customer tab fields as required.
-
Click Save to record your customer information.
-
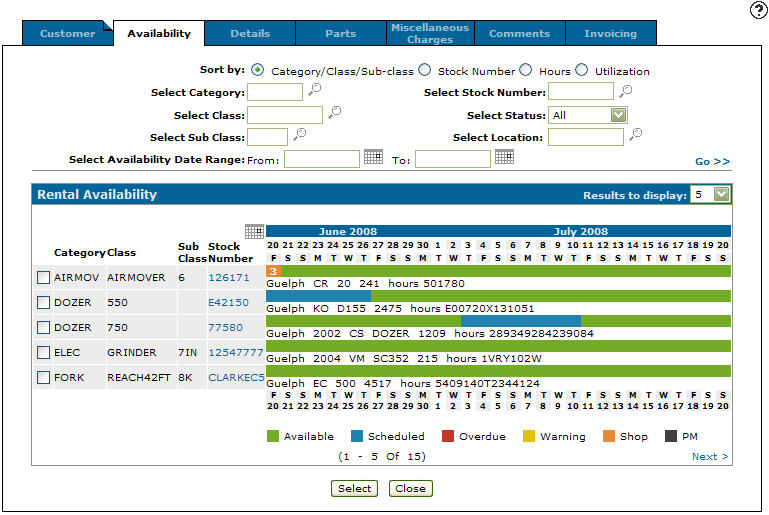
Click the Availability tab to continue entering contract information.
-
Identify the equipment you wish to check availability for by typing or searching for any combination of the Category, Class, Sub Class, Stock Number, Status or Location and the clicking the Go>> link to submit your search.
The Availability tab is updated with matching rental equipment and parts, showing their availability for rental.
Note: If you do not see the piece of equipment you are searching for, verify that the piece of rental equipment has been properly set up with a Category, Class, and Sub-Class in your system.
-
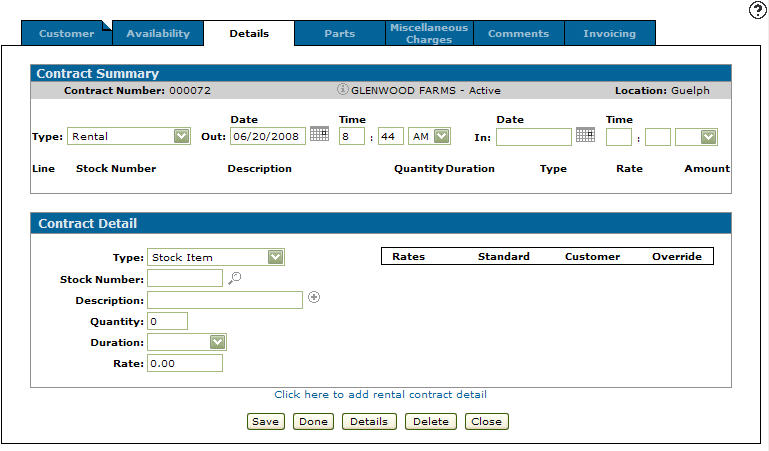
Begin the rental of a piece of equipment by selecting the corresponding checkbox and clicking the Select button.
The Details tab appears displaying a summary of the rental contract in the Contract Summary section and the details of the selected rental equipment in the Contract Details section.
-
Enter the Quantity (number of) and Duration (unit of measure) to describe the length of the intended rental.
-
Click Save to record your changes.
-
Click the Parts tab to continue entering contract information.
The Parts tab opens.
-
Enter the part number in the Part Number field, or click the Search
icon to open the Parts Search screen in a new browser window and locate the correct part.Note: Non-serialized parts may also be added to your rental contract in this way, however non-serialized parts need to be manually entered into your system using the Parts Master before you attempt to add them to any Rental Contract.
-
Click the Save button to save the part number and update the information fields with inventory and pricing information about the added part.
-
Review the updated information.
-
Add an additional part to this invoice in the next empty row, then click Save to keep your changes and continue.
-
Once all parts are added, click the Miscellaneous Charges tab to continue entering contract information.
The Miscellaneous Charges tab opens.
-
Enter the charge description in the Charge field, or click the Search
icon to open the Miscellaneous Charges search screen in a new browser window and locate the correct charge. -
Click Save to save the charge and update the information fields with inventory and pricing information about the added part.
-
Review the updated information.
-
Add additional charges to this invoice in the next empty row, then click Save to keep your changes and continue.
-
Click the Comments tab to continue entering contract information.
The Comments tab opens.
-
Enter any comments, concerns, directives that need to be added to the rental contract in either the Print on Contract/Invoice area, or the Internal Comments area.
-
Click the Save button to keep your changes and continue.
-
Click the A/R Agency tab to continue entering contract information.
The A/R Agency tab opens. The A/R Agency tab appears on the rental contract after the contract has been created.
The A/R Agency tab acquires account information from the customer's profile and displays that information in the appropriate fields. To allow these A/R accounts to be charged upon the completion of this contract an Authorization Number must be entered in the appropriate field.
-
Click the Authorize or Pre-Authorize button to continue.
Note: When dealing with a Farm Plan account; click the Authorize button and the Authorization Number is populated automatically. If it has not been approved, then Farm Plan needs to be called for a verbal authorization number. Once you have received this number, type it into the Authorization Number field and click the Pre Authorize button to continue.
-
Click the Invoicing tab to continue entering contract information.
The Invoicing tab opens.
Once the rental transaction has been defined as a contract, the system assumes (by default) that one invoice is initially produced containing all charges that have been specified on the rental transaction.
If the rental equipment has not been returned by the end of the contract period, the system automatically produces another invoice by increasing the quantity of the duration.
In the case where invoices are to be issued at specific intervals in the rental period (for example, in a Rent-to-Purchase transaction), the user can specify in advance the number of days, months, or years to pass between invoices, as well as the number of invoices to be produced.
-
Review and update the information, if required.
-
You can complete your work on the invoice in many possible ways:
To: Do This: Preview the printable version of the invoice in another browser window. Click the Preview button. Print the invoice and exit. Click the Print Invoice button. Recalculate the number of invoices, the dates that the invoices are produced, and the charges that appear on each invoice. Click the Recalculate button. Display the line items, tax, sub-totals, and totals for the invoicing of this contract. Click the Totals button. Save any changes made without exiting the Invoicing screen. Click the Save button. Save any changes made and exit the Invoicing screen. Click the Save & Done button. Close the invoice without saving changes. Click the Close button. Once you have completed working on the Rental Contract you need to confirm delivery information and if necessary, create a Traffic Ticket to indicate proper delivery and receipt of the rental equipment and parts.
 The Rental Counter screen appears.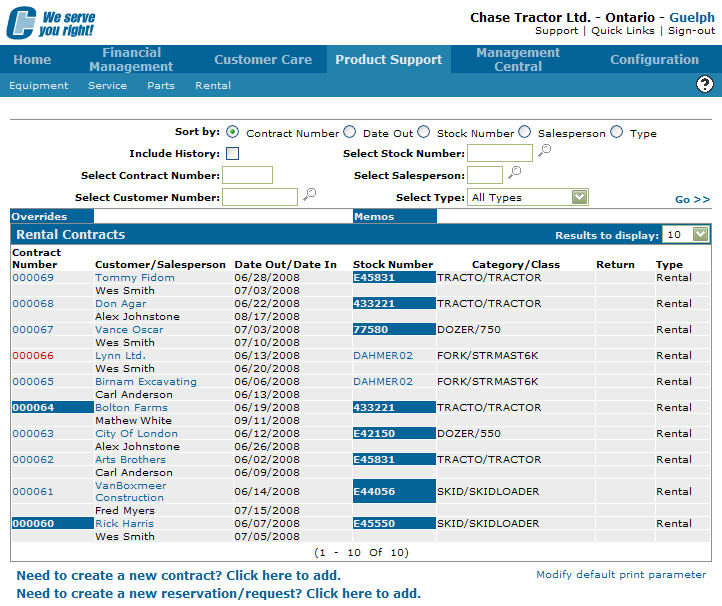
Screen Description
The sorting options on the Rental Counter screen are:
| Sort by | |
|---|---|
| Field | Description |
| Contract Number | Sort the search results by contract number. |
| Date Out | Sort the search results by date out. |
| Stock Number | Sort the search results by stock number. |
| Salesperson | Sort the search results by salesperson. |
| Type | Sort the search results by contract type. |
The search fields on the Rental Counter screen are:
| Field | Description |
|---|---|
| Include History | If selected, includes rental contract history within the rental contract search results. |
| Select Contract Number | Search for rental contracts by entering a contract number. |
| Select Customer Number | Search for rental contracts by entering a customer number. |
| Select Stock Number | Search for rental contracts by entering a stock number. |
| Select Salesperson | Search for rental contracts by entering a salesperson. |
| Select Job Site | Search for rental contracts by entering a job site location. |
| Select Category | Search for rental contracts by entering the category of the unit(s) on the contract. |
| Select Class | Search for rental contracts by entering the class of the unit(s) on the contract. |
| Select Subclass | Search for rental contracts by entering the subclass of the unit(s) on the contract. |
| Select Type | Search for rental contracts by selecting a contract type from the drop down list. |
| Select Location | Search for rental contracts by entering the branch location where the contract was created. |
Note: Rental contracts that have overrides are highlighted.
The fields on the Rental Counter screen are:
| Field | Description |
|---|---|
| Contract Number |
The rental contract number. Hover over the Contract number for the context menu to appear. Contract numbers with reverse highlighting indicate that the rental rates on the corresponding contract have been changed manually. |
| Customer/Salesperson |
The customer name or salesperson associated with the rental contract. If the contract was created for a miscellaneous customer, the name specified in the Ship To field on the Customer tab of the contract will appear. |
| Date Out/Date In |
The date the unit was rented. The date the unit is due to be back. |
|
Stock Number / VESign Status |
The rental unit stock number. Stock Numbers with reverse highlight indicate that the stock number's profile has memos attached to it. The signing status of the VESign document. Can be one of:
Note: OneSpan imposes a 120-day limit on quotes. You can send quotes for signature that expire after this time, however, the VESign will expire at 120 days, even though the quote is still active. |
| Category/Class/Job Site |
The rental unit's category and/or class. The rental unit's current job site location. |
| Return |
Whether the unit has been returned before its scheduled return date. If the rate has been set to hour usage, lines are set to Held (H), until the hours in is updated. Valid return codes include: R- Returned, O- Off Rent, E- Exchange, H- Hold Unit. An * beside a return code denotes that the unit is part of a multiple unit contract. |
| Type | The type of rental contract (e.g. rental, rent to purchase, reservation, request, demo rent, loaner or held). |
| Location | The branch location where the contract was originally created. |
Move the cursor over a Contract Number and select one of these options from the pop-up menu:
-
Edit—to edit a rental contract.
-
Print—to print a rental contract.
-
Close—to hard-close a rental contract. Hard-closing a rental contract deletes the contract and any open invoices associated with the contract, regardless of whether there are pending invoices or unreturned units on the contract.
Note: You cannot hard-close a rental contract currently in use by another user.
-
Return—to return a rental contract using one of the rental return options Returned, Off Rent, Hold Unit, Exchanged, or Partial Return.
Click on a customer name from the Customer/Salesperson field to open the Customer Profile screen.
Click on a Stock Number to open the Equipment Profile screen.
Click on the Need to create a new contract? Click here to add link to create a new rental contract.
Click on the Need to create a new reservation/request? Click here to add link to add a reservation or a request.
Click on the Modify default print parameters link to modify default print parameters.
Click on the Reverse a Rental Invoice link to open the Reverse Sale screen to reverse a rental invoice.
Click on the Tethr It Now link to open the Tethr It interface.