Configuring MyDealer
This section provides procedures you can use to customize the appearance and functionality of MyDealer.
Topics in this section include:
See also: MyDealer: Configuring User Profiles.
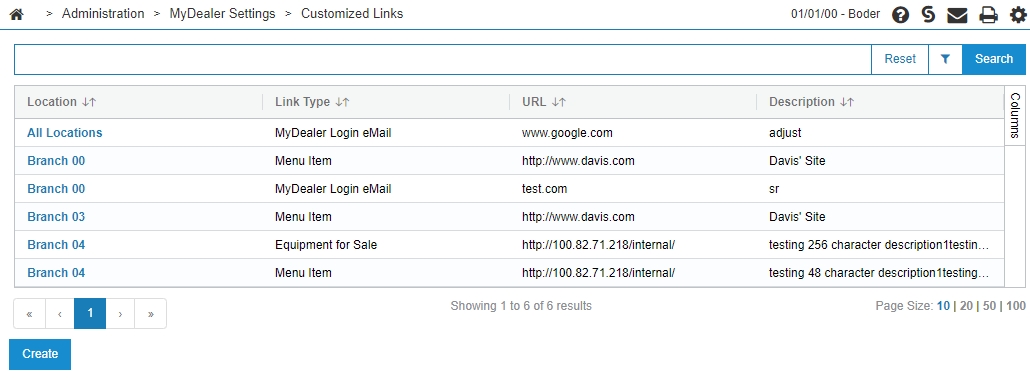
Create Customized Links
The MyDealer application allows you to direct users to proprietary websites using customized links configured in IntelliDealer.
Tip: It is necessary that you create a customized MyDealer Login link. This link is included in the Welcome email that is sent to all new MyDealer users added to the system. It's also used for password reset requests triggered by users of MyDealer.
-
From anywhere within IntelliDealer, navigate to Administration > MyDealer Settings> Customized Links.
-
Click Create.
-
Fill in the fields referring to the Customized Links table of parameters.
-
Click Save.
The link is applied immediately, however if there are users currently logged in to MyDealer, they may have to sign out and sign back in to see the change.

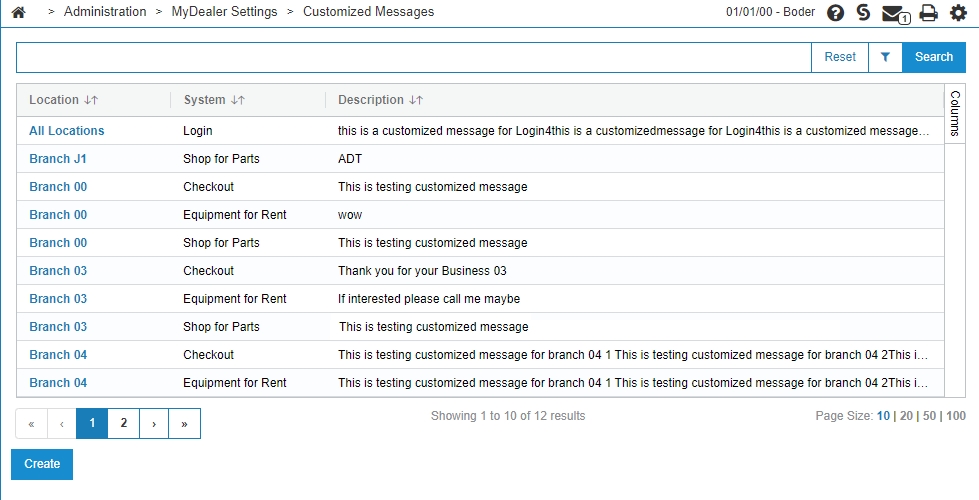
Create Customized Messages
You can create customized messages that appear on various screens in the MyDealer application.
-
From anywhere within IntelliDealer, navigate to Administration > MyDealer Settings> Customized Messages.
-
Click Create.
-
On the Add Customized Message screen, select the Location and the MyDealer System for which the message will apply.
-
In the Description field, enter the message as it will appear in the selected System.
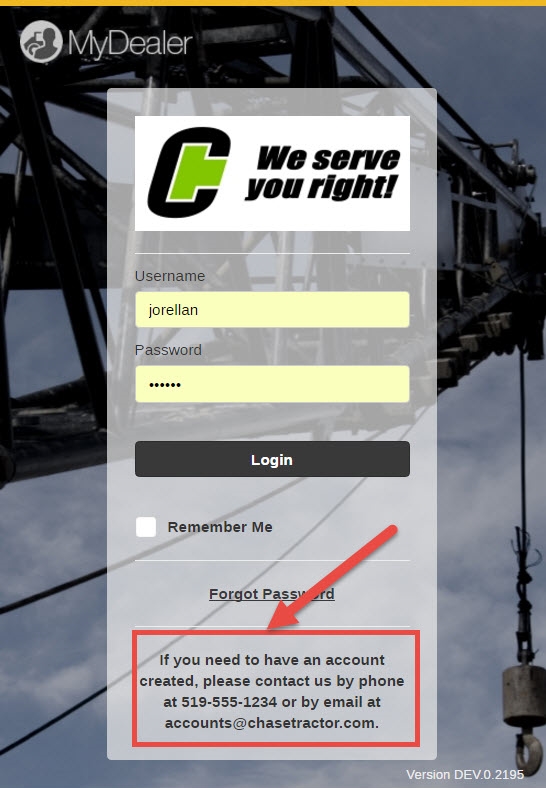
For example, it is recommended that you create a message for the Login screen that directs users to a phone number or email address they can contact to request a MyDealer account. -
Click Save after making your selections.
The message is applied immediately, however if there are users currently logged in to MyDealer, they may have to sign out before they see it in the application.

Configure the Appearance of MyDealer
MyDealer Web can be customized to match the branding of your dealership. The screens to be customized are:
| Screen | Description | Configured on... |
|---|---|---|
| Login | Displayed to the user when they first navigate to your site, it displays the log in dialog. This page is used by all locations. | Administration > MyDealer Settings> System |
| Home | Displayed to the user after successful log in. This page is specific to the location. | Administration > MyDealer Settings> System, then click the Location tab |
Tip: Use the login screen as centralized branding for all dealerships. Whereas the branding on the home screen can be used to identify to the user the specific dealership location they are accessing.
-
From anywhere within IntelliDealer, navigate to Administration > MyDealer Settings> System.
-
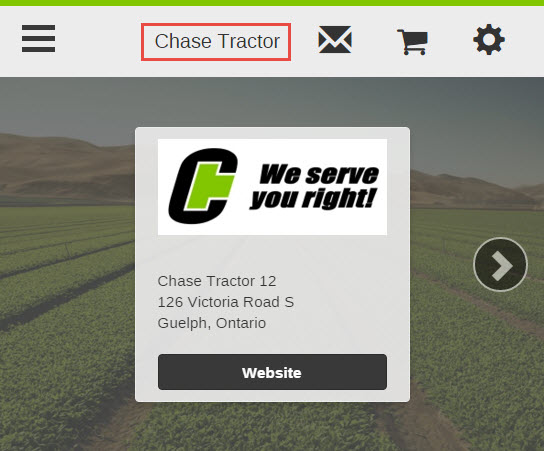
Enter the Dealership Name in the field provided.
The name entered in this field is what appears in the header of the application. -
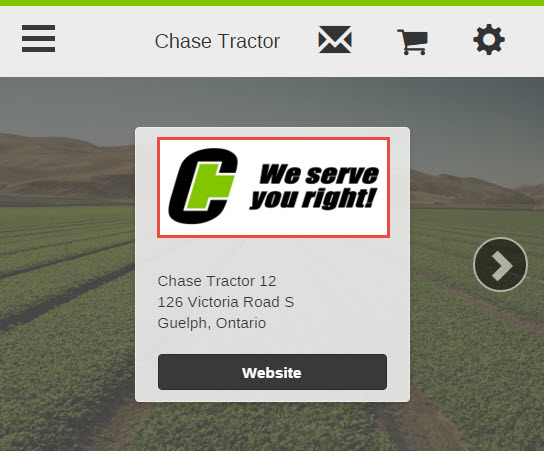
In the Dealership Logo field, click the Search icon to browse for a logo image to use in the application. This logo appears on the Log In screen of the application.
The recommended dimensions for the logo are 250x100px.
A preview of the selected logo image appears to the right of this field.
-
In the Dealership Logon Image field, click the Search icon to browse for an image to use in the application. This image appears as the background on the Log In screen of the application.
The recommended dimensions are 1366 x 768px with a resolution of at least 1080ppi. If the image is a different size, IntelliDealer will resize it to fit, keeping scaling correct, and adding white space if required.
-
In the Dealership Type field, select whether you want the background image of the application's Log In screen to feature an Agricultural photo (a picture of a green field), or a Construction photo (a picture of a construction unit).
-
In the Dealership Theme Color field, select the desired theme color; either Default (which is green), Yellow, Blue, Green, or Red.
This color is used for borders and highlighted menu options in the application.A preview of the selected theme color will appear to the right of this field.
-
Click Save, then click the Locations tab.
-
In the Dealership Logo field, click the Search icon to browse for a logo image to use in the application.
This logo appears on the Home screen of the application.The recommended dimensions for the logo are 250x100px.
-
In the Dealership Home Page Image field, click the Search icon to browse for an image to use in the application. This image appears as the background on the Home screen of the application.
The recommended dimensions are 1366 x 768px with a resolution of at least 1080ppi. If the image is a different size, IntelliDealer will resize it to fit, keeping scaling correct, and adding white space if required.
-
After making the desired selections, click Save.
The changes are applied immediately, however if there are users currently logged in to MyDealer, they may have to sign out before they can view the changes.
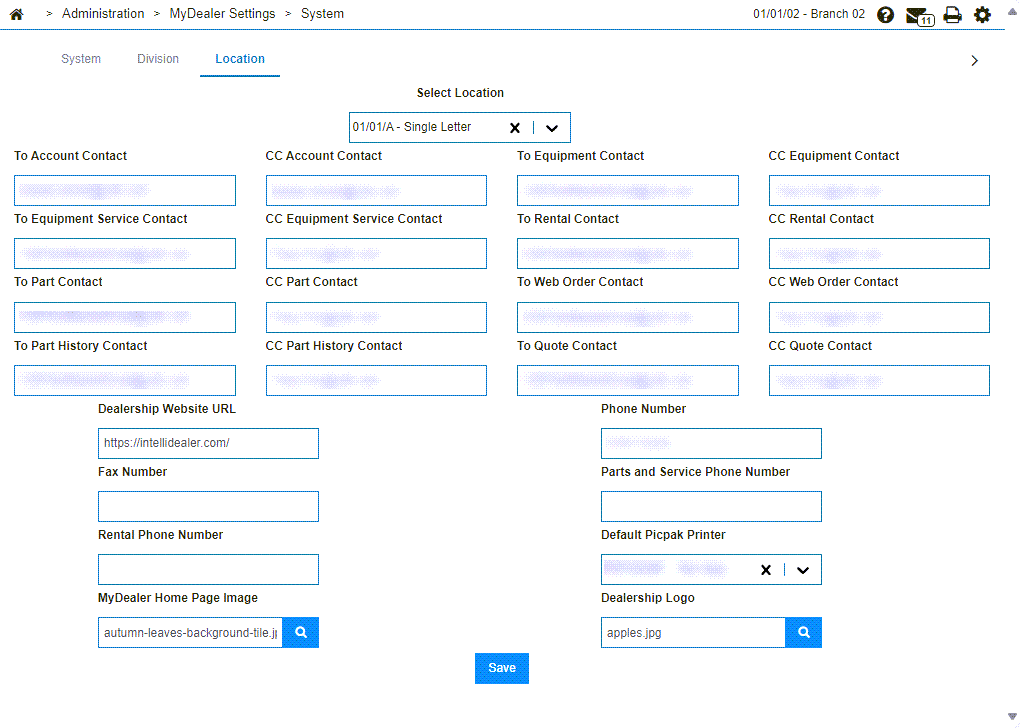
Configure Contact Information in MyDealer
Your dealership's contact information appears in several areas in MyDealer. Whenever a user generates an inquiry or order from the application, there is no option to manually enter the recipient. As such, you must configure the appropriate recipients and contact information on the MyDealer Settings screen.
-
From anywhere within IntelliDealer, navigate to Administration > MyDealer Settings> System then click the Location tab.
-
Fill in the fields as described in MyDealer Settings: Location tab.
-
After making your selections, click Save.
The contact information is applied immediately, however if there are users currently logged in to MyDealer they may have to sign out before they can view the changes.
Configure Customer-facing Alerts
If you are licensed for feature number 6518 and are currently using the Alert Management system at your dealership, all alerts received by the customer via email or SMS text message are presented on the My Alerts screen of the MyDealer application. The MyDealer Home screen also displays a notification of how many alerts the customer has received since their last MyDealer session.
Only External alerts are visible to customers using MyDealer. For details regarding alert types, please see the Alert Type Overview topic.
For details on how to configure customer-facing alerts, see the Alert Management Overview topic.
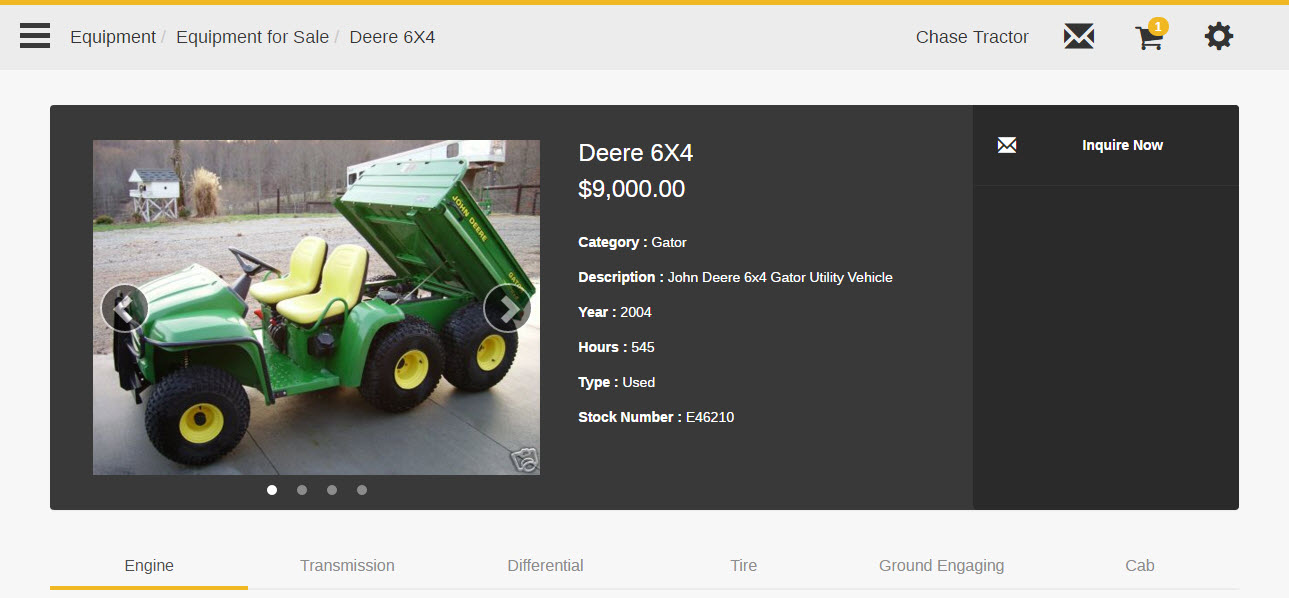
Select and Configure the Equipment Units to be Listed for Sale in MyDealer
For a unit to be listed on the Equipment for Sale screen in MyDealer, you must configure the settings for the desired unit on the MyDealer tab in IntelliDealer.
Note: Before you begin, you must activate the Access eSales and Modify eSales switches in security system 800.
For information regarding units that are listed in other modules of the application, see the Other Equipment Requirements section below.
-
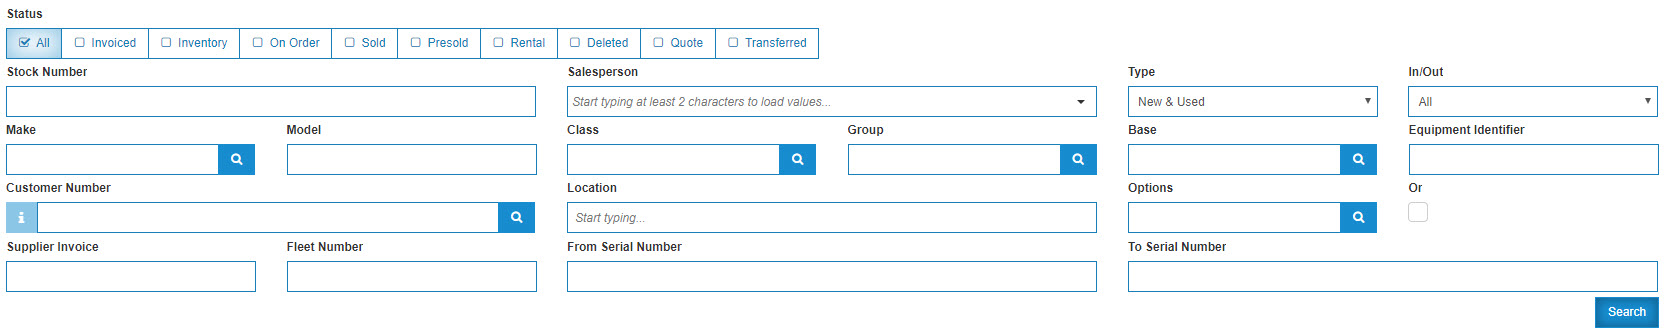
From anywhere within IntelliDealer, navigate to Product Support > Equipment> Equipment Profile .
-
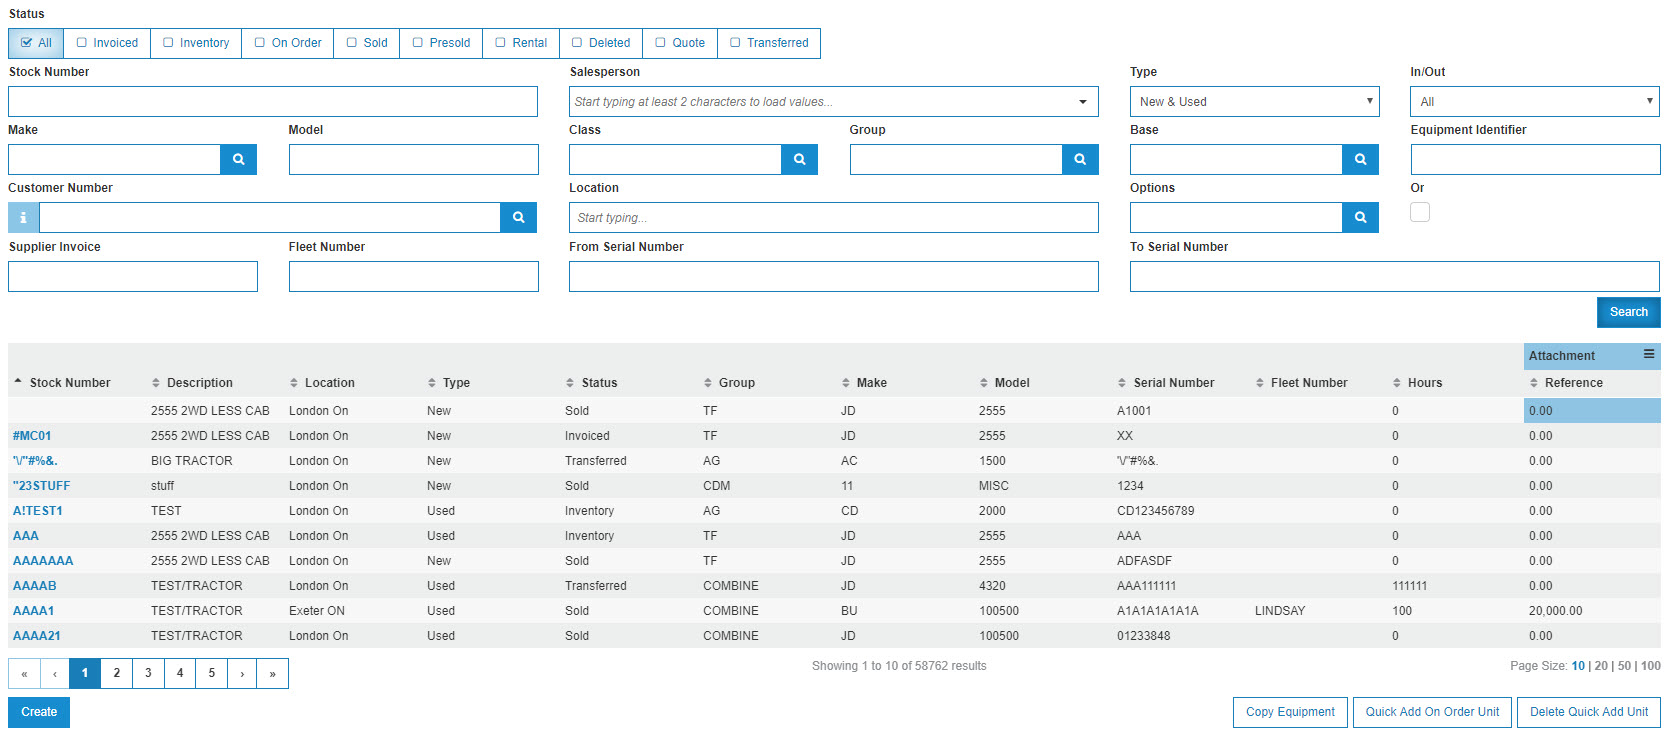
Use the search fields to locate the desired unit, then click Go. The screen refreshes, displaying the results.
Tip: Only units with a Status of Inventory, On Order, Sold or Rental can be listed in MyDealer. Click the checkbox next to these statuses to show only units that can be listed.
-
Select the desired Stock Number.
-
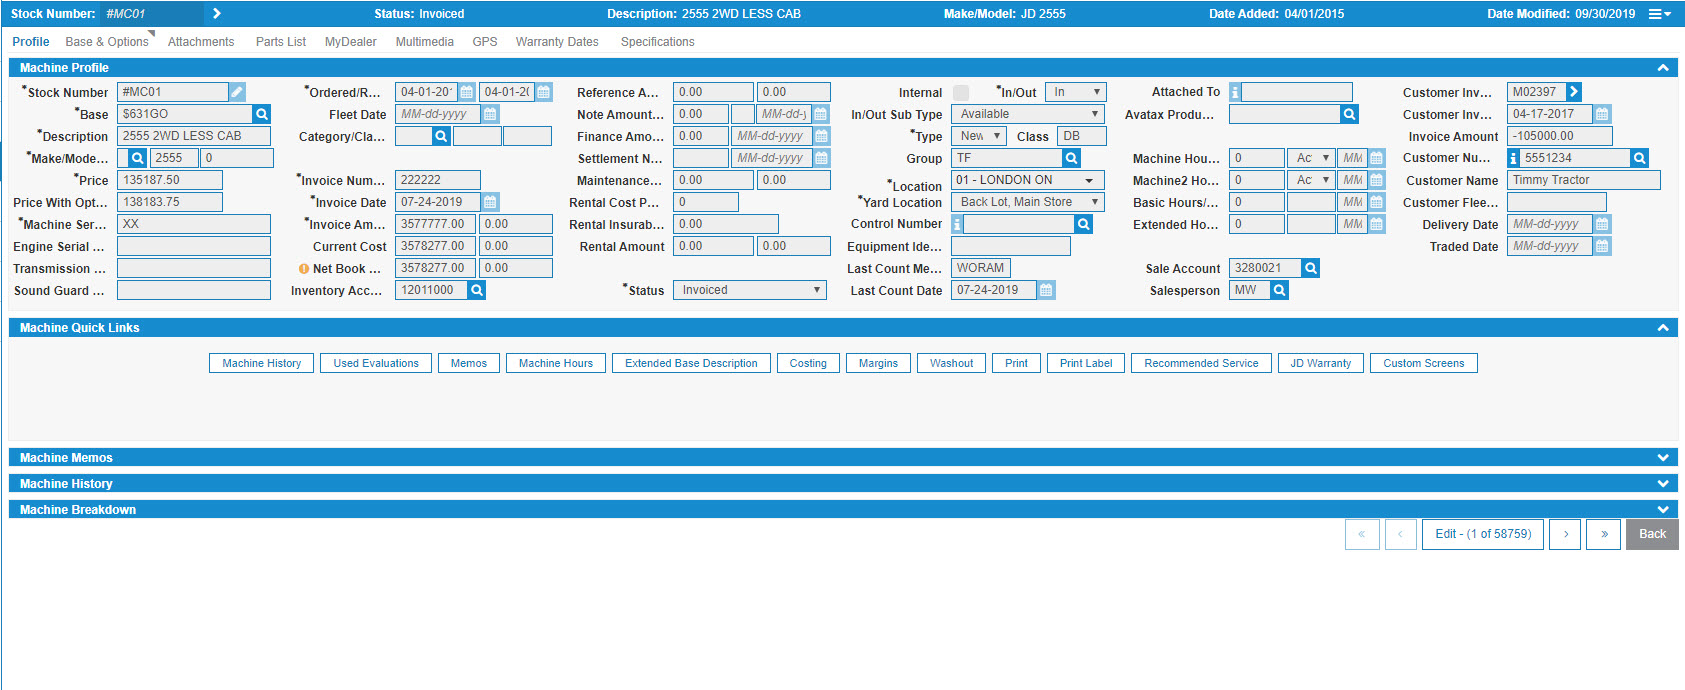
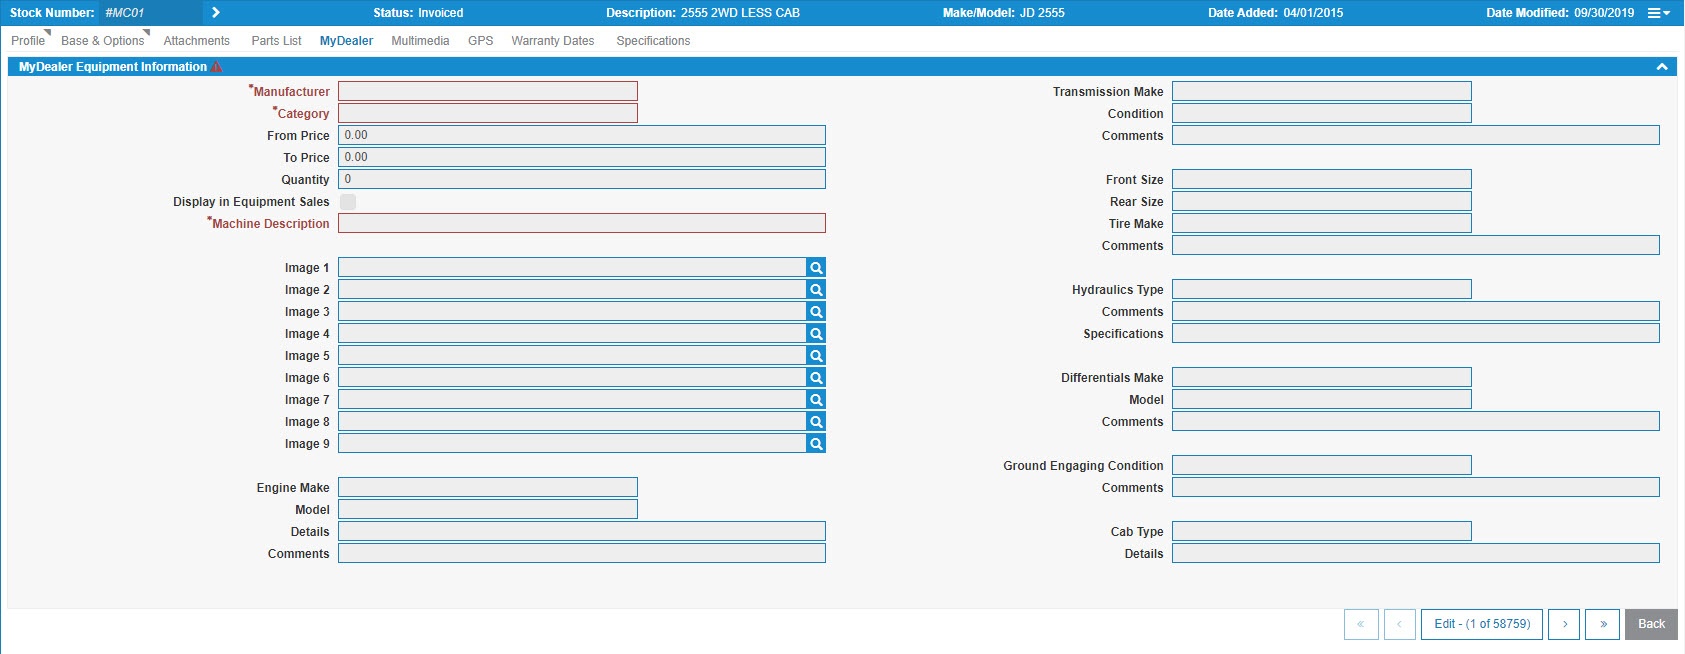
Click the MyDealer tab.
-
To open the Equipment for edit, click Edit at the bottom right.
-
Select the Display in Equipment Sales field, then enter the Category, Manufacturer, Machine Description and Price of the unit in the fields provided.
The Price displayed in MyDealer is the value entered in the Price Range From field. The Price Range To field is only used for IntelliDealer.
The Quantity field has no effect in MyDealer and is used only for IntelliDealer.
-
In the Images fields, select the photos you want to associate to the selected unit.
The first image selected appears in MyDealer on the Equipment for Sale listing screen, and the remaining images are added to the carousel displayed on the Equipment Details screen.
-
In the remaining sections of the MyDealer tab enter any additional details you want to display about the selected machine component. If you do not enter any information, the component is not displayed in MyDealer.
-
Click Save.
The unit is added to the Equipment for Sale listing screen in MyDealer.
Other Equipment Requirements
To properly display units in the My Equipment, My Rentals and Equipment for Rent modules in MyDealer, the following criteria must be met:
| Module | Requirements |
|---|---|
| My Equipment | Any equipment owned by the customer appears in the My Equipment module. |
| My Rentals |
Any rental contract detail lines associated to the customer where the following is true appear in the My Rentals module:
|
| Equipment for Rent |
Any units that meet these criteria are displayed in the Equipment for Rent module:
|
Feature: 7001
Security: 994 WebAdmin, Access MyDealer Settings, 800 Equipment Profile Access eSales and Modify eSales
Revision: 2024.11