Vendor Profile
The Vendor Profile screen allows you to view activity on a vendor's profile.
Note: This screen requires access to one or both of these external URLs: https://www.google.com/jsapi and https://www.gstatic.com/charts/loader.js. If the screen is not displaying correctly, it may be because the system has been denied access to the URL. Ensure that these URLs are unblocked or unfiltered in your organization’s firewall and web filtering devices.
Topics in this section are:
Adding a Vendor Profile
Prerequisites: Ensure that the vendor you are adding does not already exist in the system.
-
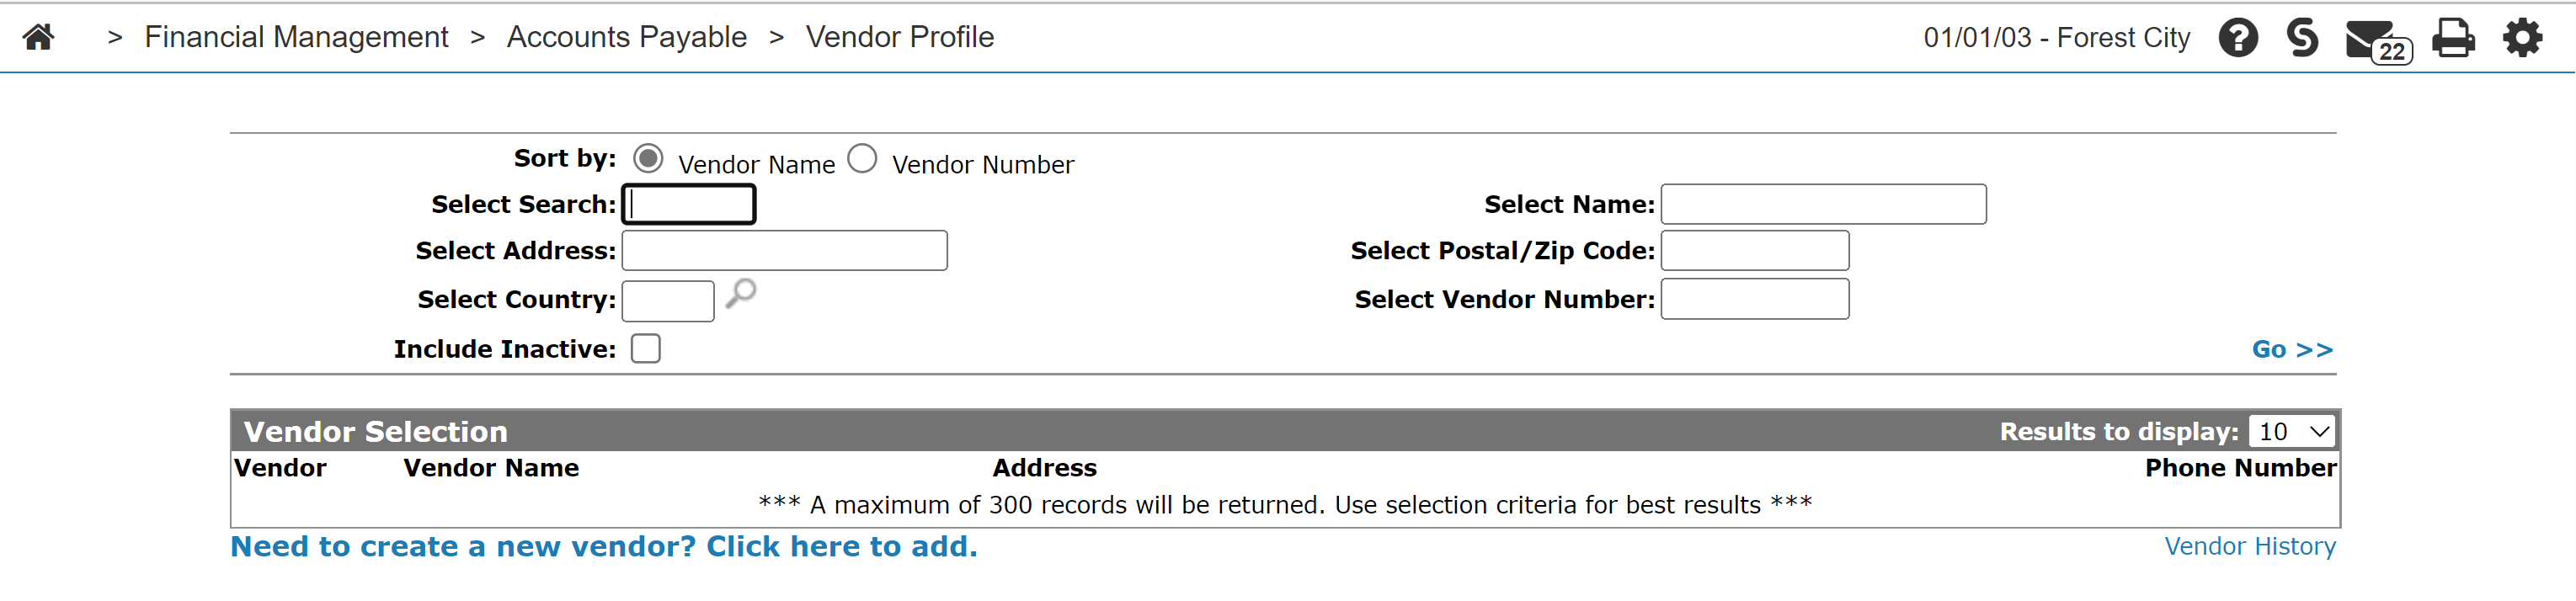
Navigate to Financial Management > Accounts Payable > Vendor Profile.
-
Click the Need to create a new vendor? Click here to add link.
-
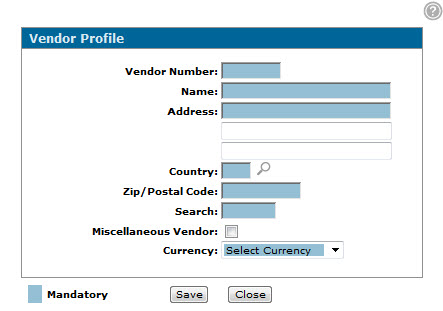
Fill in the fields, referring to the parameters table.
-
Click Save to store the vendor information in the database of A/P vendors.
The Vendor Profile screen appears.
Screen Description
Note: The fields displayed and the information displayed in them can change depending whether you are adding a new vendor or viewing an existing one, and based on your Field Security settings.
The fields the Vendor Profile screen are:
| Field | Description |
|---|---|
| Vendor Number |
The vendor number. Maximum of six alphanumeric characters. When creating a new Vendor Profile, you must enter a new Vendor Number into the system manually. VitalEdge recommends that your Vendor Number consist of 4 alpha followed by 2 numeric characters. For example, ABCD12. |
| Company Name |
The vendor's company name. Appears on printed checks. |
| Address |
The vendor's address. Appears on printed checks. |
| Country | The country where the vendor is located. |
| Zip/Postal Code | The vendor's zip/postal code. |
| Business Phone Number | The vendor's business phone number. |
| URL | The vendor's website address. |
| Search | Used to help locate a vendor when searching for a vendor, it is typically the first 5 characters of the vendor's name. |
| Miscellaneous Vendor | Denotes whether the selected vendor will be grouped with other vendors that have been marked as miscellaneous. |
| Currency |
The currency type the vendor accepts payments in. This may also cause a currency verbiage to be printed on the check, depending on the value loaded on the Currency screen. |
The Account Information section of the Vendor Profile screen allows you to view the selected vendor's account information activity.
Click Update/View Profile link to access the full profile screen and add or edit information on these tabs: Profile, Contacts, Cross Reference, Distribution, Memos, Payment Terms, Dealer, or Multimedia .
Click on the Search link to return to the Vendor Selection screen to screen the system for another vendor.
Click on the History link to open the Vendor History screen to view vendor history.
Click on the Fiscal History link to open the Fiscal History screen to view the vendor's fiscal history by year.
Click on the Calendar History link to open the Calendar History screen .
Click on the Multimedia link to open the Multimedia screen.
Click on the Custom Screens link to open the Custom Screen tab.
The Account Information section of the Vendor Profile screen displays yearly activity on the vendor's profile.
Click on the Total link to open the Accounts Payable - Outstanding Details screen.
Use these buttons to complete your work on the Vendor Profile screen:
| Button | Function |
|---|---|
| Back | Returns to the Vendor Selection screen. |
| Label | Opens the Select Print Parameters screen allowing you to print vendor labels. |