Creating a Work Order Quote
-
From any IntelliDealer screen, click on the Product Support tab.
The Product Support Quick Links screen will appear.
Product Support Quick Links screen
-
From the Service List, click the Work Order Quoting link.
The Work Order Quoting screen will appear.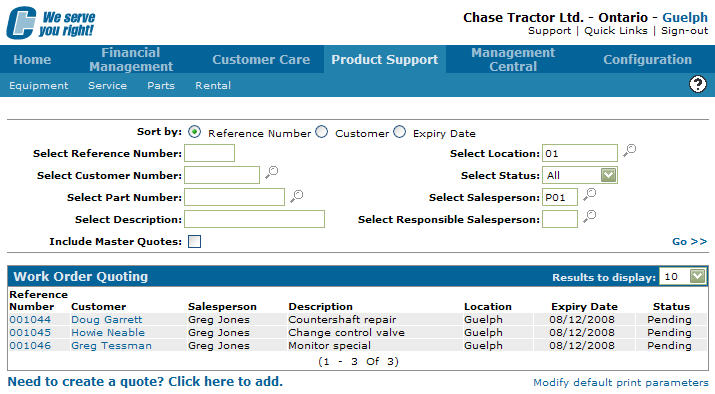
Work Order Quoting screen
-
On the Work Order Quoting screen, click on the Need to create a quote? Click here to add link.
The Customer Quote - Header tab will appear.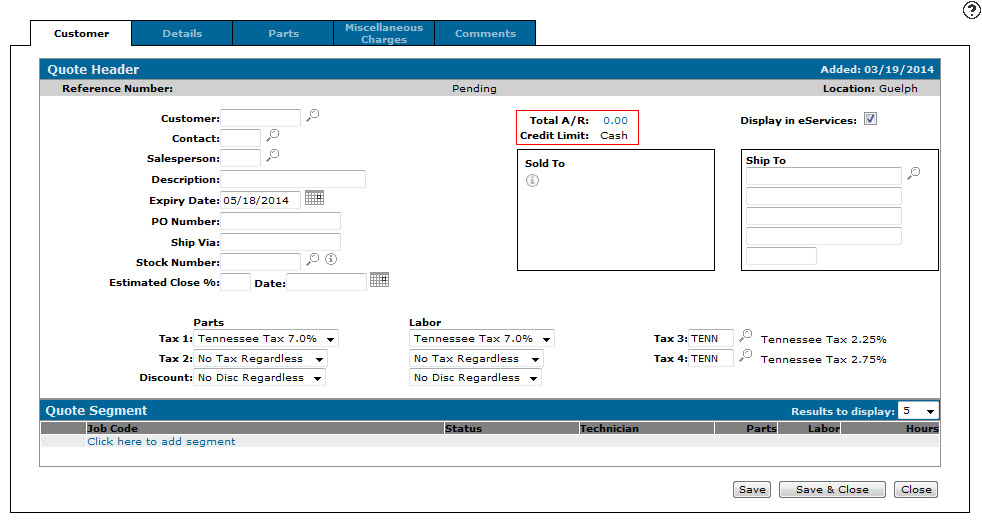
Customer Quote Header tab
-
On the Customer - Quote Header tab, enter a Customer number.
- or -
Click on the Search icon.
icon.
The Your Customers screen will appear.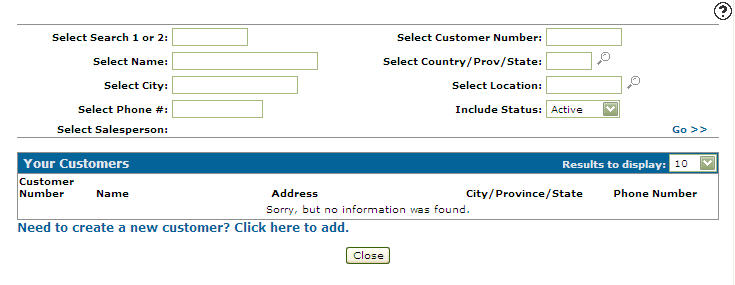
Your Customers screen
-
On the Your Customers screen, enter the search criteria and click the Go>> link to locate the desired customer.
-
Click on the desired customer name.
The Customer - Quote Header tab will appear with the selected customer number in the Customer field and the customer's Sold to address filled out.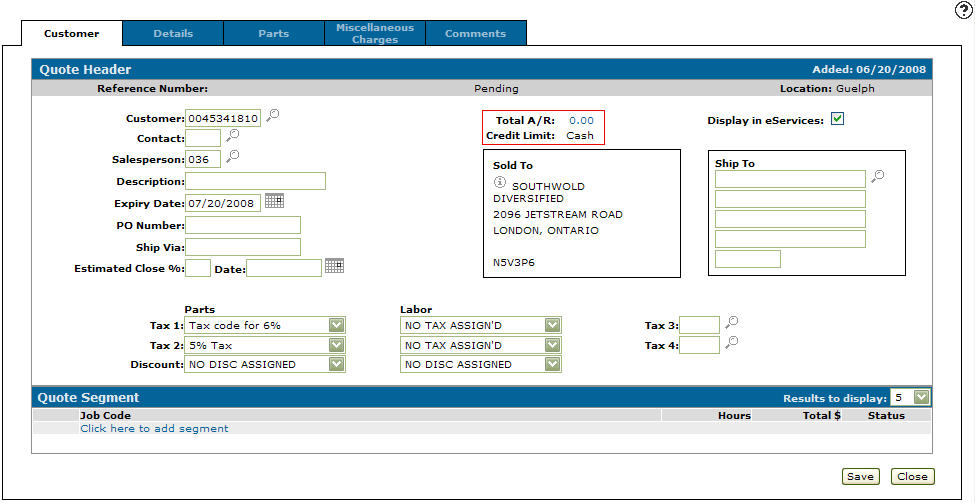
Customer - Quote Header tab
-
(OPTIONAL) On the Customer -Quote Header tab, enter a Contact number.
- or -
Click on the Search icon and select a Contact from the list.Note: If you enter a contact name in this field, it will be printed on the quote.
-
Enter a Salesperson ID.
- or -
Click on the Search icon and select a salesperson from the list.Note: This field may be automatically populated depending on the initially setup.
-
Enter a job Description.
Note: The Description field is used on the Work Order Quoting screen as a reference field and will not appear when the quote is printed.
-
Enter the Stock Number that the quote will apply to.
-or-
Click the Search icon and select a stock number from the list.Note: If the unit does not exist in the system a ? may be entered in this field, however you will then have to enter the machine Serial Number.
-
Click the Click here to add segment link.
- or -
Click the Detail tabs.
The Details tab will appear.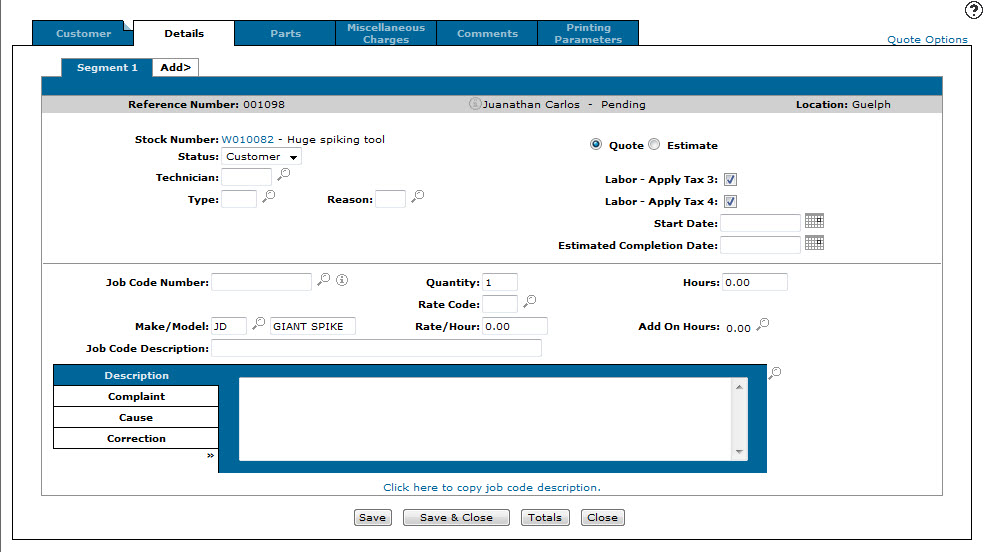
Details tab
-
On the Details tab, select the Status of the segment depending on the type of service work to be performed; either Customer, Internal, or Warranty.
-
In the Technician field, enter or select the technician ID you want to assign to the segment.
Note: A generic technician number can be used (CUST, WARR, INTER, etc.) instead of assigning a technician.
-
In the Type field, enter or select the type code for the segment.
Note: Valid type codes are listed and configured on the Types screen.
Note: This field may or may not be mandatory depending on the initial system set up.
-
In the Reason field, enter or select the reason code for the segment.
Note: Valid repair codes are listed and configured on the Reasons screen.
Note: This field may or may not be mandatory depending on the systems setup.
-
In the Quote/ Estimate fields, use the radio buttons to select whether or not the quote will be locked to the specified quote amount.
- Quotes are locked to the specified quote amount
- Estimates allow you to estimate the quote amount and does not lock the quote to the specified quote amount.
-
(OPTIONAL) In the Labor - Apply Tax 3 and Labor - Apply Tax 4 fields, select whether to apply the Tax 3 and Tax 4 codes selected on the Customer - Quote Header tab to the segment.
-
In the Start Date field, use the Calendar icon to select the start date for the service outlined on the segment.
Note: The start date selected must be the current date or any date after the current date and cannot be greater than the date entered in the Estimated Completion Date field.
-
In the Estimated Completion Date field, select the estimated completion date for the service outlined on the segment.
-
In the Job Code Number field, enter or select the job code number for the segment.
Note: In the absence of a job code number, NA (Not Applicable) can be used. You may also import individual or job codes using the Search icon next to this field.
-
In the Make/ Model fields, enter or select the machine make and model of the unit associated to the work order.
Note: These fields may already be populated based on the stock number selected for the quote on the Customer - Quote Header tab.
-
In the Rate Code field, enter or select a rate code for the segment.
Note: Valid rate codes are listed and configured on the Rates screen.
-
In the Rate/ Hour field, enter the labor rate per hour that will be charged for the service being performed on the segment. The value entered in this field will be multiplied by the value entered in the Hours field to determine the total quote amount.
If you do not enter a labor rate per hour in this field, the system will use a default labor rate based on your system settings.
Note: For more information about default labor rates, see the About Default Labor Rates topic.
-
In the Hours field, enter the estimated amount of hours that will be required to complete the service outlined on the segment.
-
(OPTIONAL) If you entered NA in the Job Code Number field, enter a brief description of the work to be performed in the Job Code Description field.
-
(OPTIONAL) In the Description, Complaint, Cause and Correction fields, enter a description of the service to be performed, the customer complaint associated to the service, the cause of the required service, and the potential corrective service that will be required.
- (OPTIONAL) If you think that additional hours may be required for the service outlined on the segment, click the Search icon next to the Add On Hours field to add additional service hours to the quote.
-
Complete the work order quote by adding additional quote information to the remaining tabs:
- Parts: Allows you to add parts to the quote that will be required for the service.
-
Part Number and Quantity fields: Enter the Part Number and desired Quantity. The system will automatically populate the remaining fields on the tab once the Save button is selected.
-
Price and Margin fields: Depending on user security, Prices and Margins can be manually adjusted after saving a quote. The system will automatically recalculate the price accordingly.
-
- Miscellaneous Charges: Allows the user to add miscellaneous charges to a quote. These charges are defined the Miscellaneous Charges/ Credit screen and can be a flat charge, percentage of parts, labor, or both.
If a Miscellaneous Charge is not setup with a standard price, the system will force the user to enter a price in the Price field.
- Comments :Allows additional comments and information to be added to the quote. The comments can be printed on the quote.
Depending on the options selected on the Printing Parameters tab, comments can be included when printed on the corresponding quote .
- Printing Parameters: Allows you to choose the options you wish to appear on the quote before printing.
- Parts: Allows you to add parts to the quote that will be required for the service.
-
Click the Save button to record your work order quote entry.
- or -
Click Close to exit the Details tab without saving any of the information.