Equipment Invoicing: Customer - Invoice Header
Use the Customer - Invoice Header tab to create an equipment invoice.
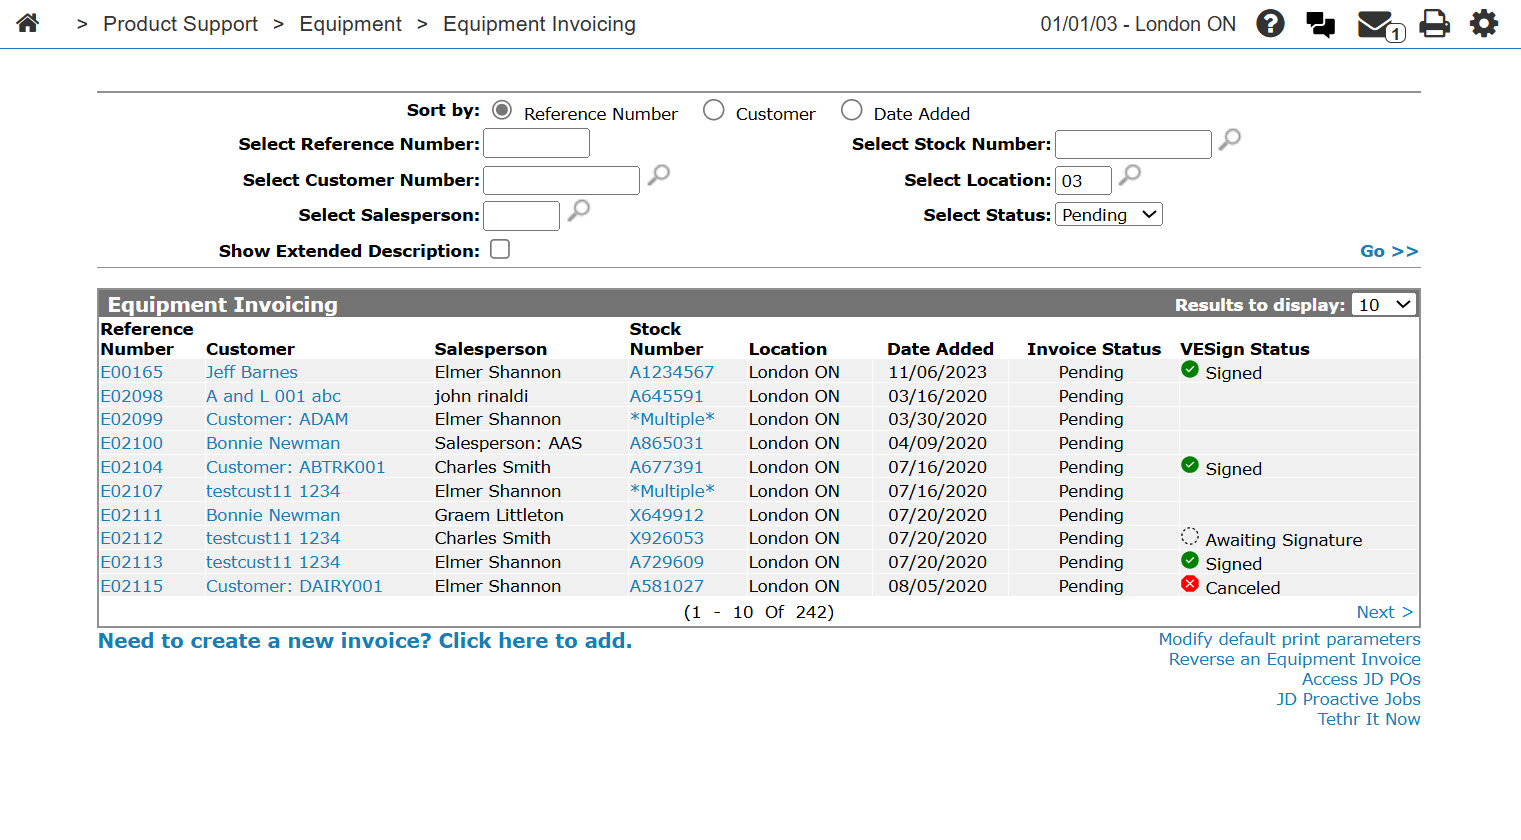
To open the Customer - Invoice Header tab, hover over a Reference Number on the Equipment Invoicing screen and select View from the pop-up menu, or click the Need to create a new invoice? Click here to add link.

Topics in this section are:
Important Notes about Discounts
General Information
-
Discounts on equipment invoices are only for parts and trade-ins, the discount will never apply to the unit being sold
-
Because the selected discount could potentially apply to both the parts and the trade-ins, the discount value that displays on an equipment invoice would be the final resulting value when combining the calculated parts and calculated trade-in discount values.
-
The Discount Exempt Value: table switch in the equipment invoicing table only allows you to select discount codes configured with alpha discount codes (which are generally exempt codes), this is the default discount code associated to sale line for the unit being sold (I'm not sure what the purpose of this is).
-
Confirmed that the GL account used for the discount for either parts or trade-ins on equipment invoices is the Equipment Invoicing Account in the DISCOUNTS table.
For Parts
-
When using a discount configured with type Subtract from Selling Amount, a discount line will show on the invoice with the discount amount.
-
When using a discount configured with type Add to Net Amount, the price of parts on the invoice will be modified and no discount line will show.
-
Selecting any discount seems to refresh the parts prices.
For Trade-Ins
-
Only discounts configured with type Subtract from Selling Amount have an affect on trade-ins.
-
The discount has to be added to the equipment invoice header after the trade-in is added for it to include the trade-in in the discount calculation.
-
Equipment invoicing table switch Discount Applied Before Trade-In: has to be unchecked for the discount to affect the trade-in.
Creating a New Equipment Invoice
-
Navigate to Product Support > Equipment > Equipment Invoicing.
-
Click the Need to create an invoice? Click here to add link.
-
Fill in the customer information, as required. You can either enter the required information, or click the Search
 icon to search for it. Enter data in these fields:
 -
Customer - the customer number. After entering or selecting a customer number, the Customer - Invoice Header tab refreshes. and adds any customer information found in the customer’s profile.
-
Contact - Optional. If a contact is selected, the printed invoice includes
Attention: <name of contact>. See Select Contact. -
Salesperson - The Salesperson field may have been filled in automatically, depending on your user and group settings.
-
PO Number - The PO Number field is optional only if the customer profile does not require a PO number be registered for all items invoiced to this customer.
-
Ship Via - Complete only if the shipping location is different than the Sold To location.
-
Discount - Select an option from the drop down list.
Note: Skip the Invoice Number field. An invoice number is automatically be assigned to this field (based on your system defaults) as soon as you save this invoice.
-
-
Click the Click here to add segment link.
- or -
Click on the Details tab -
Fill in the Equipment Invoicing Details, as required. You can either enter the required information, or click the Search
icon to search for it. Enter data in these fields: -
Stock Number—the equipment being invoiced. If the Equipment Profile for the stock includes existing attachments, then the Equipment Attachments screen opens. You must select an option for the attachment, one of:
-
Invoice—add to the invoice.
-
Add to Attachment Tab—Add it to the Attachments tab. This option is controlled by the user's authority to access the Attachments tab.
-
Detach—remove the attachment.
-
-
Price—the price being charged for the equipment.
-
Description—Optional. A description of the base equipment and its options. If you leave the Description field blank, the first line of the description logged in the equipment profile is automatically loaded when the segment is saved.
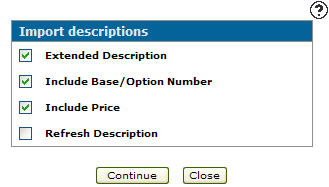
You can import description information by clicking the Import Descriptions link. The Import Descriptions screen appear in a new browser window, from which you may select the descriptions to import.
-
-
You can either navigate to the other tabs to add further details to the invoice, or use one of these buttons to complete your work on the invoice:
-
Save—creates the invoice.
-
Save & Close—creates the invoice and close the modal.
-
Add Deposit—If configured, allows you to collect a deposit on the invoice. See How to Collect a Deposit.
-
Close—closes the modal without saving, effectively canceling the invoice.
-


Screen Description
The Information fields on the Customer - Invoice Header tab are:
| Information | |
|---|---|
| Field | Description |
| Reference Number | The invoice reference number. |
| Status |
The current status of the invoice. Changes to Status can only be made in the Equipment Profile. |
| Location | The branch location of the invoice. |
The fields on the Customer - Invoice Header tab are:
| Field | Description |
|---|---|
| Customer |
The customer on the invoice. If security switch Show Notifications when utilizing Customer is enabled and the customer has notifications, a link appears below the customer. Click the link to see the notifications. See Customer Notifications. |
| Invoice Number | An alphanumeric invoice number (available only when adding a new invoice). |
| Contact |
A customer contact can be selected. If a contact is selected, the printed invoice includes Select the icon |
| Salesperson | The salesperson creating the invoice. This field defaults to the user's default salesperson ID. |
| Responsible |
The salesperson responsible for the invoice. This field is for informational purposes only, however it will be included on print-outs related to the invoice. Note: This field is mandatory if the Responsible Salesperson Required parameter is activated on the Invoicing screen. |
| PO Number | The customer-supplied PO number. |
| Ship Via | The carrier to be used to ship the item being quoted. |
| Discount | The default discount code for this invoice. The discount codes must be set up on the Discounts screen before they can be used. |
| Tax 1 |
Applies the selected Tax 1 code to the invoice. If this field is left blank, the Tax 1 code configured for the selected customer on the Customer Profile tab is used. Valid Tax 1 codes are listed and configured on the Tax 1 screen. |
| Tax 2 |
Applies the selected Tax 2 code to the invoice. If this field is left blank, the Tax 2 code configured for the selected customer on the Customer Profile tab is used. Valid Tax 2 codes are listed and configured on the Tax 2 screen. |
| Tax 3 |
Applies the selected Tax 3 code to the invoice. If this field is left blank, the Tax 3 code configured for the customer on the Customer Profile tab is used. Valid Tax 3 codes are listed and configured on the Tax 3 screen. |
| Tax 4 |
Applies the selected Tax 4 code to the invoice. If this field is left blank, the Tax 4 code configured for the customer on the Customer Profile tab is used. Valid Tax 4 codes are listed and configured on the Tax 4 screen. |
| Total A/R | The customer's current accounts receivable balance. |
| Credit Limit | The customer's credit limit as maintained in the customer's profile. |
| Available Credit |
The customer's current available credit as maintained in the customer's profile. Note: Feature 6178 AND activating special credit checks are required to see this field. Activate at Configuration > Miscellaneous > Other > System Settings > Location tab under Financial. |
| Sold to | The name and address of the customer the unit(s) is sold to. |
| Ship to | An
alternate address where the unit is to be shipped. This address defaults to the customer's main ship to address setup on the Ship to tab within Customer Profile. If
additional ship to addresses exist, a Search |
| Pricing Group |
The user can set a Pricing Group in the Customer Profile ship-to's. |
A maximum of 9,999 units, totaled between all segments, can be included in an invoice.
The fields in the Invoice Segment section of the Customer - Invoice Header tab are:
| Invoice Segment | |
|---|---|
| Field | Description |
| Stock Number | The inventory identification number or unit number of the unit you are quoting. |
| Description | The brief description of the unit. |
Use these buttons to complete your work on the Customer - Invoice Header tab:
| Button | Function |
|---|---|
| Delete |
Deletes the selected invoice. You cannot delete invoices that have been Released or Invoiced, nor can you delete invoices that have a deposit. You can verify whether the invoice has a deposit on the Details tab. |
| Save | Saves changes made on the Customer - Invoice Header tab. |
| Save & Close | Saves changes made on the Customer - Invoice Header tab and closes the invoice. |
| Completed Inspection(s) (Legacy) |
Opens completed inspections from the legacy inspection system for the equipment on this invoice. This button is available when InspectionPlus is enabled and completed inspections from the legacy (non-InspectionPlus) system exist for this invoice's equipment. |
| No Inspection (Legacy) |
Indicates that no inspections from the legacy inspection system are associated with the equipment on this invoice. This button is available when InspectionPlus is enabled and no legacy inspections exist for this invoice's equipment. |
| Link Inspections |
Opens the InspectionPlus Linked Inspections screen for this equipment invoice. Use this screen to link existing InspectionPlus inspection forms to the invoice or create and link new blank inspection forms. The Linked Inspections screen displays a Stock Number column when opened from an equipment invoice so you can see which stock number each linked inspection applies to. When the invoice has more than one stock number, IntelliDealer opens the Select Stock Number modal so that you can identify which stock number the inspection applies to. This button is available when InspectionPlus is enabled. Note: If any InspectionPlus forms linked to this invoice are still in progress, billing is locked and the in-progress forms must be resolved before the invoice can be released or billed. |
| Close | Closes the Customer - Invoice Header tab without saving changes and returns to the previous screen. |