IntelliTech Setup
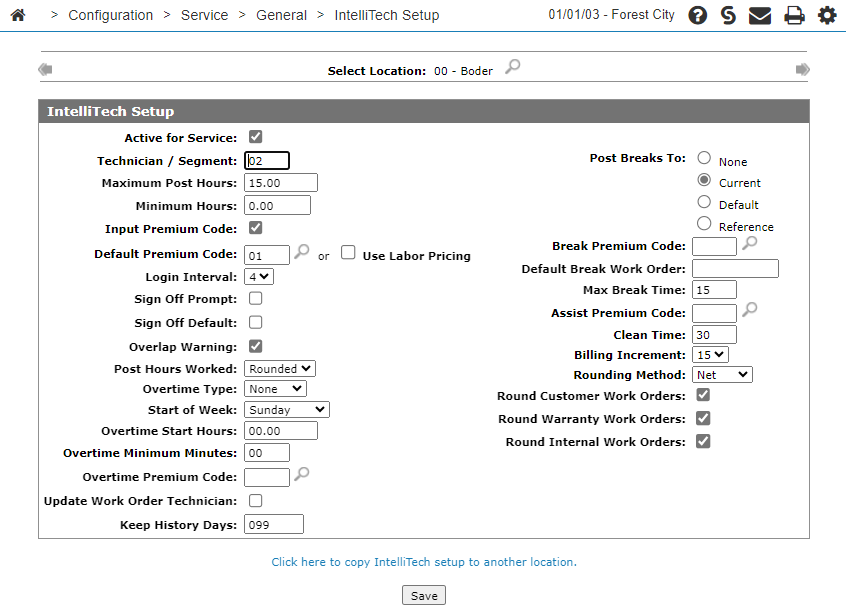
IntelliTech is a browser-based time logging and information system that streamlines processes for service technicians, enabling them to perform their job more effectively. You can use the IntelliTech Setup screen to configure IntelliTech functions.
Warning: Do not make changes to the IntelliTech Setup settings during regular business hours. Any changes should be made when there are no users or technicians logged in.
To open the IntelliTech Setup screen, from anywhere within IntelliDealer navigate to Configuration > Service > General > IntelliTech Setup.
Topics in this section include:
Setting up IntelliTech Functions
-
Navigate to Configuration > Service > General > IntelliTech Setup .
-
Verify the location and if necessary, search for and select the branch location you wish to set up.
You can use the Previous
 or Next
 buttons to scroll to the next location or back to a previous location.
 -
Update the configuration as required, referring to the table in the Screen Description
-
Click Save to save any changes or additions to the IntelliTech Setup screen.
Post-requisite: For each employee that will be using IntelliTech to log hours follow these instructions: Adding Users. For technicians set the Class to technician.
Setting up the Break, Lunch and End of Day Buttons
To show the Break button, the technician must have the Break button enabled via security switch 812 - Service IntelliTech, Access Breaks. On the IntelliTech Setup screen set:
-
Max Break Time to a value greater than zero.
-
Post Breaks To any value other than None. If Post Breaks To is set to Default, then you must set Default Break Work Order to the number of the Work Order set up to log breaks.
-
To show the Lunch and End of Day buttons set Clean Time to a value greater than zero.
Copying an IntelliTech Setup to Another Location
-
Click the Click here to copy IntelliTech Setup to another location link.
-
Click a Location.
The IntelliTech Setup screen appears displaying the copied parameters for the selected branch location.
-
Modify the parameters as required, referring to the table in the Screen Description, then click Save to apply the copied parameters to the selected location.
Adding Users
Every user who is expected to log their time to IntelliTech must be set up with an an Employee Profile and an IntelliDealer User ID .
The security required to perform this task is:
-
-
Access Maintain Users Profile
-
Access Maintain Users Security
-
-
604 Financial Management - Payroll
-
Profile - Access
-
Profile - Modify Employee
-
Profile - Access Service Information
-
Profile - Modify Service Information
-
-
-
CRM Access Profile
-
The steps are:
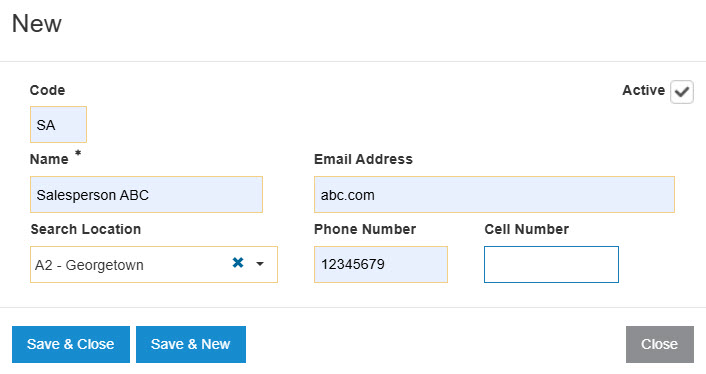
Setup a Salesperson ID
-
Navigate to Configuration > CRM > Profile > Salespeople.
The Salesperson screen opens.
-
Click Create.
-
Fill in the fields, then click Save.
Set up an Employee Profile
-
Navigate to Financial Management > Payroll > Employee Profile.
The Employee Profile screen opens.
-
Click the Click here to add an Employee.
-
Fill in the fields, then click Save.
Set up an IntelliDealer User ID
-
Setup a new user profile in IntelliDealer referring to Adding a New User to the IntelliDealer System.
-
Associate the salesperson ID and technician ID created in the previous steps with the new user.
Add User Security
-
Navigate to Administration > Settings > Security.
The User Groups screen opens.
-
Add the new user to an existing security group or create a new security group for this user.
The user setup is now complete. On the login page of IntelliDealer, the user can click the Forgot Password? link to receive an email prompting them to create a new password, thus allowing them access to IntelliDealer.
Screen Description
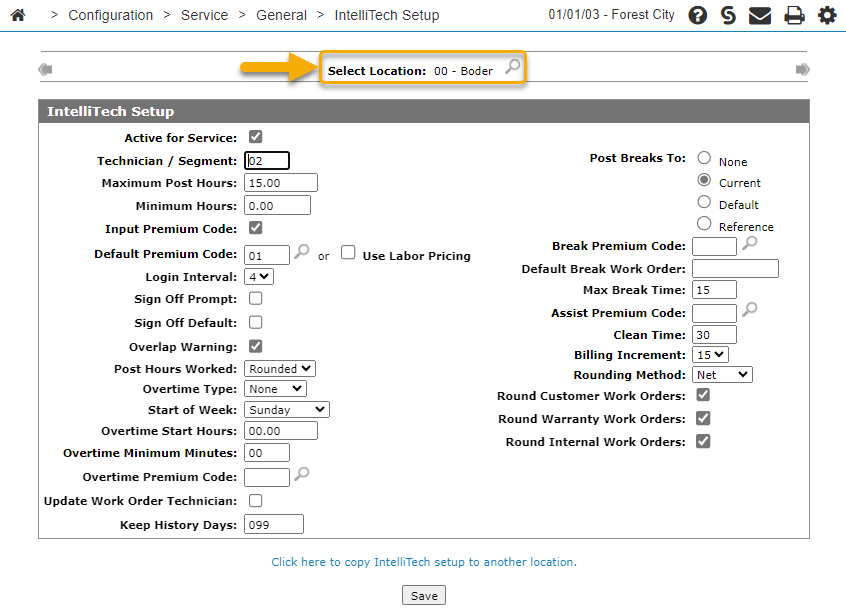
Use the Select Location search field to select the location you wish to configure. Click Previous or Next
 to scroll to the next location or back to a previous location.
The fields on the IntelliTech Setup screen are:
| Field | Description |
|---|---|
| Active for Service | If selected, the current location you are in is active for service, and technician labor posting will use the following IntelliTech configuration. |
| Technician / Segment | The number of technicians allowed to be signed on to a single segment of a work order at one time. |
| Maximum Post Hours |
The maximum post hours that a technician may be signed onto a work order for (from start to stop). If a technician’s hours run over the configured maximum, a message appears informing them that they cannot log off and a supervisor must close the labor transaction through the Product Support > Service > Supervisor screen, Labor In Progress tab. |
| Minimum Hours |
The minimum time that a technician must be logged into a work order before time is charged to a work order. Actual hours worked always post. |
| Input Premium Code | If selected, allows technicians to input the premium codes when they log off a work order. |
| Default Premium Code |
The default premium code when a technician is logging off a work order. If the Input Premium Code field is selected, the premium code configured here populates the Select Premium Code field on the Additional Information screen. The technician is free to select an alternate premium code. If this field is left blank, IntelliDealer will either determine the default or will prompt the user for the value. |
| Use Labor Pricing |
If selected, the system uses the premium code derived from the labor pricing system. If not selected, the system uses the Input Premium Code and Default Premium Code configuration. |
| Login Interval |
The number of grace minutes the system allows for when the technician logs onto the next work order. If it is within the value specified, the system will adjust the Log On time to the Log Out time of the previous transaction. For example, if the interval is 3 minutes and the technician logs out of a work order at 9:23. If they log onto the next work order/segment at 9:25 (2 minutes later), the system adjusts the start time from 9:25 to 9:23. Valid values are 1, 2, 3, or 4 minutes. |
| Overlap Warning | If selected, IntelliDealer displays a warning message on the supervisor display screen when the start and stop information overlaps one or more existing entries for a technician. |
| Post Hours Worked |
Whether the posted hours are the Actual hours worked, or if the hours are Rounded (see Rounding Method). |
| Overtime Type |
The granularity of overtime calculations. Options are: Weekly, Daily, or None (not calculated). This impacts IntelliTech and MobileTech scans only. Any adjustments must be made via the supervisor screen. Check with your local labor regulations when setting this value. See Setting up Technician Overtime in IntelliTech. |
| Start of Week |
Which day should be the first day of the pay week. IntelliDealer resets the overtime hours accumulator buckets on this day. |
| Overtime Start Hours |
The time when overtime hours calculation begins. Only used when Post Hours Worked is set to Actual. Enter minutes as fractions of an hour. For example, eight hours and 45 minutes is entered as |
| Overtime Minimum Minutes |
The minimum number of overtime minutes a technician must log before overtime starts to accumulate. Only used when Post Hours Worked is set to Actual. Entered as fractions of an hour. For example, 30 minutes is entered as |
| Overtime Premium Code | The Overtime Premium Code to be assigned to overtime transactions. See also Premium Codes. |
| Update Work Order Technician |
If selected, IntelliTech updates the work order repair technician number when a technician logs onto a work order not assigned to them. IntelliTech performs the update when the technician logs off the work order. Note: If the hours posted becomes zero because the scanned hours are less than the minimum, it will not update the technician field. |
| Keep History Days |
The number of days that the system will keep information before a purge is run. The recommended minimum is 30 days. |
| Post Breaks To |
Posts break time to the default work order. The technician must have the Break button enabled via security switch 812 - Service IntelliTech, Access Breaks. Options are:
|
| Break Premium Code |
The premium code to be assigned to the break transaction created. Note: The Break Premium Code must be unique and cannot be the same code used for regular or overtime hours. See W/O Premium Code G/L Defaults. |
| Default Break Work Order | If the Post Breaks To is set to Default, then you can specify the work order where all breaks will be posted to in this field. |
| Max Break Time |
The maximum amount of time (in minutes) a technician can take for their break. When a technician selects the Break button in IntelliTech, the break time countdown begins (shown in red). If the technician exceeds the maximum break time, the break time charged to the work order will be the value entered in the Max Break Time field. |
| Assist Premium Code |
The Assist Premium Code to be used on the transaction when a technician uses the ASSIST button in IntelliTech. |
| Clean Time |
The minutes value entered in this field are added to the technician's log out time when Lunch or End of Day is selected on the Logged On screen. The value must be between 0 and 30. Clean time allocates time for the technician to clean up the bay, wash hands, and so on before leaving for lunch or at the end of the day. Therefore if the clean up time is 5 minutes and the technician gets an hour lunch, they are expected to be logged out for up to 65 minutes. Note: A value must be entered for the Lunch and End of Day buttons to appear in IntelliTech. |
| Billing Increment |
The value to which technician hours are rounded as specified by the Rounding Method field. |
| Rounding Method |
How rounding occurs for technician hours posted to a work order. Options are:
The Overtime Type must be set to None when using either the On/Off or Net rounding methods. Regardless of the rounding method selected, rounding is never be applied to break time or assist hours. |
| Round Customer Work Orders/ Round Warranty Work Orders/ Round Internal Work Orders | If selected, applies the rounding method configured above to the selected work order types. |
Select the Click here to copy IntelliTech Setup to another location link to copy IntelliTech Setup to another location.
Click Save to save your changes to the IntelliTech Setup screen.