Technician Service Scheduling
Use the Technician Service Scheduling screen to view and assign work order segments to technicians at your dealership by dragging and dropping the associated work order blocks. Each work order block displayed on the screen can represent one or more work order segments.
The Technician Service Scheduling screen allows you to schedule service for each individual work order segment created at your dealership. As such, the work order blocks displayed on the screen can represent any number of segments associated to the work order number displayed in the block header.
Technicians are categorized as:
-
Road—can be assigned to work orders created at any location.
-
Branch—can only be assigned to work orders that are created at their associated Service Location, as specified on the Service Information tab of their employee profile.
The Technician Service Scheduling screen automatically refreshes every 5 minutes or whenever time off is recorded for a technician using the Need to record time off? Click here. link.
To open the Technician Service Scheduling screen, navigate to Product Support > Service > Service Scheduling.
Topics in this section are:
See also:
Prerequisites
Before you can begin using the Technician Service Scheduling screen, you must:
-
Enable Access in security switch 819 - Product Support - Service Scheduling.
-
Create a non-real technician Employee Profile to control unassigned work order segments (ie. segments which you create, but want to assign using the drag and drop functionality of the Technician Service Scheduling screen).
To create the non-real technician Employee Profile, follow the Adding an Employee procedure, but make sure the Category on the Employee Profile tab is N/A and assign no Shift Hours on the Service Information tab.
Any segments assigned to a non-real technician are listed in the Unassigned sidebar on the Technician Service Scheduling screen, allowing you to assign the service at a later date.
-
Set the Work Order Estimated Completion dropdown to either Estimated Hours and Date Required or Only Estimated Hours Required. If the Estimated Hours field is not mandatory and users leave it blank when creating a new segment, the system is not able to calculate the length of time required to complete the service, and the Technician Service Scheduling screen does not function properly.
-
Set the Service Scheduling Method dropdown to Work Order.
See also: Configuring the Service Scheduling Screens.
Calendar
The two calender options are:
-
Road—technicians can be assigned to work orders created at any location.
-
Location—technicians can only be assigned to work orders created at their associated Service Location, as specified on the Service Information tab of the employee profile
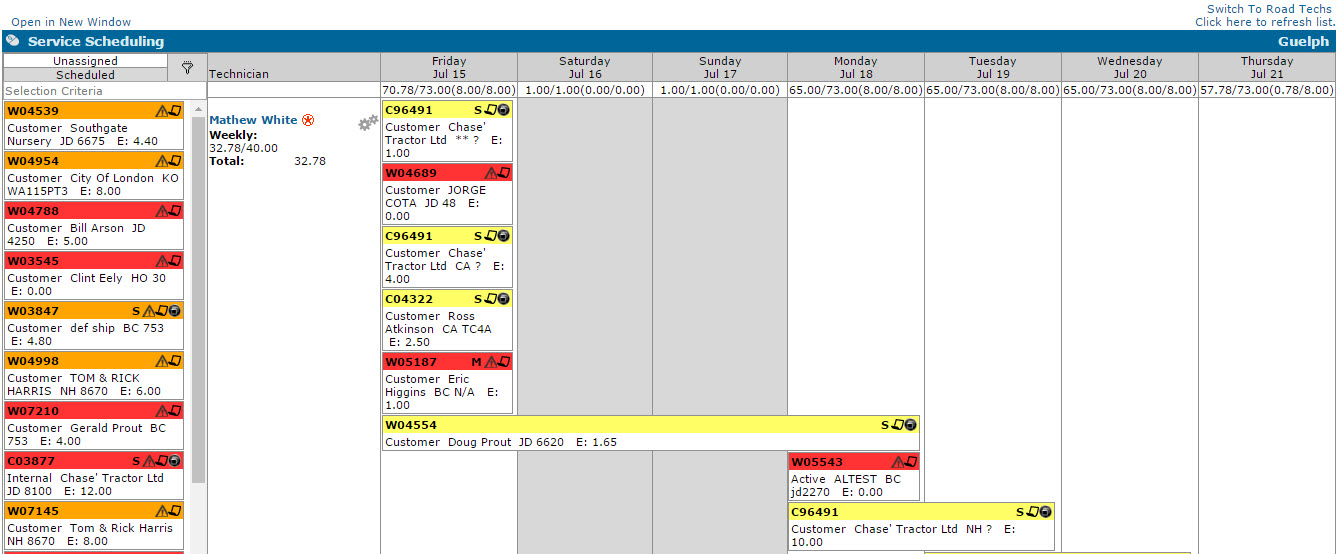
By default, the system opens on the Location Tech calendar, displaying only work order blocks and technicians associated to your current location.
To switch to the Road Tech calendar, click the Switch To Road Techs link. The screen refreshes, displaying all Road technicians and the work orders assigned to them.
When using either calendar, all work orders scheduled for the current week are displayed, beginning on today's date. Signed Off, Closed or Deleted work order segments are omitted from the screen, as well as monthly work orders.
You cannot schedule service on any grayed-out dates as they represent days on which the selected technician is completely unavailable. Days with a striped gray background can be used to schedule service, however they denote that the selected technician is not available for 100% of their Shift Hours due to vacation time, sick time, or any other time off scheduled for the technician (as specified on the Time Off Hours screen.)

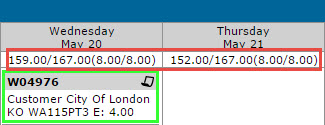
Below each date at the top of the calendar, the system displays the total scheduled hours and the total available hours for all technicians on that date. The total scheduled hours and the total available hours for the selected technician is also displayed in parentheses.
Note: If a negative value is entered on the Time Off Hours screen for the selected technician (denoting overtime), the total available hours for the technician increases.
Technician List
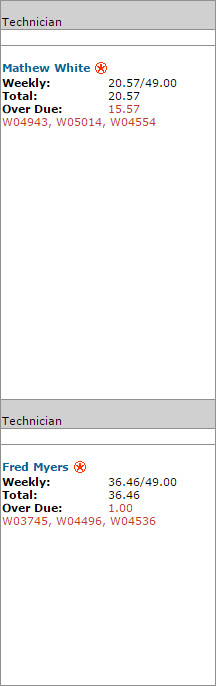
To the left of the calendar is a list of all the technicians at your dealership, along with their Weekly scheduled hours (for the week currently displayed on the calendar), their Total scheduled hours and their Over Due scheduled hours (if applicable).
Note: If Over Due hours are displayed, any work order numbers associated to the Over Due hours amount are listed.
For an employee to be listed as a technician, these conditions must be met:
-
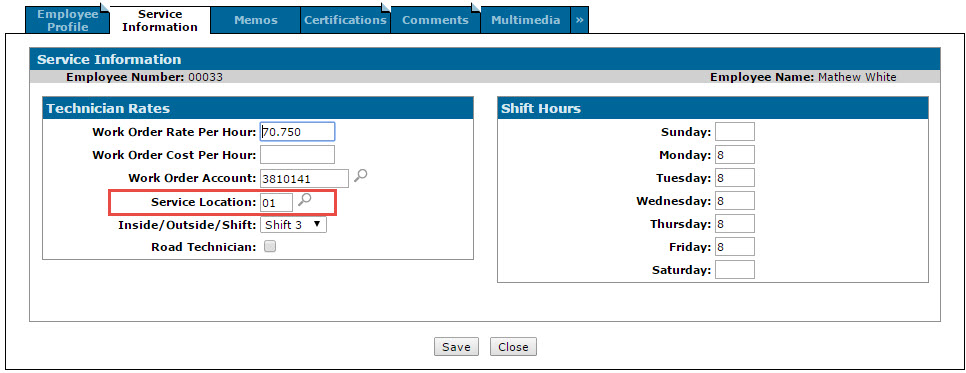
Technician Rate information as well as Shift Hours for at least one day must be configured for the employee on the Service Information tab.
Any days for which no Shift Hours have been configured appear grayed-out on the calendar and you are not able to book the selected technician for these days.
-
The Class assigned to the technician's Employee Profile must be active for service scheduling (the Omit From Scheduling switch for the selected Class is deactivated on the Classes screen)
-
The Category assigned to the technician's Employee Profile must not be N/A (any employee assigned a Category of N/A does not appear on the Technician Service Scheduling screen).
-
The employee cannot be terminated (the Termination Date field on the Employee Profile tab is blank)
If you are viewing the Branch Tech calendar, only technicians assigned to your current location are displayed (based on the Service Location field of the technician's Service Information tab.)
If you are viewing the Road Tech calendar, only technicians for whom the Road Technician switch has been activated are displayed (as specified on the Service Information tab of the employee profile).
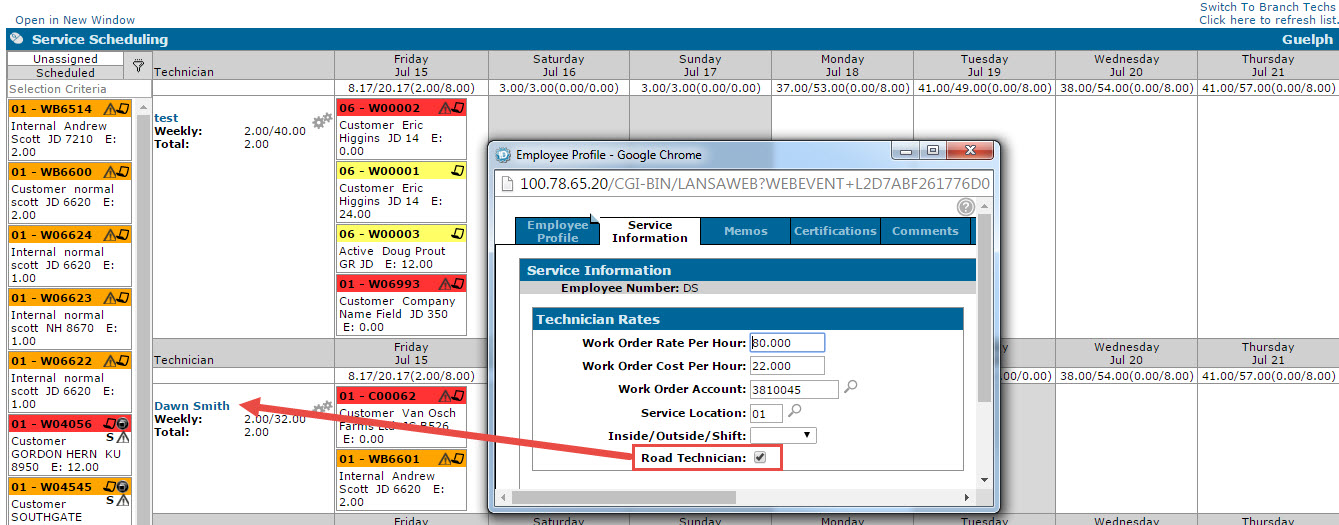
If you have activated the Edit Technician Info switch in security system 819, the Edit Technician icon appears next to each technician, allowing you to edit their Road Technician setting, Service Location, Shift or shift hours on the Employee Information window.
Changing a technician's settings while they currently have work orders assigned to them can have a number of effects:
| Setting | Effect |
|---|---|
| Road Technician |
If you activate the Road Technician switch for a branch technician, they are moved to the Road Tech calendar along with all of the work orders currently assigned to them. The priority codes on each order do not change. If you deactivate the Road Technician switch for a road technician who is currently assigned to work orders from multiple branches, the following occurs:
|
| Service Location |
If you change a road technician's service location, there is no immediate effect. If you change a branch technician's service location, the following occurs:
|
| Shift | If you change a technician's shift to one that is not currently displayed on the calendar, the technician no longer appears listed on the screen. |
| Shift Hours |
If you change an technician's shift hours, the work orders currently assigned to them shifts according to the technician's new available hours. For example, if a technician currently has 8 available shift hours on Monday and 8 hours worth of work orders assigned to them, if you change their shift hours to 6, the work order blocks moves into Tuesday. |
If a red certification  icon may appears next to a technician's name, you can view any certifications the selected technician has been awarded on the Employee Certifications screen.
Assigning and Scheduling Work Order Segments
Assigning and scheduling segments on the Technician Service Scheduling screen is simply a matter of dragging a work order block to the desired date and technician then, if applicable, selecting the segment(s) you want to assign from the Select Segments To Assign window. Where you drag the block however, determines whether or not the segment(s) are immediately assigned a priority code (Priority Scheduled Orders) or whether it is scheduled based on the date on which the block was placed (Date Scheduled Orders).
Priority Scheduled Orders
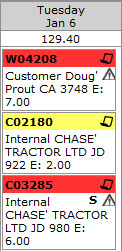
Priority Scheduled Orders are listed beginning on the current date and cascade down the calendar based on the Priority Code assigned to the order/segment, the technician's available hours, and the number of hours required to complete the service. For example, in the following screen shot Alex Johnstone (who has 10 available work hours each day) has ten Priority Scheduled Orders assigned to him.
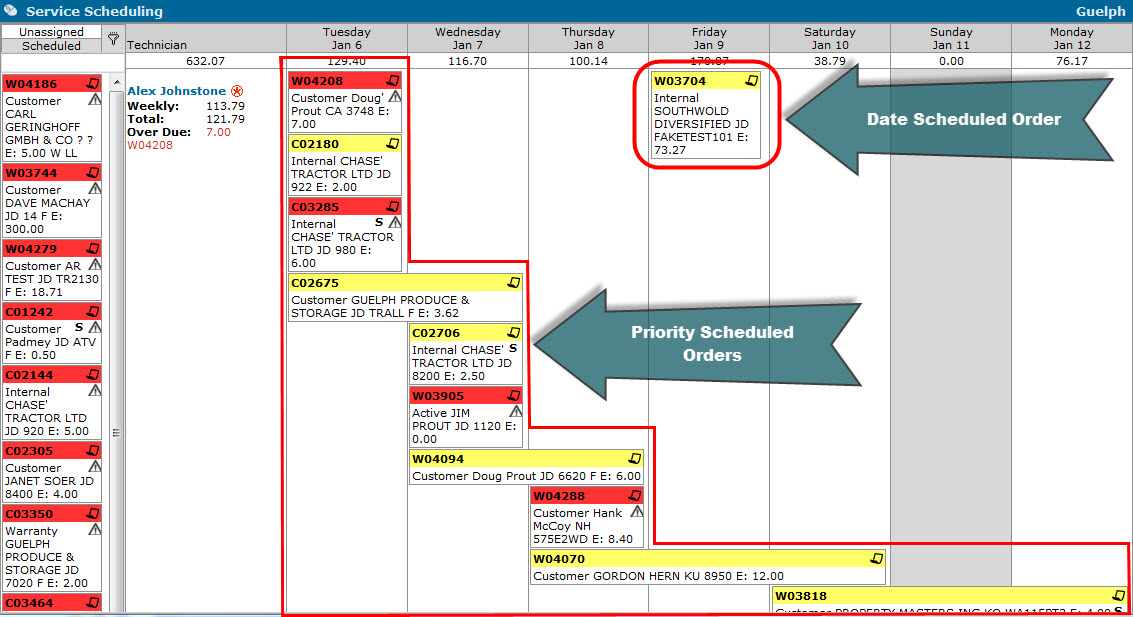
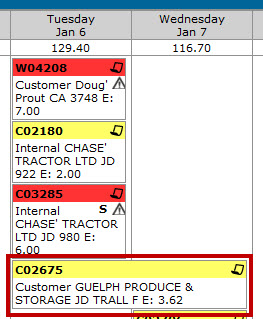
Based on the sequence displayed on the calendar, work order W04208 has the highest Priority Code, C01208 has the second highest Priority Code, C03285 has the third highest Priority Code, etc. As such, each of these orders are placed on today's date (because ideally, they should be completed first, and the number of hours remaining on the orders fits within Alex's available hours.)
Order number C02675 also has a high Priority Code, but based on the Estimated Hours required to complete the service (as specified on the Segments tab) it stretches into tomorrow's date:
Work order segment blocks in the Unassigned sidebar become Priority Scheduled Orders when they are dragged to a date on which Priority Scheduled Orders already exist (meaning they are immediately assigned a priority code by the system that reflects the area of the calendar on which the block was dropped; if the block is dropped at the "top" cascading Priority Scheduled Orders, it is immediately assigned a "high" priority code so that the service can be completed first; if the block is dropped at the "bottom" of the cascading Priority Scheduled Orders, it is immediately assigned a "low" priority code so that the service is completed only after the other Priority Scheduled Orders are complete.)
On a nightly basis, the system automatically re-prioritizes the orders so that high-priority service is completed before low-priority service. During this process, the system also assigns priority codes to Date Scheduled Orders as soon as they are "bumped" by a Priority Scheduled Order block.
Note: Because the order in which Priority Scheduled Orders are listed relies on the priority code and Scheduled Start Date assigned to each work order segment, the Priority Code field on the Segments tab is locked when using the Technician Service Scheduling screen, and the Scheduled Start Date can only be manually entered when assigning a segment to a non-real technician.
Date Scheduled Orders
Date Scheduled Orders are orders/segments that have yet to be assigned a Priority Code because they have been placed on the calendar on a date on which no Priority Scheduled Orders exist:
As the Scheduled Start Date for a Date Scheduled Order approaches, as soon as the Date Scheduled Order block gets "bumped" by a Priority Scheduled Order block, the system assigns it a priority code during the nightly process so that it fits within the existing Priority Scheduled Orders, based on the following logic:
- If the Date Scheduled Order has an Estimated Completion Date earlier than the date on which the Priority Scheduled Order "bumped" it, the system assigns it the "highest" priority code so that it can be completed as soon as possible.
- If the Date Scheduled Order has an Estimated Completion Date later than the date on which the Priority Scheduled Order "bumped" it, the system assigns it an "ending priority code" so that it won't be worked on until the other Priority Scheduled Orders are complete.
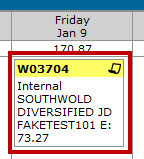
For example, if work order W03704 is scheduled for Friday January 9th and has a Estimated Completion Date of Monday January 19th, if a Priority Scheduled Order block "bumps" into on the 8th, on the night of the 8th during the nightly process the system assigns W03704 an "ending priority code", and on the morning of the 9th it appears at the bottom of the cascading Priority Scheduled Orders.
For more information regarding priority codes, see Segments tab help topic.
Un-assigning or Re-assigning Work Order Segments
To change the technician assigned to the segment(s) represented by a block, simply click and drag the block header or the ![]() icon to the desired technician and date, then, if applicable, select the segments you want to re-assign on the Select Segments To Assign window.
icon to the desired technician and date, then, if applicable, select the segments you want to re-assign on the Select Segments To Assign window.
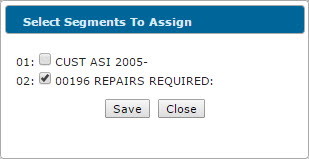
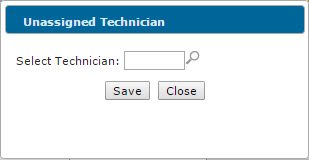
To un-assign the technician assigned to the segment(s) represented by a block, click and drag the block header or the ![]() icon to the Unassigned/Scheduled sidebar then, if applicable, select the segments you want to un-assign on the Select Segments To Assign window and enter a non-real technician number on the Unassigned Technician window. If you do not enter a valid non-real technician ID on the Unassigned Technician window, you are not permitted to move the block back into the Unassigned/ Scheduled sidebar.
icon to the Unassigned/Scheduled sidebar then, if applicable, select the segments you want to un-assign on the Select Segments To Assign window and enter a non-real technician number on the Unassigned Technician window. If you do not enter a valid non-real technician ID on the Unassigned Technician window, you are not permitted to move the block back into the Unassigned/ Scheduled sidebar.
Screen Description
The search fields on the Technician Service Scheduling screen are:
| Field | Description |
|---|---|
| Search |
Search for work order segment blocks by work order number. When you use this field, the system highlights any orders that meet the selected criteria in blue. |
| Select Technician |
Filters the work order segment blocks that are displayed in the calendar by technician ID, unless you are already filtering by a specific Shift. If you select a Shift and the screen currently displays the technicians associated with that shift, any technicians you enter into this field are removed from the calendar. To display multiple technicians in the calendar, leave this field blank or separate the desired technician IDs with a space (do not use commas). |
| Shift |
Filters the work orders/segments that are displayed in the calendar based on the shift associated with the assigned technician, as specified in the Inside/Outside/Shift field of the Service Information tab. If you select a specific shift in this field, any technicians you enter into the Select Technician field are removed from the calendar. |
| Pause Auto Refresh |
When you check this box, the service list does not automatically refresh when the screen loads or whenever the system automatically refreshes the list. This is beneficial for dealers that have a large number of work orders and do not want frequent refreshes to inhibit modifications of multiple work orders. |
The fields on the Technician Service Scheduling screen are:
| Field | Description |
|---|---|
| Unassigned/ Scheduled Sidebar |
Depending on the selected filter, this panel displays one of these options:
If you are viewing the Branch technician calendar, only work order blocks associated with your current location are listed in the sidebar. You can configure the amount of information that is displayed for each work order listed in the sidebar using the Selection Criteria screen. |
| Technician |
Lists all of your dealership's technicians. Note: If you are viewing the Branch technician calendar, only technicians assigned to your current location are listed. For an employee to be listed as a technician, these conditions must be met:
In addition to the technician name, the total work hours assigned to all technicians is displayed at the top of the column, as well as the Weekly scheduled work hours, Total scheduled work hours, and Overdue work hours for the selected technician (if applicable). The values in the Weekly, Total, and Overdue fields are driven by the work orders that are scheduled for the technician, compared to the Shift Hours that are configured for the technician on the Service Information tab. For example, if you assign the selected technician to work on 3 work orders this week totaling 20 scheduled hours and the same technician has shift hours for 6 days of the week totaling 48 hours, the Weekly value displays as "20/48". If Overdue hours are listed for a technician, the work order number that has yet to be completed is displayed. If the technician's name appears highlighted in green, it is because they are currently logged on to a work order/segment. |
| Calendar View |
The calendar view always opens to today's date and displays all open work order segments (not signed off, closed, or deleted) that are scheduled for the selected technician(s) for the next 7 days. Depending on the manner in which you schedule the work order segments, the order blocks are either displayed in cascading order based on priority code (Priority Scheduled Orders), or simply listed on the Scheduled Start Date of the order (Date Scheduled Orders). For more information about Priority Codes, see the Segments help topic. For more information about how to schedule a Priority Scheduled Order or a Date Scheduled Order, see the Drag and Drop Service Scheduling Overview topic. Below each date at the top of the calendar the system displays the total scheduled hours and the total available hours for all technicians on that date. The total scheduled hours and the total available hours for the selected technician are also displayed in parentheses. Days on which a technician is partially unavailable (based on time off that is booked on the Time Off Hours screen) appear with a striped gray background. Days on which a technician is completely unavailable (based either on their Shift Hours or scheduled time off) appear fully grayed-out and you cannot schedule service for these days. You can configure the amount of information that is displayed for each work order block that is displayed in the calendar using the Selection Criteria screen. |
The color of each work order segment block that is displayed in either the calendar or sidebar represents the status of the order:
| Color | Description |
|---|---|
| Yellow | There are no issues with starting or completing the order on time (i.e., there are enough hours to complete and start the service on time). |
| Gray | The technician is currently Logged On to the order but the order is not assigned to them. |
| Red |
There is an error. Can be one of:
|
| Orange | The selected work order segment is assigned Reason code S (Preventative Maintenance), as specified on the Segments tab of the order. |
| Green (outline) | The selected technician is currently Logged On to at least one of the segments represented by the block. |
| Blue (outline) | The selected work order block meets the search criteria that you entered in the Search field. |
These icons allow you to view more information about each work order segment block on the Technician Service Scheduling screen:
| Icon | Description |
|---|---|
| M | Click this icon to view any work order memos that are associated with the work order on the Work Order Memo screen. |
| S |
Click this icon to view all the segments on the selected work order number. This icon appears only if the segments associated with the selected work order are assigned to multiple technicians (real and non-real). |
|
|
Click this icon to view any errors that are associated with the selected block. |
|
|
Click this icon to open the Customer - Work Order Header tab, allowing you to make changes to the order. If the Edit Work Order switch is deactivated on the Authorization List For Product Support - Service Scheduling screen, clicking this link opens the Work Order Details screen instead. |
|
|
When the selected work order has multiple segments, click and hold this icon when you drag the block to the desired date/technician. When you release the block, the Select Segments To Assign window appears, allowing you to select the exact segments you want to assign to the technician that you drop the block on. Although the Select Segments To Assign window appears by simply clicking the A work order block that represents any segments still assigned to the technician remains on the calendar and a work order block that represents any unassigned segments appears in the Unassigned/Scheduled sidebar. For more information, see the table below. |
The Technician Service Scheduling screen allows you to perform these actions:
| Action | Steps |
|---|---|
| To assign, reassign, or unassign work order segments | Drag and drop the desired work order block to either the calendar or sidebar. Note that depending on where you drop the work order block, you can determine the priority code that is assigned to the order. For details, see the Drag and Drop Service Scheduling Overview. |
| To change the Road Technician setting, Service Location, Shift, or shift hours of a technician |
Click the Edit Technician The Edit Technician Changing any of the aforementioned settings using the Edit Technician |
| To book time off for a technician |
Click the Technician name or the Need to record time off? Click here link. If the Post Hours To Work Order switch is active for the time off code you use to schedule the time off hours with, the system forces you to post the hours to a work order. This is useful when your dealership employs work orders to track paid vacation, training, sick time, or other paid time off. |
| To create a work order | Click the Need to create a work order? Click here to add link. The Customer - Work Order Header tab appears. |
| To configure the amount of information that is displayed for each work order segment block | Click the Filter The Selection Criteria screen appears. |
| To view any certifications awarded to a technician (if applicable) | Click the Certification Lookup icon next to the desired technician name. The Employee Certifications screen appears. |
| To switch between the Road Tech/Branch Tech calendars | Click the Switch To Road Techs/Switch To Branch Techs switch. The screen refreshes, displaying the selected calendar. |
| To refresh the calendar | Click the Click here to refresh list link. The calendar refreshes, displaying any new data. |
| To change the dates that are displayed in the calendar | Click the Arrow icons to move either forward or backward by 1 week. |
Security: 819 - Product Support - Service Scheduling
Revision: 2025.10