Work Order: Customer
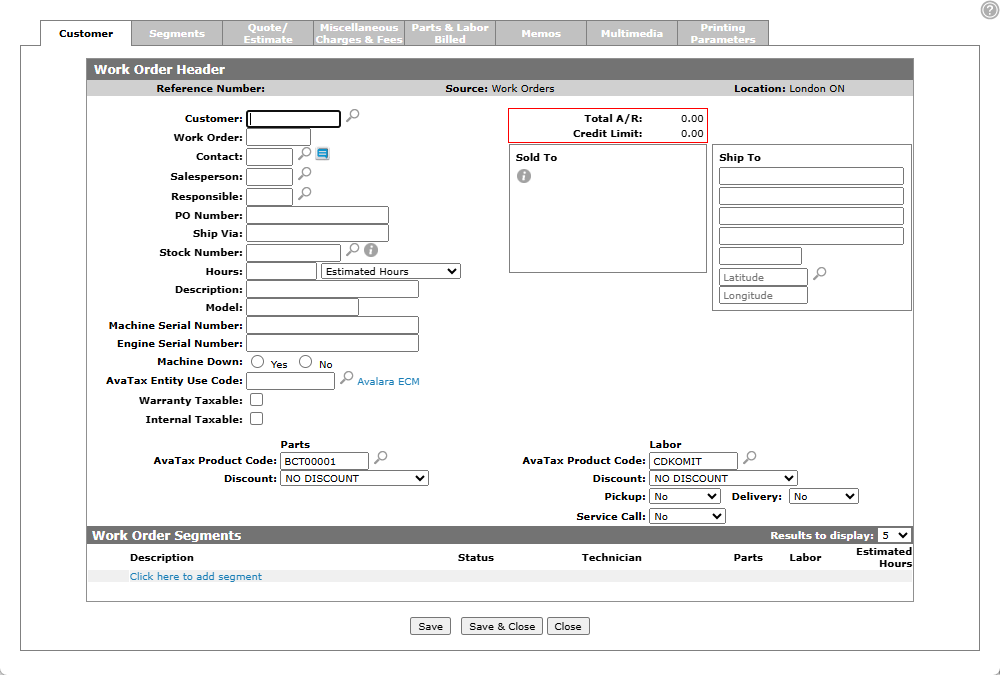
You can use the Customer - Work Order Header tab to add or edit the customer information for a new or existing work order. When creating a new work order, you must first configure the customer information on this tab.
Changes to one of these field values on a work order triggers the Automatic Work Order Adjustments system: Customer Number, Tax 1 (parts or labor), Tax 2 (parts or labor), and Discount (parts or labor).
To open the Customer - Work Order Header tab, navigate to Product Support > Service > Work Orders, then click an Order Numberand select Edit W/O from the pop-up menu, or click Create.

Creating a New Work Order
-
Navigate to Product Support > Service > Work Orders and click the Create button.
-
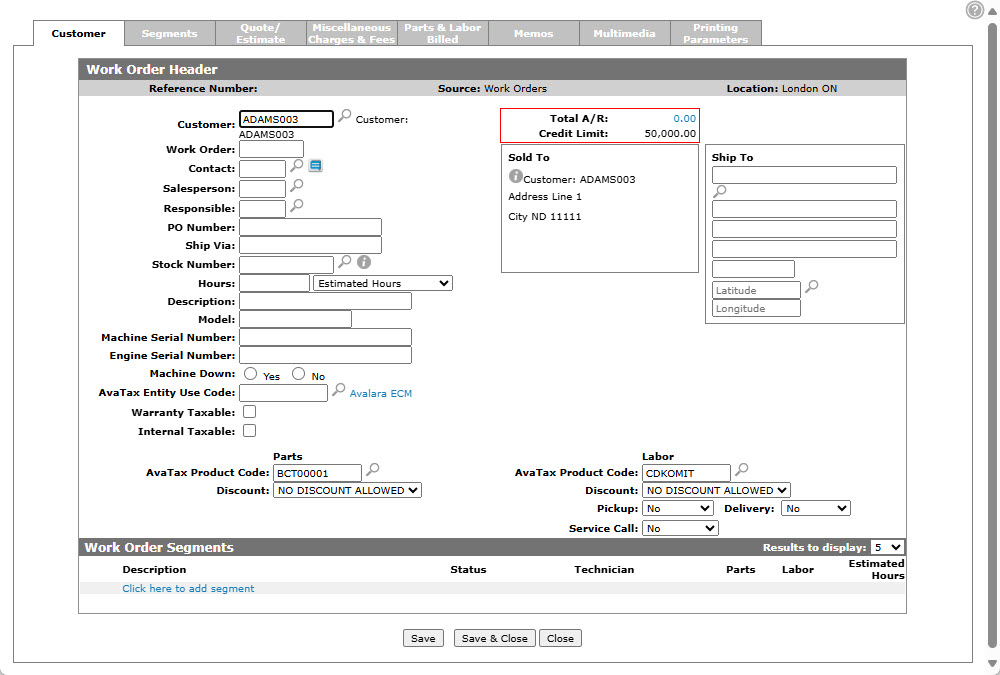
Enter a customer number in the Customer field , or click the Search
 icon to search for and select one.
The Customer - Work Order Header tab refreshes, adding any information found in the customer’s profile.
Depending on your security settings, the Equipment Listing screen may automatically appear after entering or selecting the customer number. If it does, skip to step 8.
-
Skip the Work Order Number field. A work order number is automatically be assigned to this field (based on your system settings) as soon as you save this invoice.
-
Enter the salesperson ID in the Salesperson field or click the Search
 icon to search for the appropriate salesperson.
The Salesperson field may have been filled in automatically, depending on your user and group settings.
-
On the Customer - Work Order tab, type the purchase order number in the PO Number field. This field is optional, unless the Customer Profile is set to require a PO number be entered.
-
Enter the shipment company or method in the Ship Via field. Complete this step only if the shipping location is different than the Sold To location.
-
Enter a stock number in the Stock Number field or click the Search
icon to search for the equipment.Use these tips to improve your search:
-
When searching using the Select Serial Number field, the system searches all characters of the serial number for the value entered in the Select Serial Number field.
-
When searching for customer owned equipment, select the Invoice option from the Select Status field and fill in a customer number in the Select Customer Number field.
-
When searching for dealer owned equipment, select the Inventory (or another appropriate status) from the Select Status field and ensure that the Select Customer Number field is left blank.
After a number is selected:
-
If a profiled piece of equipment is selected, the Machine Serial Number and Engine Serial Number fields are automatically populated based on the Equipment Profile. The Stock Order Number is mandatory, however, you can use a ? when creating the Work Order but have to change it to a stock number before billing. When using a ? in place of the stock number you must manually enter values in the Description, Model, and Machine Serial Number fields.
-
Depending on your security settings, after a stock number is selected the screen may automatically refresh to the Segments tab.
-
If the machine on the work order has an open PIP, warranty, or is on a service agreement, the system retrieves and displays the details before allowing you to continue.
-
-
On the Customer - Work Order Header tab, enter the number of hours in the Hours field, and select whether these are none (meaning unknown), actual (read off the meter), or an estimate (as close to the meter as possible) of the hours on this piece of equipment).
Note: When applicable, the Hours 2 field should be completed to represent a certain component of the machine.
-
Enter in a Machine Serial Number and Engine Serial Number.
If a profiled piece of equipment was selected, these fields are automatically completed based on the equipment profile.
-
Fill in these optional fields if required:
-
Discount—applied to both parts used to complete this work order and/or labor charged to complete this work order.
-
Pickup—chose one of yes, no, or picked up.
-
Delivery—chose one of yes, no, or delivered.
-
Service Call—chose one of yes, or no.
-
-
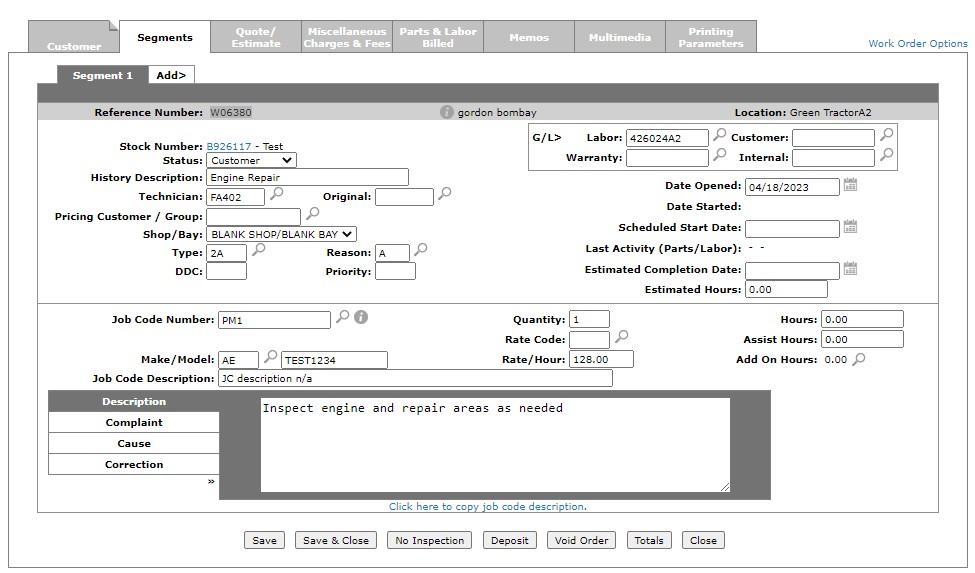
Select the Click here to add segment link or click the Segments tab.
-
Select the Status of the work order segment from the drop-down list. See Status Codes.
If you set the segment as Active, be aware that this automatically applies a customer rate to the work order.
-
Enter a description of the work in the History/Description field.
-
Enter the technician id in the Technician field or click the Search
icon to search for and select a technician. If this repair is a rework job, you should enter the id of the original technician who performed the work in the Orig field.
-
(OPTIONAL) Fill in these optional fields:
-
Pricing Customer—the customer number of the pricing customer
-
Shop/Bay combination from the list and
-
Type—the work order type code field or click the Search
icon to search for one. The Type Code dictates the Rate Codes that can be applied to the segment. For more information, see the Rates topic. -
Date Opened—click the associated Calendar icon to select a date or leave blank to default to the current date.
-
-
Enter the work order reason code in the Reason field or click the Search
icon to search for and select one.Note: The DDC (Downtime Delay Code), and priority code fields are not required during the initial set up of a work order. In fact, it is preferable that these fields be completed by a technician or service manager as the work commences, progresses, and is completed.
-
Skip the Date Started field.
This field should not be populated until labor is posted or a part is sold to the work order. If the Date Started field is left blank the system automatically populates the field when either labor or parts are first sold to the work order.
-
Enter the job code in the Job Code Number field or click the Search
icon to search for and select a job code.If no applicable Job Code is available or no Job Code is known, you may type ‘N/A’ to indicate that it is not an applicable field.
-
Once you have selected a Job Code Number, click Save to populate the Job Code Description, Quantity, and Hours fields with defaults acquired from the job code.
-
Enter in the Description box any and all tasks expected to be completed by the technician as a part of this segment of the work order. If a Job Code of NA was used, you must manually enter a job code Description.
Tip: Once you have completed your work on the new work order, note the automatically generated Reference Number in the upper left of the Work Order screen. Then, when you return to the Open Work Orders screen, you will be able to search for the work order by its reference number.
-
Once have entered the necessary work order information you can complete your work order in many possible ways:
To: Do this: To save the information without closing the screen.
Click the Save button.
To save the information and close the screen.
Click the Save / Exit button.
To view the charges and totals currently posted to this work order.
Click the Totals button.
To leave this screen without saving any changes.
Click the Close button.
If you have successfully added your work order to the system, the Open Work Orders screen appears.
Screen Description
The Information fields on the Customer - Work Order Header tab are:
| Information | |
|---|---|
| Field | Description |
| Date Added/Modified | The date the work order was added and when it was last modified. |
| Reference Number | The work order reference number. |
| Source |
Indicates which part of the system the work order was originally created in. Can be one of: Service Agreements, Work Orders , Equipment Quoting , Work Order Quoting, Traffic, Customer Portal. Not Assigned indicates the work order was created within the Legacy system. |
| Location | The location where the work order was originally created. |
These fields appear on the Customer - Work Order Header tab:
| Field | Description |
|---|---|
| Customer |
The number of the customer associated to the work order. If security switch Show Notifications when utilizing Customer is enabled and the customer has notifications, a link appears below the customer. Click the link to see the notifications. See Customer Notifications. Note: If you change the customer assigned to the work order, the Default Account and Default Cash Code of the new customer (as specified on the Rental & Service tab) will be assigned to each segment on the order, assuming it hasn't been deleted, Signed Off, or Closed. Any work order postings affected by these changes are displayed on the Work Order Adjustment - Mass Change screen. |
| Contact |
The customer contact associated with the work order. Any print outs related to the order include this name. Select the icon next to this field to open the VitalEngage Text application. |
| Work Order |
The alphanumeric work order number. If left blank, the system automatically assigns the next available work order number. This field only appears when creating a new work order. |
| Salesperson | The salesperson creating the work order. This field defaults to the salesperson ID loaded to your user profile. |
| Responsible |
The salesperson responsible for the quote. This field is for informational purposes only, however it is included on print-outs related to the quote. This field is mandatory if the Responsible Salesperson Required For Work Orders switch is activated in the CMBR5 table of the green screen application. |
| PO Number |
The purchase order number, as provided by the customer. No dates are printed on the Repair# line in the body of the invoice if the PO Number begins with a less than sign (<). |
| Ship Via |
The carrier being used to ship the unit, for example UPS. If the Add Ship to security switch is turned on in the Authorization List for Product Support - Service Work Order screen, this field is automatically populated with the source work order number. |
| Stock Number |
The stock number of the unit being serviced. This field is controlled by the System Settings. When creating a new work order, a "?" may be used in place of an actual as a stock number, if the Allow ? Stock Number security switch is activated in the Authorization List for Product Support - Service Work Order screen. You must replace the "?" with a real stock number before the work order can be closed. If you are licensed for feature number 6218, a PreCise link appears next to this field. Click this link to locate the selected unit using the PreCise Mobile Resource Management tool. |
| Hours |
The number of hours on this unit's hour meter followed by the type of reading:
These settings affect the behavior of this field:
|
| Hours 2 |
Defaults to the hours 2 value from the unit profile (file CGIBASE) and auto-selects Actual hours. If you change the value here, that change may update the unit's profile as this value is stored in the CGIBASE file; there is no separate value stored for hours 2 on the work order. This field only appears for units that have two hour meters, as specified by the Group Code assigned to the unit. |
| Description | A brief description of the unit. |
| Model | The model number on the unit. |
| Machine Serial Number |
The serial number on the unit, as provided by the manufacturer. |
| Engine Serial Number | The serial number on the engine. |
| Machine Down |
Select Yes to indicate that the machine is NOT in a usable state, or No to indicate that it is in working order. This field only appears if the Mandatory Machine Down Prompt In Work Orders checkbox is selected on the System Settings: Location screen. |
| Tax 1 Parts & Labor |
Applies the selected Tax 1 code to the parts and/or labor added to the work order. If this field is left blank, the Tax 1 code configured for the selected customer on the Customer Profile tab is used. If default labor tax codes have been assigned to both the Customer and the Ship To address on the order, the default tax codes associated to the Ship To address take precedence. |
| Tax 2 Parts & Labor |
Applies the selected Tax 2 code to the parts and/or labor added to the work order. If this field is left blank, the Tax 2 code configured for the selected customer on the Customer Profile tab is used. If default labor tax codes have been assigned to both the Customer and the Ship To address on the order, the default tax codes associated to the Ship To address take precedence. |
| Discount |
The discount code assigned to the work order. Only valid discount codes configured for your location on the Discounts screen appear as selectable options. |
| Tax 3 |
Applies the selected Tax 3 code to the entire work order (parts posted to the work order and labor posted to the work order). If this field is left blank, the Tax 3 code configured for the customer on the Customer Profile tab is used. The Tax 3 code is only applied to parts posted to the work order if the Allow tax on work order labor charges Y/N checkbox is selected on the System Settings: Location screen. |
| Tax 4 |
Applies the selected Tax 4 code to the entire work order (parts posted to the work order & labor posted to the work order). If this field is left blank, the Tax 4 code configured for the customer on the Customer Profile tab is used. The Tax 4 code is only applied to parts posted to the work order if the Allow tax on work order labor charges Y/N checkbox is selected on the System Settings: Location screen. |
| Pick Up | Indicates if the unit needs to be picked up from its current location. For reference only. |
| Delivery |
Indicates if the unit needs to be delivered from its current location. For reference only. |
| Service Call |
Indicates if the unit requires a service call. Options include Yes, No, MobileTech, or MobileTech (Synched). When a technician logs into a work order from MobileTech (IDMA), the Service Call field is automatically updated to MobileTech (Synched). While this value is displayed, the work order cannot be accessed or logged into from IntelliTech. This prevents simultaneous access to the same work order from both systems. Selecting MobileTech allows the work order to be synchronized to MobileTech. Once a MobileTech user logs into the work order, the status updates to MobileTech (Synched) automatically. |
| Total A/R | The customer's current accounts receivable balance. If you want to see a detailed summary of the amount in the Outstanding A/R screen, click the amount shown. |
| Credit Limit |
The customer's maximum credit limit. A dealer-maintained customer credit rating may appear next to the Credit Limit field (e.g. AA). |
| Available Credit |
The customer's current available credit as maintained in the customer's profile. Note: Feature 6178 AND activating special credit checks are required to see this field. Activate at Configuration > Miscellaneous > Other > System Settings > Location tab under Financial. |
| Sold to | The name and address of the customer associated to the work order. |
| Job Jacket |
The job jacket number associated to the work order. This field only appears if the work order is associated to a job jacket. |
| Ship to |
The alternate shipping address for the selected customer, as configured in the Ship to tab of the customer profile. If multiple alternate shipping addresses exist, the Search |
The Work Order Segments section displays the first five segments of the work order. The fields in the Work Order Segments section of the Customer - Work Order Header tab are:
| Work Order Segments | |
|---|---|
| Field | Description |
| Description | A brief description of the service required for the selected unit. |
| Status | The status of the segment, which represents the type of work being performed; either Customer, Internal, or Warranty. |
| Technician | The name of the technician assigned to the segment. |
| Parts | The total price of all parts that have been added to the segment. |
| Labor | The total dollar amount of all labor that has been posted to the segment. |
| Estimated Hours | The estimated time (in hours) that the selected segment will need to be completed. |
Click the PreCise link to locate the selected unit on the PreCise software.
Click a segment Description to view or edit the segment in the Segments tab.
Click the Bill Segments link to create individual work orders for each segment using the Bill Segments screen. Note that:
-
The Bill Segments link only appears if the selected work order has more than one segment and the Allow Bill Segments switch is turned on in the Authorization List for Product Support - Service Work Order screen.
-
The Bill Segments link does not appear on work orders created using the Bill Segments screen.
-
You can add up to 50 repair segments on a work order. Each segment can be set up for different types of service work which must be done on the same unit. For example, the first repair could be for the hydraulic pump, the second repair for the starter, the third repair for the transmission and so on.
Use these buttons to complete your work on the Customer - Work Order Header tab:
| Button | Function |
|---|---|
| Save | Saves changes made on the Customer - Work Order Header tab. |
| Save & Close | Saves changes made on the work order and closes the work order. |
| Active Inspections |
Opens a new screen that displays any active inspections associated with that work order. Ensure pop-up windows are enabled on your browser. |
| No Inspection (Legacy) | Opens a new screen that displays Inspections configured on the Inspection Type Configuration Screen. |
| Link Inspection | Opens to the Linked Inspections screen. This button only appears if there are no other inspections linked to the work order. |
| Close | Closes the Customer - Work Order Header tab without saving and returns to the Open Work Orders screen. |