Work Order: Segments
A Segment represents a specific job, task, or phase within the overall work order. The Segments tab allows you to:
You can add up to 50 repair segments on a work order. Each segment can be set up for different types of service work which must be done on the same unit. For example, the first repair could be for the hydraulic pump, the second repair for the starter, the third repair for the transmission and so on.
To open the Segments tab, from the Customer - Work Order Header tab, click a work order segment Description or the Segments tab.
Changes to one of these field values on a work order trigger the Automatic Work Order Adjustments system: Rate/Hour, Type, and Status.
If you are using the Work Order Service Scheduling or Technician Service Scheduling screens, certain fields on the Segments tab are locked. See the Drag and Drop Service Scheduling Overview.
Topics in this section are:
Real-time Work Order Billing Usage
When real-time billing is enabled, you can submit the invoice for immediate processing. If there is more than one invoice remaining, they will be processed by the billing schedule, unless you choose to process them earlier.
-
Create a new work order filling in the fields as required.
-
Save the work order.
-
Click the Segments tab, and close all segments in the work order.
-
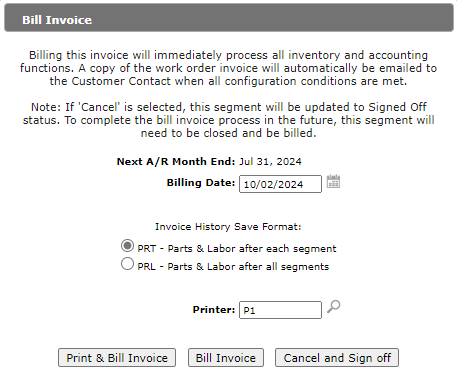
On the Bill Invoice screen:
-
Set the Billing Date.
-
Select a save format. For details on the formats, Printing Parameters.
-
Set the Printer
-
-
Click one of these buttons:
-
Print & Bill Invoice—processes the invoice and prints it out.
-
Bill Invoice—processes the invoice.
-
Cancel and Sign off—cancels the invoicing process and updates the status of the invoice to Signed Off.
-
Cancel—cancels the invoicing process, but does not change the status of any segment(s).
-
Deleting a Work Order Segment
Warning: Before deleting a work order segment you must first ensure that you have cleared or reversed all charges (Parts, Labor, and Miscellaneous) that are associated with the segment you wish to delete. Once a Work Order segments have been deleted, the system clears the work order on the next billing run.
-
Navigate to Product Support > Service > Work Orders then search for the desired work order.
-
Hover over the Order Number and select Edit from the pop-up menu.
-
Click the Segments tab.
The Segments tab appears.
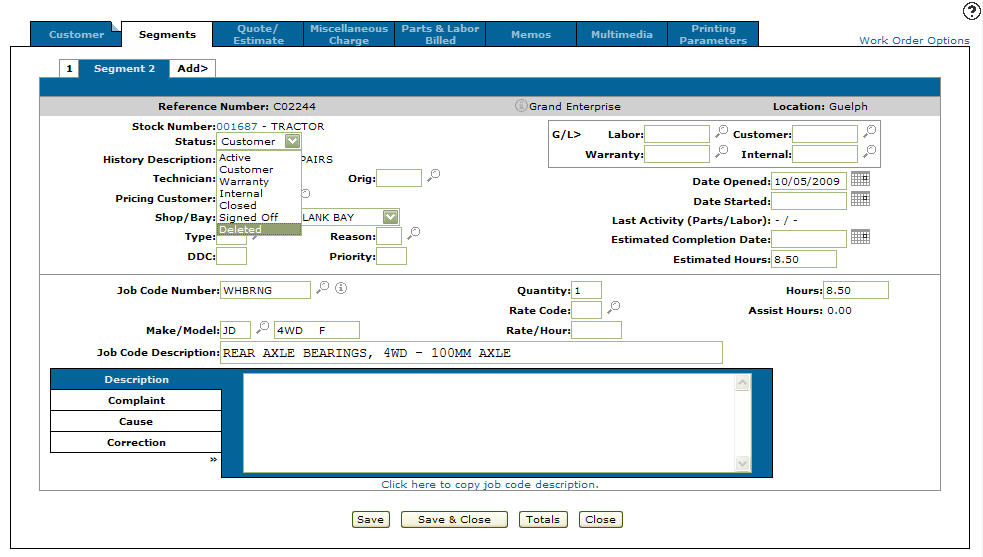
Note: Segment number 01 cannot have a status of deleted.
-
Click the Segment 2 tab.
-
From the Status drop down list, select Deleted.
-
To record the change in status, click Save.
Deleted segments remain on the work order.

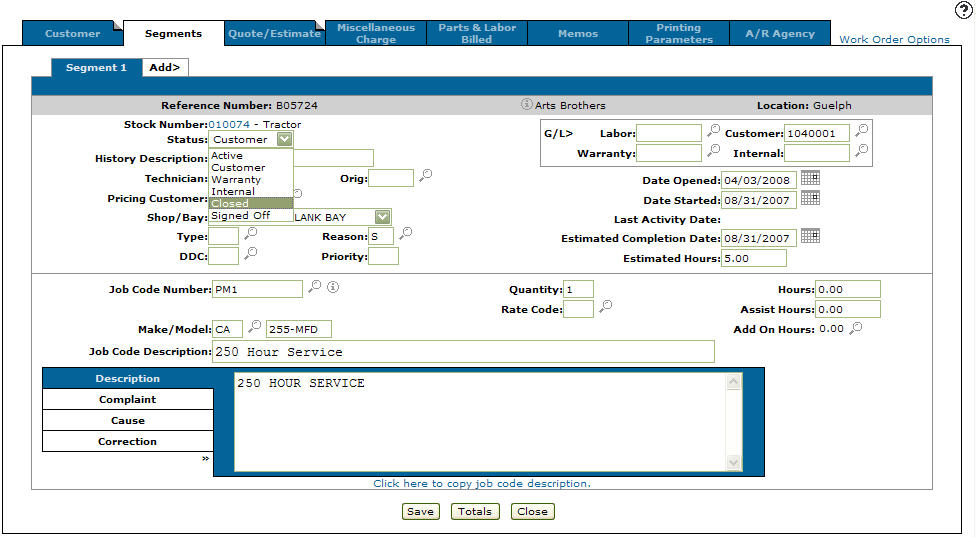
Closing a Work Order/Invoicing a Work Order
Before closing a work order you must first ensure that all outstanding parts purchase orders are closed. This prevents a user from closing the work before all parts are charged to the work order.
All segments on the work order must be closed before a work order can be invoiced. Closing a work order segment prevents users from posting parts and labor to the segment.
-
Navigate to Product Support > Service > Work Orders then search for the desired work order.
-
Hover over the Order Number and select Edit from the pop-up menu.
-
Open each Work Order segment by clicking Description link , or click the Segment tab.
-
Verify all charges, descriptions, and the G/L account on the work order segment.
-
If you are satisfied, from the Status drop down list, set the work order status of all segments to Closed.
-
You may complete your status change in any of these ways:
To Do This To save the information without closing the screen. Click the Save button. To save the information and close the screen. Click the Save/Exit button. To view the charges and totals currently posted to this work order. Click the Totals button. To leave this screen without saving any changes. Click the Close button. Once the status of all segments has been changed to Closed, and the work order saved, the work order can no longer be edited. IntelliDealer attempts to process the work order immediately.
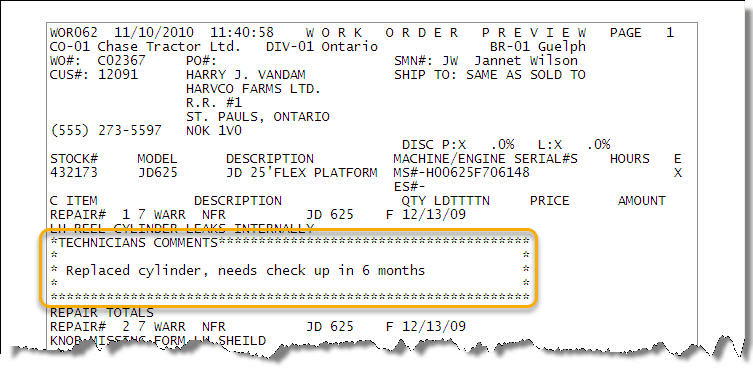
Adding Technician Comments to a Work Order
Technicians can leave comments in a work order that will be included in the Technician Comments section of the work order print out. To do so, enter a < (less than) sign in the Description field of the Segments tab.
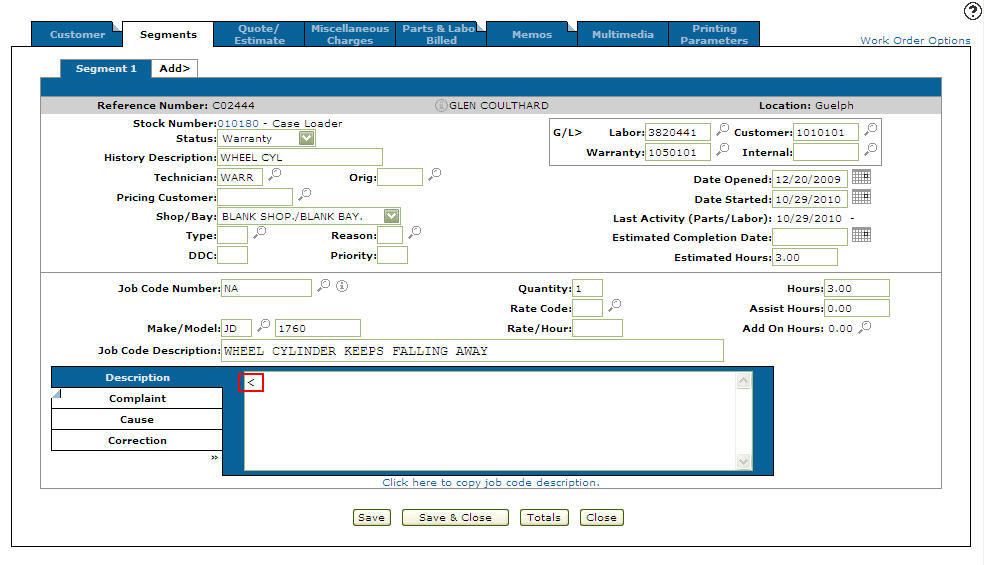
To save the technician comments, click Save.
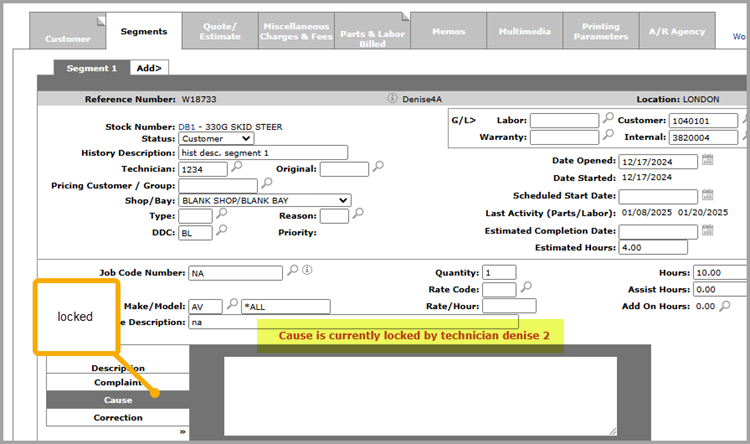
If a technician is logged on to the same work order in IntelliTech, the system displays a message to notify you that the tab is locked.
On the Printing Parameters tab, fill out the appropriate fields and click Preview. You can view the technician's comments on the preview.
Screen Description
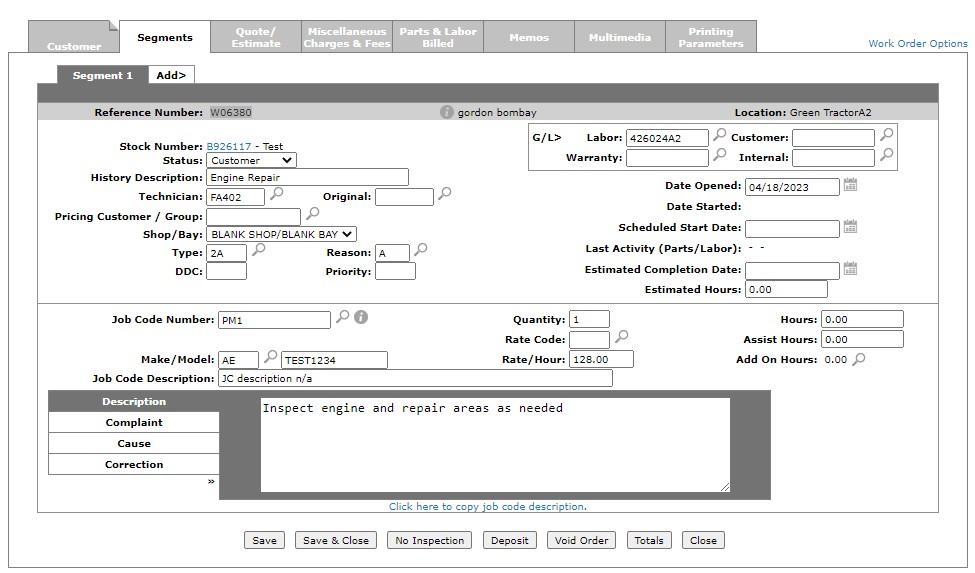
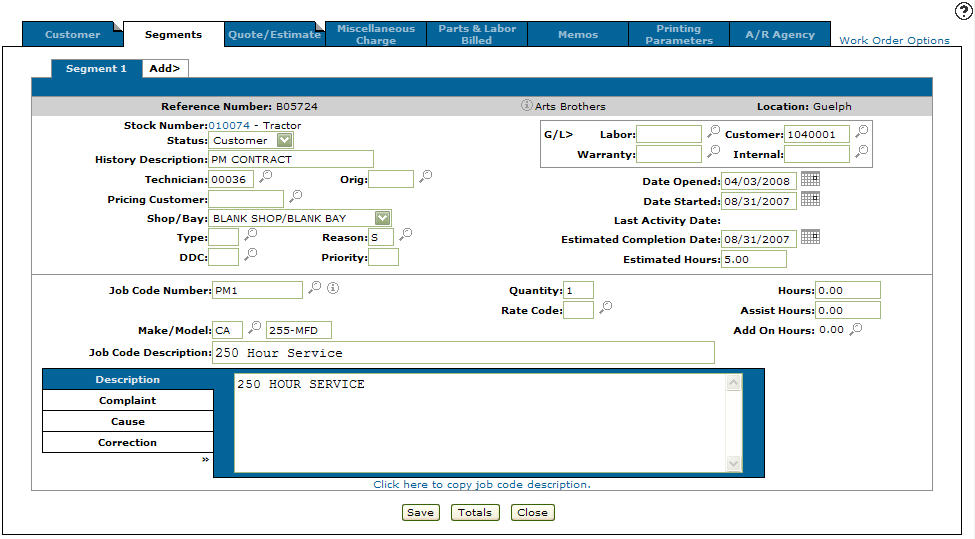
The Information fields on the Segments tab are:
| Information | |
|---|---|
| Field | Description |
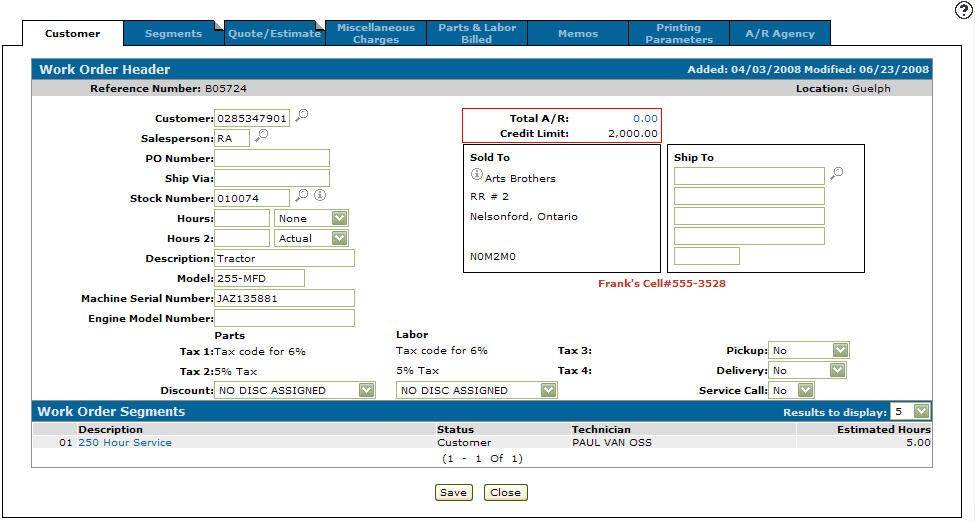
| Reference Number | The work order reference number. |
| Customer | The name of the customer associated with the work order. |
| Location | The location the work order was originally created. |
These fields appear on the Segments tab:
| Field | Description |
|---|---|
| Stock Number |
The stock number of the unit on the work order. If you are licensed for feature number 6218, a PreCise link appears next to this field. Click the link to locate the selected unit using the PreCise Mobile Resource Management tool. |
| Status |
The status of the segment on the work order. See the status codes table. All Segment numbers except for segment number 01 can have a status of deleted. To add or charge parts or labor on a segment that is closed, simply change the status to the correct code and click Save. Once a work order is closed and authorized using the Payment Card Interface, the work order cannot be re-opened and only printing parameters may be altered. If there are any miscellaneous charges on the work order with Minimum Charge amounts that have not been fully billed to the order (as specified on the Miscellaneous Charges tab), the system issues a warning when attempting to close the last segment on the order. When the segment is first created, the Default Cash Code associated to the customer (as specified on the Rental & Service tab) is used to determine the Status of the segment. If the customer on the work order then changes, the Default Cash Code associated to the new customer is used to determine the segment status, as long as the segment has not been deleted, Signed Off or Closed. |
| History Description |
A summary description of the major repairs being done on the work order. This field will contain the job jacket number if the work order was created from a Job Jacket. There is only one history description comment shared by all segments on the entire work order. |
| Technician |
The technician assigned to this segment. If you are using the Technician Service Scheduling screen, you should assign new segments to a "non-real" technician so that you may schedule the service using the drag and drop functionality of the Technician Service Scheduling screen. For more information, see Drag and Drop Service Scheduling Overview. If more than one technician is to work on a segment, enter in the lead technician. The lead technician entered becomes the default technician on the Labor Entry screen. |
| Original | The original technician who performed the previous work on the unit. |
| Pricing Customer/Group | Allows you to select a customer number or group used for pricing (parts/labor) on the work order instead of using the pricing attached to the customer selected on the Customer - Work Order Header tab. |
| Shop/Bay | Select the shop or bay assigned to the segment. Shops and bays are defined on the Shop and Bay screens. These values are used specifically for service scheduling. |
| Type |
The type code for the segment, which represents the type of service to be performed. Valid type codes are listed and configured on the Types screen. The Type Code dictates the Rate Codes that can be applied to the segment. See Rates. This field is mandatory if the VALIDATE W/O TYPE & REASON (Y/N) switch is set to Y in the CMBR3 table of the green screen application. Note: For an important note on Work Order Types, click here. |
| Reason |
The reason code for the segment, which represents the reason for the repair. Valid repair codes are listed and configured on the Reasons screen. |
| DDC | Downtime delay codes are used to indicated why a segment has been delayed. The DDC code is updated by manually entering in the code in the DDC field or by entering in a code in the DDC field on the Labor Entry screen. |
| Priority |
The priority of this work order/segment in relation to the other work order/segments for the selected technician, as displayed on the Scheduled Work Orders screen. Depending on the option selected in the Service Scheduling Method switch of the CMBR5 table, this field is either be user-defined (if the Service Scheduling Method switch is set to W) or system-generated and locked (if the Service Scheduling Method switch is set to T). When this field is user-defined (Service Scheduling Method set to W), you can enter any two characters to determine priority. For example, if you use priorities 1, 2 and 3, you can code a work order/segment with "1A" to place it between two other work orders/ segments that have been set to priorities 1 and 2 on the Scheduled Work Orders screen. When this field is system-generated and locked (Service Scheduling Method set to T), the code will be generated using the following logic when the work order/ segment is scheduled on the Technician Service Scheduling screen:
See also: Drag and Drop Service Scheduling Overview. |
| Labor G/L | The default labor G/L account for this segment if no G/L account is entered when posting hours. |
| Customer G/L |
The customer's G/L account that all cash code 5 (customer) charges are charged to when the segment is closed and billed out. The Customer G/L field defaults to the G/L account associated with the customer's default A/R agency. If the customer on the work order has default Service Work Order information configured on their profile (as specified on the Rental & Service tab), the account in this field may be locked to a specific value. For details, please see the Rental & Service screen help topic. |
| Warranty G/L |
The warranty G/L account that all cash code 7 (warranty) charges are charged to when the segment is closed and billed out. The warranty G/L field defaults to the G/L account set up in the CASHTAB for cash code 7. If the customer on the work order has default Service Work Order information configured on their profile (as specified on the Rental & Service tab), the account in this field may be locked to a specific value.See Rental & Service. |
| Internal G/L |
The internal G/L account that all cash code 8 (internal) charges are charged to when the segment is closed and billed out. If the Internal G\L account is left blank Invoice, Transfer, or Rental unit accounts with an internal charge default to the account loaded in the Expense Account field on the Edit Equipment Defaults screen. If the Expense Account field is left blank the inventory account on the stock number is used. If invoiced and the Internal G/L account is left blank the Expense Account field on the Edit Equipment Defaults screen is used. If the Expense Account field is blank, the Internal G\L field will default to G/L account set up in CASHTAB for cash code 8. If this is a fixed asset The Internal G/L field defaults to the Maintenance Expense account load on the Edit Equipment Defaults screen. If the customer on the work order has default Service Work Order information configured on their profile (as specified on the Rental & Service tab), the account in this field may be locked to a specific value.See Rental & Service. |
| Date Opened | The date the work order was created. If the field is left blank, it defaults to the current date. |
| Date Started |
The date the work on the work order started or when it is scheduled to start. The start date is automatically loaded with the date of the first parts or labor transaction posted against the work order. When using the Work Order Service Scheduling screen or the Technician Service Scheduling screen, this field is locked. |
| Scheduled Start Date |
The date on which the service for the selected segment is scheduled to start. When using the Technician Service Scheduling screen, this field is only editable when the selected segment has been assigned to a non-real technician. For details, see the Drag and Drop Service Scheduling Overview topic. |
| Last Activity (Parts/Labor) |
The date the last parts/labor transactions was posted to the work order. |
| Estimated Completion Date |
The estimated date the work order will be completed. A date next to this field denotes the date on which the selected segment was first marked as Signed Off or Closed. This field is mandatory if the Mandatory Est Compltn Hrs/ Date switch is set to D or Y in the CMBR3 table of the green screen application. |
| Estimated Hours |
The estimated hours it will take to complete the work on the work order. By turning on the security switch Default Estimated Hours to Job Code Hours on system 810 in the administrative section of IntelliDealer, you can load the value from the Job Code Hours field on the Job Code Details screen instead of the value from the Average Hours field, into the Estimated Hours field. If multiple job codes are imported, the total amount of hours for all imported job codes appears in the Estimated Hours field. This field is mandatory if the Mandatory Est Compltn Hrs/ Date switch is set to H or Y in the CMBR3 table of the green screen application. This is STRONGLY recommended if you are using the Work Order Service Scheduling screen or Technician Service Scheduling screen. See the Drag and Drop Service Scheduling Overview topic for details. |
| Job Code Number |
The job code number used for this segment. If no job code is to be used on the segment, enter N/A as the job code. If multiple job codes have been imported on to the segment, MULTIPLE appears in the Job Code Number field. |
| Make/Model |
The manufacturer of the unit. The model number on the unit. |
| Quantity |
The amount of the job code to be performed. Example: doing a tire check 4 times would mean the Quantity would be 4. |
| Rate Code |
The rate code for the segment, which can determine the default labor rate/hour. Valid rate codes are listed and configured on the Rates screen. Only rate codes that have been assigned to the selected Type Code can be added to the segment. For more information, see the Rates topic. See also: About Default Labor Rates. |
| Rate/Hour |
The default labor rate per hour for this segment if no rate per hour is entered when posting hours. See also: About Default Labor Rates. |
| Hours |
The amount of job code hours it will take to complete this segment. If multiple job codes are imported, the total amount of hours for all imported job codes appear in the Hours field. |
| Assist Hours | The amount of hours from a second technician that is needed to complete the work on the work order. |
| Add on Hours |
Any additional hours. Add on hours, if used, can affect your total hours on the job code for this work order and also affect the Total/Average hours on the job code. Typically these are for smaller jobs. For example, if a tractor has air conditioning it might add extra minutes to the job. |
| Job Code Description |
A brief description of the job code. |
| Description |
A description of the work to be performed on the work order. This field is populated automatically if Auto-create Hours Updated Comment has been enabled on the Authorization List For Product Support - Service Supervisor screen. The Description, Complaint, Cause, and Correction fields can be updated from within IntelliTech, depending on your user's security. If multiple job codes are imported, each job code description, job code, job code hours, and total amount of hours for all imported job codes appear in the Description field. Adding a < sign adds a comment section for technician comments on the work order/invoice print out. Place any comments after the < sign in order to include them within the comments section. Adding a * sign adds a comment section for supervisor comments on the order/invoice. More info on supervisor comments can be found here. |
| Complaint | A description of a complaint related to the work order, if applicable. |
| Cause | A description of what caused the original complaint. |
| Correction | A description of how the complaint was corrected. |
Note: The Description, Complaint, Cause, and Correction fields can be locked, allowing only one user or technician to access it at a time. If an authorized user or technician is adding or editing one of these fields from either the Logged On screen or the Segments tab, a message appears if another user attempts to add or edit one of the fields, indicating that the field is currently locked.
The available Status Codes are:
| Status Code | Description |
|---|---|
| Active |
Indicates the segment is open for work. The default status of newly opened segments if Default Status To Select Status is not enabled in security switch 810 Product Support - Work Orders. If you set the segment as Active, be aware that this automatically applies a customer rate to the work order. Parts and labor can be charged to this segment. If the cash code is left blank when parts and labor are being charged to this segment, then the cash code defaults to customer. |
| Customer |
Indicates the segment is open for work and that customer settings for payment, pricing and accounting are in effect. Parts and labor can still be charged to this segment. If the cash code is left blank when parts and labor are being charged to this segment, then the cash code defaults to customer. |
| Warranty |
Indicates the segment is open for work and that warranty settings for payment, pricing and accounting are in effect. Parts and labor can still be charged to this segment. If the cash code is left blank when parts and labor are being charged to this segment, then the cash code defaults to warranty. |
| Internal |
Indicates the segment is open for work and that dealer settings for payment, pricing and accounting are in effect. Parts and labor can still be charged to this segment. If the cash code is left blank when parts and labor are being charged to this segment, then the cash code defaults to internal. |
| Ready to Close | This is a selection available on the Work Order listing screen, but is not a status of the segment. It lets the user filter for work orders where every segment on the work order is signed off, closed, or deleted. |
| Closed |
The segment is complete and ready for billing. Parts and labor can not be charged to the segment. If a work order has several segments, the status of a segment can be changed to closed as soon as the segment is completed even if the other segments on the same work order have not been completed. This helps prevent parts and labor from accidentally being posted to the wrong segment. The work order is processed on the next work order billing only if all segments on the work order have a status of closed. |
| Deleted |
Segments can be deleted if there was an error. Deleted segments are still in the system, but they are no longer active. All segment numbers except 01 can have a status of deleted. |
| Signed Off |
The technicians have signed off on the work. This status does not appear on a work in process report. If Allow Charges to Signed Off Work Order is enabled in System Settings, parts and labor can still be charged to the segment. |
These options are available through the Work Order Options pop-up menu:
| Option | Description |
|---|---|
| Mass Change | Opens the Update Work Order screen allowing you to apply changes to the Status, Type code, Reason code, or G/L account fields across all segments of the work order. |
| Mass Add | Opens the Add Segments screen allowing you to add a selected number of segments to the work order. |
| Mass Copy | Opens the Copy Segments screen allowing you to copy the segment you are currently on to new segments, by selecting the number of copies you wish to create. |
| Quick Close |
Closes all open and completed segments. If the close was successful, the Printing Parameters tab opens. Note: If there are any miscellaneous charges on the work order with Minimum Charge amounts that have not been fully billed to the order (as specified on the Miscellaneous Charges tab), the system issues a warning when attempting to close the last segment on the order. |
| CNH Telematics | Opens the CNH Telematics screen which provides geographical and parametric information on equipment. |
| CNH Fault Codes | Opens the CNH Fault Codes Lookup screen. |
| CNH eTime/Smartview | Opens the CNH Dealer Portal. |
| CNH SRT Job Codes | Opens the CNH SRT Job Codes screen which retrieves CNH SRT job code data on a real-time basis when you provide the Vehicle Identification Number (VIN). |
| CNH DRQ Inspections | Opens the CNH DQR Inspections which retrieves the Delivery Quality Report (DQR) checklist summary (id, type, etc.) from CNH. |
| CNH Interactive Maintenance | Opens the CNH Interactive Maintenance screen which provides integrated access to a complete maintenance history for CNH parts. |
| Warranty Credits | Opens the Warranty: Work Order Segments screen which you can use to review warranty claims for repairs or replacements covered under warranty. |
| JD WINXML | Opens the JD WINXML Select Dealer Number screen allowing you to enter further warranty claim information for use with John Deere warranty submissions. |
| JD Warranty | Opens the JD Warranty screen which allows you to submit warranty claims, retrieve PIPS, retrieve open PIPS, retrieve warranty dates, and submit delivery receipts. |
| Bobcat Warranty | Opens the Bobcat Warranty screen allowing you to select a Bobcat dealer and enter further warranty claim information for use with Bobcat warranty submissions. |
| Vermeer iWarranty | Opens the Vermeer iWarranty screen, allowing you to review and send any service information related to the selected segment to the Vermeer iWarranty web service. |
|
Thermo King Warranty Thermo King SVC |
Opens the warranty Claim tab for Thermo King, allowing you to enter further warranty claim information for use with Thermo King warranty submissions. |
| Komatsu Factory Campaigns | Displays any active Komatsu factory campaigns (suggested service and known equipment failures) for the selected unit. For details, please see the Active Komatsu Factory Campaigns screen help topic. |
| Vermeer Field Campaigns | Opens the Vermeer Field Campaigns screen. |
| CNH DEP eWarranty Vehicle Lookup | Opens the CNH DEP eWarranty Vehicle Lookup screen which contains eWarranty vehicle data about the unit. |
| CNH eWarranty Claim Submission | Opens the warranty Claim tab for CNH eWarranty. |
| Ditch Witch Service Bulletins | Opens the Ditch Witch Service Bulletins screen. |
| Vermeer Job Codes | Opens the Vermeer sign in window to access Job Codes on the Vermeer site. See Walkthrough of Adding Vermeer Job Codes to a Work Order. |
| Expert Services | Opens the John Deere Expert Services screen, which allows dealers to import Expert Services jobs into IntelliDealer Work Orders and Work Order Quoting. |
| Kubota Draft Claim Submission | Opens the warranty Claim tab for Kubota. |
| Kubota Inventory Details | Allows a user to view the customer's policies and campaigns on equipment they own. See Kubota Inventory Details. |
| MTD Warranty | Opens the MTD Warranty screen allowing you to enter further warranty claim information for use with MTD warranty submissions. |
| Komatsu Warranty |
Opens the Komatsu Warranty screen allowing you to enter further warranty claim information for use with Komatsu warranty submissions. |
| Polaris Vehicle Lookup | Opens the Polaris Vehicle Lookup screen so you can view vehicle specifications, service bulletins, warranty claims, and additional media (owner manuals, product compliance certificates, etc) about Polaris vehicles. |
When the corner on the segment's Description, Cause, Complaint or Correction (and any Work Order tab) is "flipped" it signifies that data is present on that particular tab.
To copy a job description into the segment Description, click the Click here to copy job code description link. The description associated with the Job Code Number appears in the Description field .
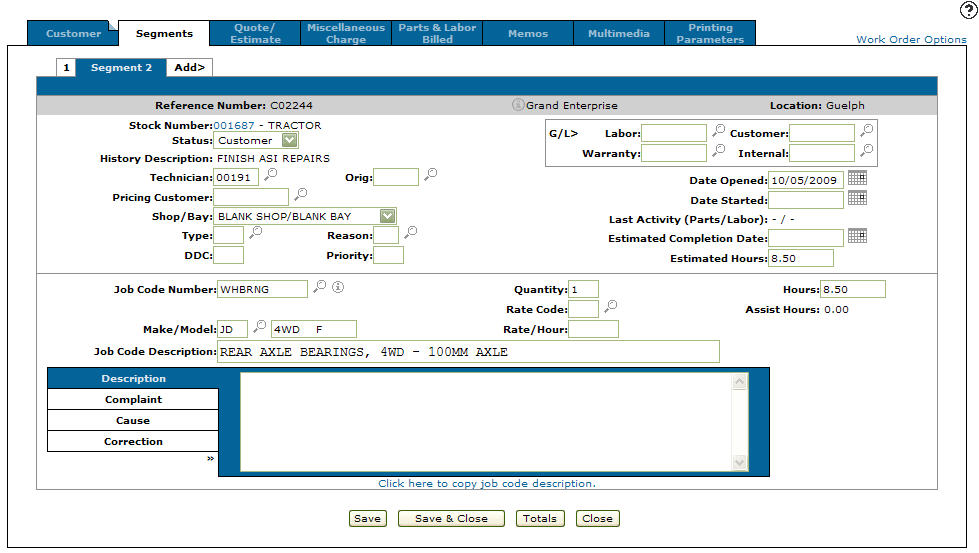
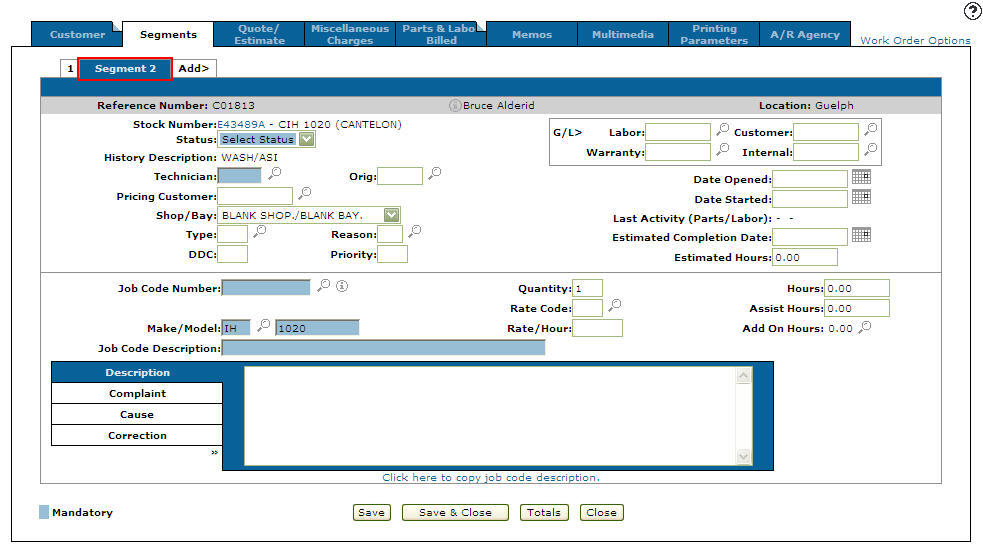
To add a new work order segment click the Add> tab. The Segments tab refreshes adding a new Segments tab to the work order indicated by the addition of a Segment 2 tab.
Use these buttons to complete your work on the Segments tab:
| Button | Function |
|---|---|
| Save | Saves changes made on the Segments tab. |
| Save & Close | Saves changes on the Segments tab and closes the work order listing. |
|
No Inspection Active Inspection(s) Completed Inspection(s) |
The text on this button dynamically changes depending on the state of an inspection:
|
| Deposit | Opens the Deposit modal. See Deposit within a Work Order Segment. |
| CNH Reward Card | |
| SLA |
Opens the Service Labor Adjustment modal. This button only displays when premium codes are set within the Service section of the System Settings - Division tab, and transactions have been added to the Work Order. |
| Void Order |
Sets the first segment on the work order to Closed, deletes remaining segments, and closes the work order. The Void Order button only appears if the work order has no outstanding order charges and at least one open segment. |
| Delete |
Deletes the work order header and work order data from the system (as stored in the WOH and WOTAH files.) This button only appears if no segments have been saved to the order. |
| Reserve |
Opens the Reserve screen allowing the user to enter a reserved amount pre-authorizing the work order for a pre-defined amount of the customer's credit. To use the reserve function, all locations must be set up for the Internal A/R Credit Check system. |
| Totals | Opens the Totals screen. |
| Signature |
If you are using a signature device at your dealership, allows you to capture a signature for the work order. This button only appears if the Signature Required checkbox has been selected for the Cash Code on the work order. If you do not have access to the green screen application to turn this switch on or off, contact your system administrator. This button also does not appear if the Capture Electronic Signatures switch is deactivated on the Authorization List for Product Support - Parts Invoicing screen, or if the work order was created for a customer that is marked as Internal or has Transfer selected in the Terms field of their Customer Profile. |
| Close | Closes the Segments tab and closes the work order listing. |