
Configuration: Parts Book Epsilon1
Use the Parts Book Epsilon1 screen to configure the AGCO Epsilon1 electronic parts catalog interface. The interface sends parts pricing and availability from IntelliDealer to AGCO Epsilon1 while users work in the catalog. Users can export pick lists from Epsilon1 and import them into a parts invoice or parts requisition in IntelliDealer. Epsilon1 can be accessed from modern web browsers and does not require the ActiveX control used by the legacy AGCO Epsilon interface. When configured on the Parts Invoicing Tab tab, the interface can also create parts invoices from parts ordered on the AGCO PartsBook website (AGCOPartsBook.com).
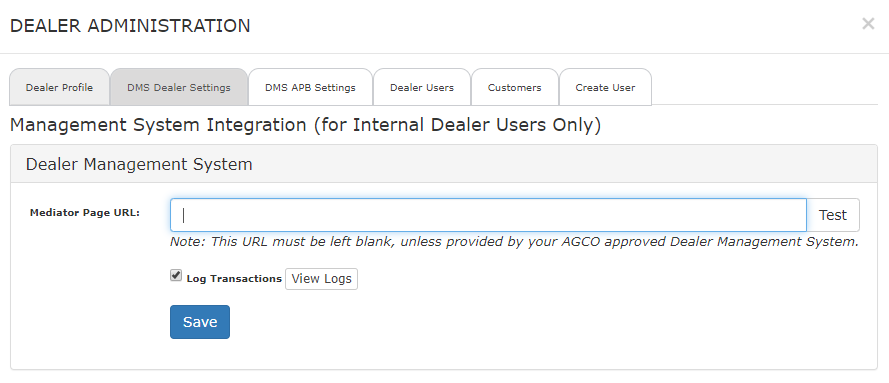
Epsilon1 requires an HTTPS connection. On-premise server dealers need a digital certificate for MyDealer because this interface uses MyDealer URLs. The dealership does not need to own MyDealer, but MyDealer must be set up for the dealership. On the Parts Book Epsilon1 Tab, you generate a Dealer Business System (DBS) URL—your MyDealer-hosted link into IntelliDealer that lets Epsilon1 request parts pricing, availability, and pick list data from your system. In AGCO Epsilon1, paste this URL into the Mediator Page URL field under Tools > Configuration > DMS Dealer Settings.
To open the Parts Book Epsilon1 screen, navigate to Configuration > Interfaces > AGCO > Parts Book Epsilon1, then select the desired tab.
Topics in this section are:
Initial Setup
Complete this setup before you use the AGCO Epsilon1 interface:
-
License feature 6221 - AGCO PartsBook-Epsilon.
-
Obtain access to the AGCO Epsilon1 electronic parts catalog.
-
Open Configuration > Interfaces > AGCO > Parts Book Epsilon1.
-
On the Vendors Tab tab, confirm AGCO vendor profile records are assigned. If AGCO vendors are not listed, click Assign Manufacturer, search for AGCO vendors, and click Select.
-
On the Dealer Numbers Tab tab, assign an AGCO dealer number to each location that participates in the interface.
-
On the Users Tab tab, create a third-party user for Epsilon1. If no user exists, click Create, enter a password, and click Save. Record the user ID and password.
-
On the Parts Book Epsilon1 Tab tab, enter your MyDealer URL, select the third-party user, enter the matching password, select a location, and click Generate. Copy the DBS URL and paste it into AGCO Epsilon1 under Tools > Configuration > DMS Dealer Settings. Test the connection in Epsilon1 and confirm the test succeeds.
-
On the Parts Invoicing Tab tab, configure parts invoice defaults, notification email addresses, and picpak options. Click Save.
-
On the Configure Printers Tab tab, assign location-specific picpak printers when needed.
Walkthrough
After setup, test the Epsilon1 interface using these steps:
-
In AGCO Epsilon1, create a pick list of parts. Pricing and availability from IntelliDealer should display on the Epsilon1 screen. Add the parts to the shopping cart and click the Invoice Pick List icon to open the Invoice Pick List screen.
-
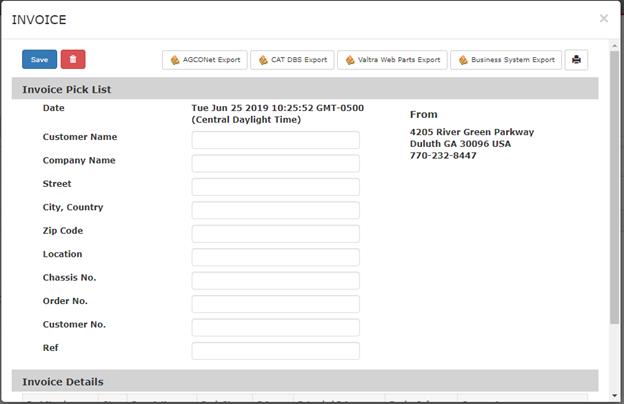
On the Invoice Pick List screen, click the Business System Export tab. Epsilon1 generates a pick list in IntelliDealer and displays the pick list name on the Invoice Pick List screen. The pick list can be imported into a parts invoice or parts requisition.
-
In IntelliDealer, open Parts Invoicing and create a test invoice using a test customer number. On the invoice details screen, click Import, select the Parts Catalog / PC File option, and enter or search for the pick list name created in Epsilon1. Click Save on the Import screen. The parts from the pick list are imported into the parts invoice.
-
Alternatively, open Parts Requisition and use the same Import procedure with the Parts Catalog / PC File option to load the pick list into a requisition.
 The AGCO Epsilon1 Invoice Pick List screen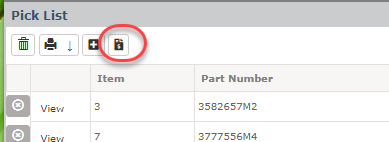

Vendors Tab
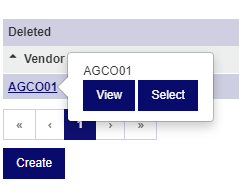
Use the Vendors tab to identify your vendor number(s). To access a Vendor Profile, click on a Vendor name or number.
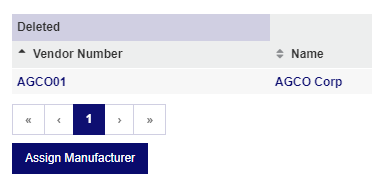
On the Vendors tab for Parts Book Epsilon1, assign vendor profile records with the AGCO manufacturer code. AGCO vendor records must be configured before you assign dealer numbers or generate the DBS URL.
To assign AGCO vendors:
-
Verify all AGCO vendors are listed on the Vendors tab.
-
If AGCO vendors are not listed, click Assign Manufacturer.
-
Search for AGCO vendors and click Select.
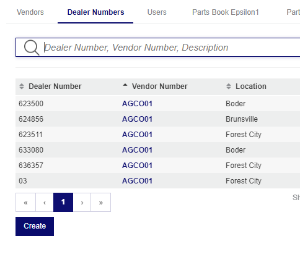
Dealer Numbers Tab
Use the Dealer Numbers tab to assign a dealer number to each dealership location. These values must be obtained from the dealer. These dealer numbers identify which locations can access the vendor's interface. See also Dealer.
On the Dealer Numbers tab for Parts Book Epsilon1, assign an AGCO dealer number to each dealership location that participates in the interface.
Users Tab
Use the Users tab to create and maintain third-party users for the AGCO Epsilon1 interface. The user ID and password you configure here are used on the Parts Book Epsilon1 Tab when you generate the DBS URL.
If no third-party user exists for Epsilon1, click Create, enter a password, and click Save. Record the user ID and password for use when you generate the DBS URL.
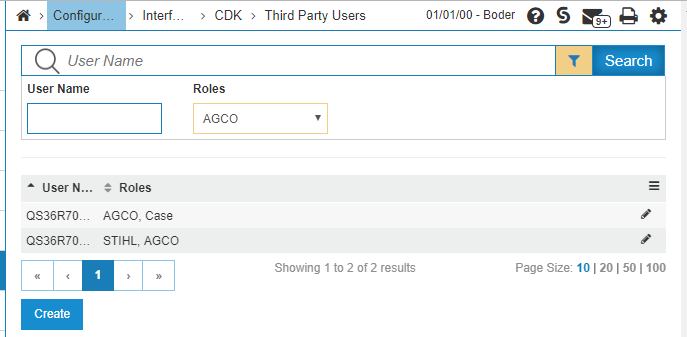
Click anywhere on the row of the User Name you are interested in to open the Edit screen:
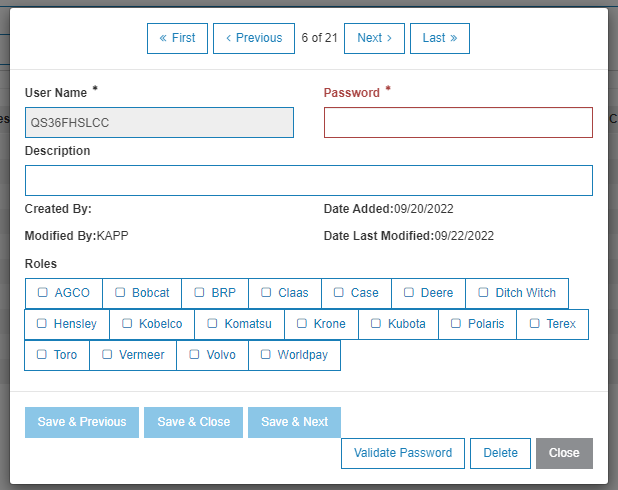
The fields on this page are:
| Field | Description |
|---|---|
| User Name | The name of the third-party user. The User Name is auto-generated and is your data library and 5 random letters. |
| Password |
When creating a new third-party user, enter a password. Warning: Changing the password after initial creation will cause the user to be unable to log in to the interface. If you do change the password, you must update the third-party that uses the ID about the new password. |
| Description | Optional. A description to help you identify the third-party user. |
| Date Added | The date the third-party user was added to IntelliDealer. |
| Created by User | The user who created this third-party user. |
| Date Modified | The date this third-party user was modified. |
| Date Modified by User | The user who modified this third-party user. |
| Roles | Third-party systems that can be checked individually. |
Use these buttons to complete your work:
-
Save & Previous—save the current changes and go to the previous third-party user.
-
Save & Close—save the current changes and close the window.
-
Save & Next—save the current changes and go to the next third-party user.
-
Validate Password—opens a dialogue into which you can enter a password associated with the current third-party user ID. It does not update the password, merely validates whether it is a valid password for that ID.
-
Delete—remove the current third-party user.
-
Close—closes the window.
Parts Book Epsilon1 Tab
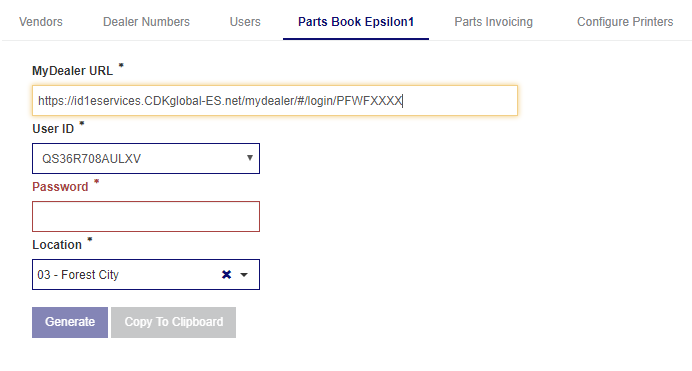
Use the Parts Book Epsilon1 tab to generate the DBS URL that connects AGCO Epsilon1 to IntelliDealer.
Fields on the Parts Book Epsilon1 tab are:
| Field | Description |
|---|---|
| MyDealer URL | Required. The dealership MyDealer URL. This value must use HTTPS. |
| User ID | Required. The third-party user created on the Users Tab. |
| Password | Required. The password for the selected third-party user. This value must match the password configured for that user. |
| Location | Required. The location used when the DBS URL is generated. |
| DBS URL | Display only. The generated mediator page URL. After you click Generate, copy this URL and paste it into AGCO Epsilon1 under Tools > Configuration > DMS Dealer Settings as the Mediator Page URL. Use the test control in Epsilon1 to confirm the connection succeeds. |
Click Generate to save the configuration and create the DBS URL. Click Copy To Clipboard to copy the DBS URL for use in AGCO Epsilon1.
Configure AGCO Epsilon1
After you generate the DBS URL in IntelliDealer, complete these steps in AGCO Epsilon1:
-
Open the AGCO Epsilon1 application.
-
Navigate to Tools > Configuration.
-
Open the DMS Dealer Settings tab.
-
Paste the DBS URL into the Mediator Page URL field.
-
Click the test control and confirm the connection succeeds.

Parts Invoicing Tab
Use the Parts Invoicing tab to set configuration details for AGCOPartsBook.com and AGCO Parts Book Epsilon. The interface creates parts invoices—or pick lists, when configured—for parts ordered on the AGCO PartsBook website.
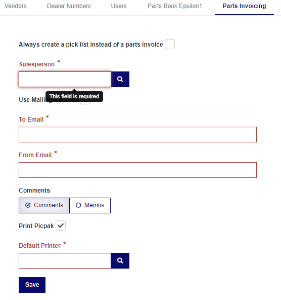
Fields on the Parts Invoicing tab are:
| Field | Description |
|---|---|
| Always create a pick list instead of a parts invoice | If selected, whenever a shopping basket is created in AGCO PartsBook/ Epsilon, a pick list is created in IntelliDealer. If not selected, a parts invoice is created instead. |
| Salesperson | Required. The default salesperson that all part orders are attributed to when they are created using the vendor website associated to the interface. |
| Use Mailing Address | If selected, the Ship To field in all parts invoices created by the selected interface uses the shipping address specified in the Customer Profile. |
| To Email | Required. In the event that the interface cannot successfully create a parts invoice, it creates and sends a notification email to the email address specified in this field. |
| From Email | Required. All emails sent to the recipient specified in the To Email field are sent from this email address. |
| Comments | The section of the parts invoice where comments from the AGCO PartsBook/ Epsilon website appears; either under Comments or Memos. |
| Print Picpak | If selected, a picpak is created for each parts invoice generated by the interface. |
| Default Printer | The default picpak printer used when a location-specific printer is not configured on the Configure Printers Tab. |
| CSO016 Printer | The default CSO016 printer used when a location-specific CSO016 printer is not configured on the Configure Printers Tab. |
Click Save to save the settings recorded on the Parts Invoicing tab.
Configure Printers Tab
Use the Configure Printers tab to define picpak and CSO016 printers by location for parts invoices created through the AGCO Epsilon1 interface. If a location is not listed, click Create to assign a location to a specific printer. If a location-specific printer is not configured, the system uses the default printers specified on the Parts Invoicing Tab.
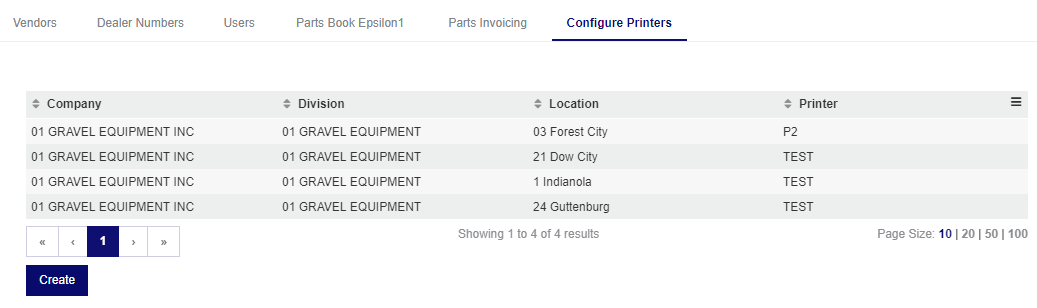
Columns on the Configure Printers tab are:
| Column | Description |
|---|---|
| Company | The company code for the location where the printer is configured. |
| Division | The division code for the location where the printer is configured. |
| Location | The location code where the printer is configured. |
| Printer | The default printer used to print picpaks for parts invoices created through the interface for this location. |
| CSO016 Printer | The CSO016 printer assigned to this location for interface-generated documents. |
Click a row to edit an existing printer configuration. Click Create to add a printer configuration for a location. When creating a record, select Company, Division, and Location in order, then select the Default Printer and CSO016 Printer. Click Save to store the configuration.
Data Source: PROPERTIES, PFWTAB
Feature: 6221 - AGCO PartsBook-Epsilon
Security: 999 - Configuration
Revision: 2026.08