Customer - General Invoicing
The Customer - General Invoicing tab allows you to create a new invoice.
Warning: The General Invoicing system is recommended for users who are familiar with accounting principles.
To open the Customer - General Invoicing tab, click an Order Number (or create a new order) from the General Invoicing screen.
Topics in this section include:
See also: General Invoicing FAQ and Avalara Tax Integration: General Invoicing.
Creating a New General Invoice
-
On the General Invoicing Screen, click the Need to create a New Order? Click here to add link.
The Customer - General Invoicing Header tab appears. -
Type the customer number in the Customer field.
- or -
Click the Search icon to open the Your Customers screen in a new browser window and locate the appropriate customer.
 After entering or selecting a customer number, the Customer - General Invoicing Header tab refreshes and adds any customer information found in the customer's profile.
-
Type the salesperson id in the Salesperson field.
- or -
Click the Search icon to open the Salesperson Selection screen in a new browser window and select the appropriate salesperson from the list.Note:
The Salesperson field may have been filled in automatically, depending on your User and Group settings. -
(OPTIONAL) If the shipping location is different than the Sold to location, type a Ship to address.
- or -
Click the Search icon to open the Ship to Selection screen in a new browser window and select the appropriate shipping location from the list associated with this customer profile. -
Click the G/L Details tab.
The G/L Details tab appears. -
Type a brief description of the general invoice line entry. You may click on the More
 icon to enter an extended description.
 -
Type the Amount of the transaction.
No amounts are automatically calculated on this screen since the intention of General Invoicing is to give the user total control over what G/L accounts are used and how much is to be posted to each account.
-
Select the general ledger Account Number for each entry of the invoice.
-
(OPTIONAL) Type a Stock Number for any entry to the invoice where required by the system.
-
(OPTIONAL) Select the Print checkbox to print the amount, the description, and the extended description (if it's filled out) for each line entry.
Note:
The stock number will NOT print and you must have at least one line set to print on the general invoice. -
(OPTIONAL) If the line entry has a stock number, enter the Cost Code (the costing sub type that corresponds to this entry i.e. C = current cost).
-
Click the Save button after each completed line entry and the system will validate your account entries and populate the TTTT field with the associated tax settings. If you have Avalara enabled, see Avalara Tax Integration: General Invoicing.
Even though the tax codes appear, tax is not calculated by these codes. You must still manually enter a tax line item referencing the appropriate tax G/L account, and tax amount. If you do not, an error message will prompt you to make the necessary tax entry.
If the line entries do not balance on this invoice when you attempt to exit the G/L Details tab, an error will be generated warning you to correct the problem. Click the error link to view an explanation of the problem and correct the balancing error before you continue.
-
Click the Invoice button or the Frequency tab.
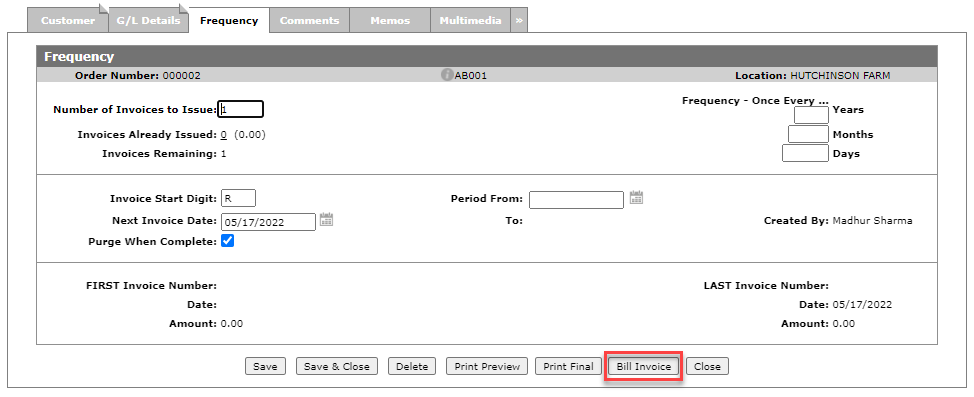
The Frequency tab appears. -
On the Frequency tab, complete the field entries to set the system with the Number of Invoices to be generated, the Frequency with which the invoicing should take place, the Invoice Start Digit, and the Purge When Complete instructions, along with other attributes such as the invoice start digit.
-
(OPTIONAL) click the Memos tab to enter any non-printable comments about the invoice.
-
(OPTIONAL) click the Multimedia tab add multimedia files to the invoice.
-
(OPTIONAL) if the final charge account is linked to an Agency Code or Cash Code that requires authorization, the A/R Agency tab should appear. For an example of the authorization process using Worldpay, see Worldpay Daily Usage: Invoicing a Customer.
-
Once you have finished your entries you can complete your work one of several ways:
To: Do This: Save any changes you've made on this screen. Click the Save button. Saves all changes and returns you to the general invoicing screen. Click the Save & Close button. Deletes the current Invoice from the system. On the Frequency tab, click the Delete button. Allows you to preview the invoice printout. On the Frequency tab, click the Print Preview button. Allows you to print the final invoice.
Depending on your security access (System 602), you may be able to go back and edit the order after printing the final invoice.
On the Frequency tab, click the Print Final button. Close this screen and returns you to the general invoicing screen without saving any of the changes you've made. Click the Close button.
Real-time General Billing Usage
When real-time billing is enabled, you can submit the invoice for immediate processing. If there is more than one invoice remaining, they will be processed by the billing schedule, unless you choose to process them earlier.
Prerequisites: You must configure a schedule for general billing. See Billing Schedule.
-
Create a new general invoice filling in the fields as required.
-
Click the Frequency tab, then click Bill Invoice at the bottom of the screen.
-
On the Bill Invoice screen, set the Billing Date and Printer, then click Bill Invoice.
The invoice is processed.
Screen Description
These Information fields appear on the Customer - General Invoicing tab:
| Information | |
|---|---|
| Field | Description |
| Order Number | The order number used as a reference number for the item. |
| Location | The location where the invoice is created. |
The fields on the Customer - General Invoicing tab are:
| Field | Description |
|---|---|
| Customer |
The number of the customer on the general invoice. If security switch Show Notifications when utilizing Customer is enabled and the customer has notifications, a link appears below the customer. Click the link to see the notifications. See Customer Notifications. |
| Contact |
The customer contact associated to the invoice. Any print outs related to the invoice include this name. Select the icon next to this field to open the VitalEngage Text application. |
| Salesperson | The salesperson associated with the invoice. |
| Responsible |
The salesperson responsible for the invoice. This field is for informational purposes only, however it is included on print-outs related to the invoice. Note: This field is mandatory if Responsible Salesperson Required For General Invoices is enabled in the System Settings, Location tab. |
| PO Number | The purchase order number. |
| Ship Via | Notes if any special shipping methods are required. For example, ship via UPS. |
| Discount | This field indicates the default discount for this invoice. The discounts must be set up on the Discounts screen before they can be used. |
| Tax 1 |
The default TAX 1 for this invoice. If this field is left blank, the field defaults to the location tax or default customer tax on the profile. Tax 1 codes must be set up on the Tax 1 screen before they can be used. |
| Tax 2 | The default Tax 2 for this invoice. If this field is left blank, the field defaults to the location tax or default customer tax on the profile. Tax 2 codes must be set up on the Tax 2 screen before they can be used. |
| Tax 3 | The Tax 3 for this invoice. If this field is left blank, the field defaults to the location tax or default customer tax on the profile. Tax 3 codes must be set up on the Tax 3 screen before they can be used. |
| Tax 4 | The Tax 4 for this invoice. If this field is left blank, the field defaults to the location tax or default customer tax on the profile. Tax 4 codes must be set up on the Tax 4 screen before they can be used. |
| Total A/R | The customer's current accounts receivable outstanding balance. |
| Credit Limit | The customer's credit limit as maintained in the customer's profile. |
| Available Credit |
The customer's current available credit as maintained in the customer's profile. Note: Feature 6178 AND activating special credit checks are required to see this field. Activate at Configuration > Miscellaneous > Other > System Settings > Location tab under Financial. |
| Sold to | The name and address of the customer. |
| Ship to |
An alternate address for the customer different from the sold to address. |
Click on the Search![]() icon next the Unit # to add another unit to the invoice.
icon next the Unit # to add another unit to the invoice.
Use these buttons to complete your work on the Customer - General Invoicing tab:
| Button | Function |
|---|---|
| Save | Saves changes made on the Customer - General Invoicing tab. |
| Save & Close | Saves changes made on the Customer - General Invoicing tab and returns to the General Invoicing screen. |
| Close | Closes the Customer - General Invoicing tab without saving and returns to the General Invoicing screen. |