Parts Invoicing
Use the Parts Invoicing screen to search for and view parts invoices, create a parts invoice, switch to work order parts requisition, confirm partial shipment of a parts invoice, view parts invoices by customer name and change default print parameters.
When searching, if a Part Number or Bin Location is selected, executing a search also scans the Parts Invoicing Details tab for a matching Part Number or Bin location.
The Parts Invoicing listing screen can be accessed from anywhere in IntelliDealer by navigating to the Product Support > Parts > Parts Invoicing.
Topics in this section are:
See also:
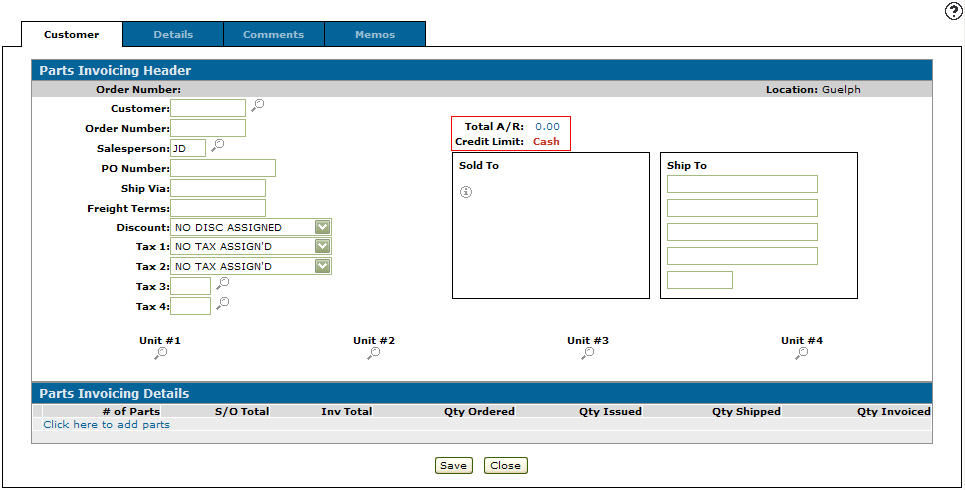
Creating a New Parts Invoice
Prerequisites: You must be licensed for VESign(Electronic Document Signing, feature number 6519) to see the Send VESign Invoice button on the Details tab.
-
Navigate to Product Support > Parts > Parts Invoicing.
-
Click Create.
-
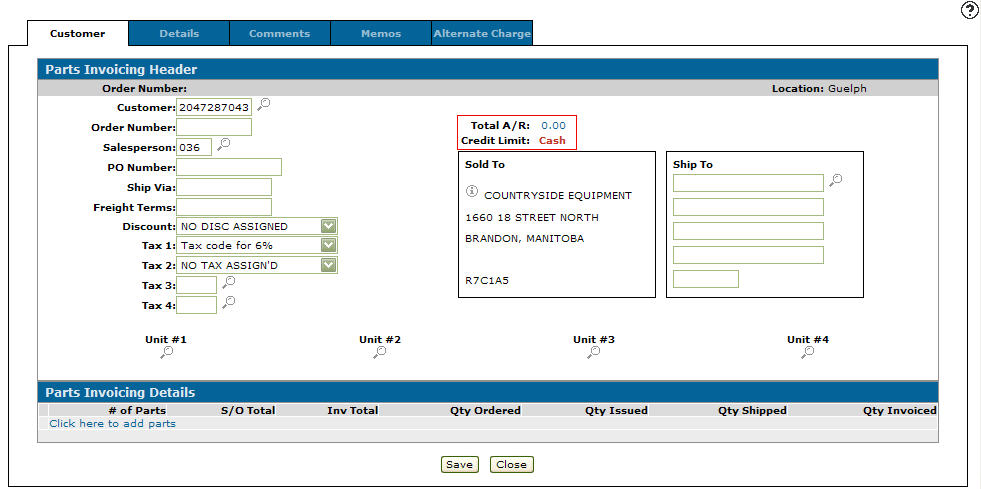
Enter the customer number in the Customer field - or - click the Search
 icon to open the Customer Listing screen in a new browser window and locate the appropriate customer.
The Customer - Parts Invoicing Header tab refreshes listing information in the customer’s profile.
-
Enter the salesperson number in the Salesperson field - or - click the Search
 icon to open the Salesperson Selection screen in a new browser window and select the appropriate salesperson from the list.
Note: The Salesperson field may have been filled in automatically, depending on your User and Group settings.
-
(OPTIONAL) Select a Discount from the list.
-
(OPTIONAL) Select your Tax (1,2,3, and 4) settings from each list.
The taxes you select on the Customer - Parts Invoicing Header are used as the default taxes for any parts added to this invoice.
-
(OPTIONAL) To load details of the machine(s) that the parts are being purchased for, select a Unit by clicking the related Search
icon to open the Unit Selection screen in a new browser window. -
(OPTIONAL - complete only if the shipping location is different than the Sold to location.) Type a Ship to address - or - click the Search
icon to open the Ship to Selection screen in a new browser window and select the appropriate shipping location from the list of shipping locations associated to the selected customer profile. -
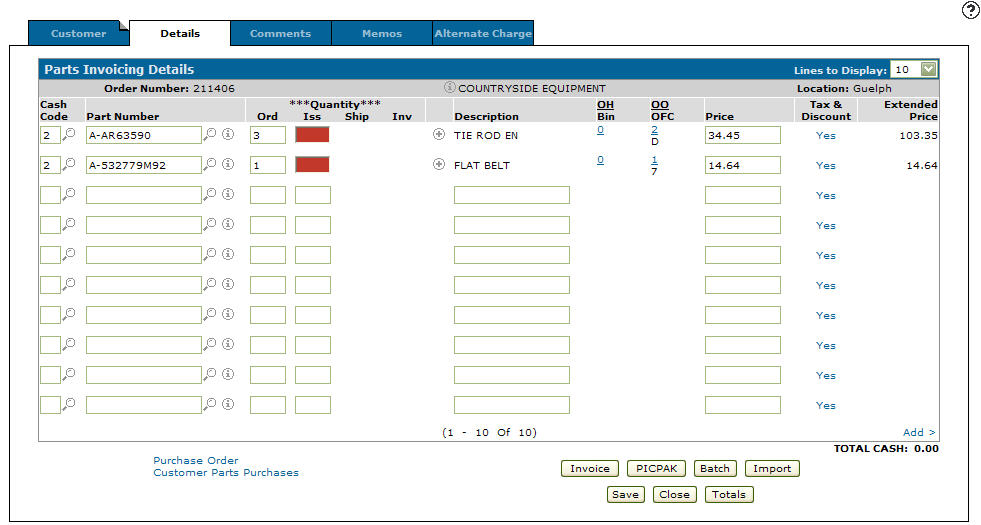
Click the Details tab - or - click the Click here to add parts link.
-
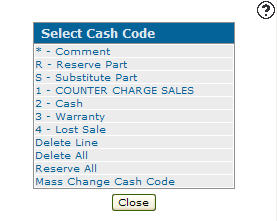
Enter a cash code in the Cash Code field - or - click the Search
icon to open the Select Cash Code screen in a new browser window and select the appropriate cash code from the list. If a default cash code was set in the selected Customer Profile, it is automatically populated the Cash Code field.
-
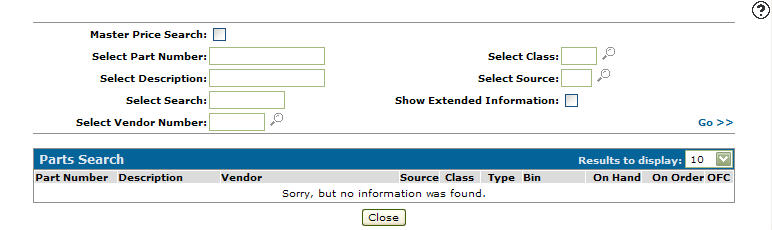
Enter the part number in the Part Number field - or - click the Search
icon to open the Parts Search screen in a new browser window and locate the correct part. -
Enter an order quantity in the Ord field.
-
Click Save to save the part number and update the information fields with inventory and pricing information about the added part.
The Iss column lists the quantity of parts that the system can issue to fulfill the need of the parts invoice. If the Iss field is highlighted in red, the location you are currently in does not have enough stock to fulfill the parts invoice. In this case, you will need to order the outstanding parts from a vendor or another location.
The Total Charge field lists the total dollar amount of the parts that can be shipped on this invoice.
-
Click Save .
-or-
- A copy of the invoice is printed according to the parameters set up on the Printing Parameters screen.
- A copy of the invoice is sent to any customer contacts configured to receive it, (as specified in the E-mail field of the Edit Contact screen.)
- If real-time billing is enabled, the invoice is processed immediately. Otherwise, any parts on the invoice that have not been previously processed are marked as ready to be processed and, during the next billing run, will have an invoice created for them.
-
Feature 6157 - Payment Card Interface is licensed
-
Table GIFTCARD is configured
-
The parts invoice is not an inquiry invoice (INQ)
Use these buttons to complete your work on the Parts Invoicing Details tab:
| Button | Function |
|---|---|
| Credit Number |
Allows you to assign a credit reference number to a credit invoice by opening the Credit Number screen. This button only appears on credit invoices. |
| Send VESign Invoice |
Clicking this button invoices the sales order, bypassing the legacy signature process, and displays the finalized invoice in a pop-up to initiate and then complete the VESign process. See VESign Process Notes. You must be licensed for VESign(Electronic Document Signing, feature number 6519) to see the Send VESign Invoice button on the Details tab. |
| Invoice |
Clicking the Invoice button causes these actions to occur: Note: If the selected order is related to a parts location transfer, you cannot change the part number or order quantity, and you cannot delete any of the line items listed on the invoice. If the Cash Code on the invoice is 2 (representing a cash sale) and the Open Change Window on Cash Invoice switch is activated on the Authorization List for Product Support - Parts Invoicing screen, clicking the invoice button opens the Change Calculator window, allowing you to calculate the change due amount. If the Display Totals/ Charge Code Before Invoicing switch is activated on the Authorization List for Product Support - Parts Invoicing screen, the Parts Invoicing Totals screen will appear unless all the line items on the invoice are using *, blanks, 3 or 4 for the Cash Code. |
| Display Invoice | Appears after an invoice is created. Click to view the finalized invoice (VESign or legacy). |
| Reprint |
Reprints the invoice. The Reprint button only appears when the parts invoice has previously been invoiced. |
| PICPAK |
Prints a PICPAK according to the parameters set up on the Printing Parameters screen. This is used if the order is not invoiced immediately. The PICPAK button appears Red if a PICPAK has already been generated for the selected invoice. When using the electronic picking ticket system, clicking this button presents you with the option to either print a PicPak or mark the parts on the invoice as Ready To Be Picked. See the Electronic Picking Ticket System Overview. When using a point-of-sale device, you will be prompted for a signature when issuing a PICPAK. This is configured on the System Settings: Location screen. |
| Batch |
Tells the system to produce the final invoice during the billing run at night and prints a PICPAK for shipping purposes before running the batch. You may be prompted for a signature after clicking the Batch button, if it has not already been captured with a PICPAK. During the billing run, batched invoices are printed, emailed or both depending on the option configured in the Print Parts Invoices field of the Customer Profile. |
| Deposit |
Allows you to add a deposit to the invoice. A Cash Code is required when the deposit button opens the Deposits screen. The amount entered is applied to the total amount of the invoice. |
| Import | Allows you to import a parts list from either a PC, equipment parts list, job code parts list, or a special terms file. |
| Gift Card |
Opens the Gift Card screen which allows you to use a valid gift card to fully or partially pay for an invoice, load credit onto a gift card, or check the current balance on a gift card. The Gift Card button only appears if: |
| Adjust LDTTN |
Opens the Tax, Discount & Level screen, allowing you to change the tax codes, discounts, pricing level or non-stock codes being applied to the selected part(s). Only parts that have been selected using the checkbox in the LDTTTTN field are updated when using the Adjust LDTTN button. |
| Save |
Saves the changes made on the Parts Invoicing Details tab. If a part with related parts is entered in the Part Number field, after selecting the Save button the Add Related Parts screen appears, allowing you to add a related part onto a sales order. |
| Apply Promotional Pricing | When selected, applies promotional pricing to parts if they are available at the user's location. |
| Update JD eCommerce |
Parts Invoices that have been created using the John Deere eCommerce interface can have their status updated here. If the order has been canceled, a comment or memo is added with a warning indicating the order was transmitted as cancelled. The comment and memo settings configured on the Parts Invoicing configuration screen are respected when adding the warning message. |
| Add'I MyKomatsu Info | When using this option, ensure that Freight Carrier and Tracking Number is filled in. These fields are mandatory when using MyKomatsu parts information. |
| Update Komatsu Shipment | Click to open a pop-up on which you can provide freight carrier and tracking number information to send to Komatsu. If you do not provide shipment information before invoicing, the pop-up automatically appears after clicking the Invoice button. Shipment information must be provided to Komatsu to allow the order to be invoiced. |
| Save/Close | Saves changes made on the Parts Invoicing Details tab and closes the screen. |
| Close | Closes the Parts Invoicing Details tab without saving and returns to the previous screen. |
| Totals | Displays charges, cash, warranty, tax and discount totals for both the sales order and the next invoice. |
Adding a Promotional Discount to a Parts Invoice
Prerequisites: You must first create a promotional part. See Creating a Promotional Part.
-
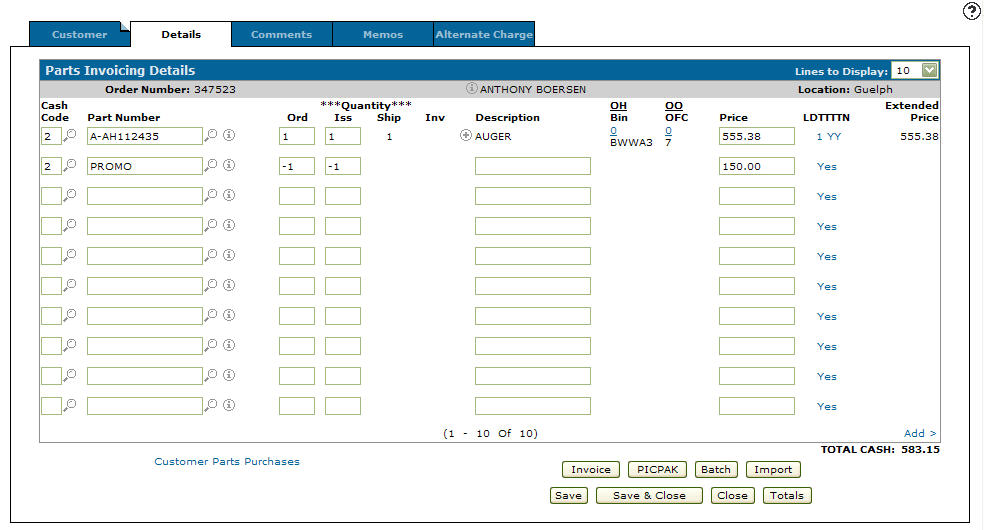
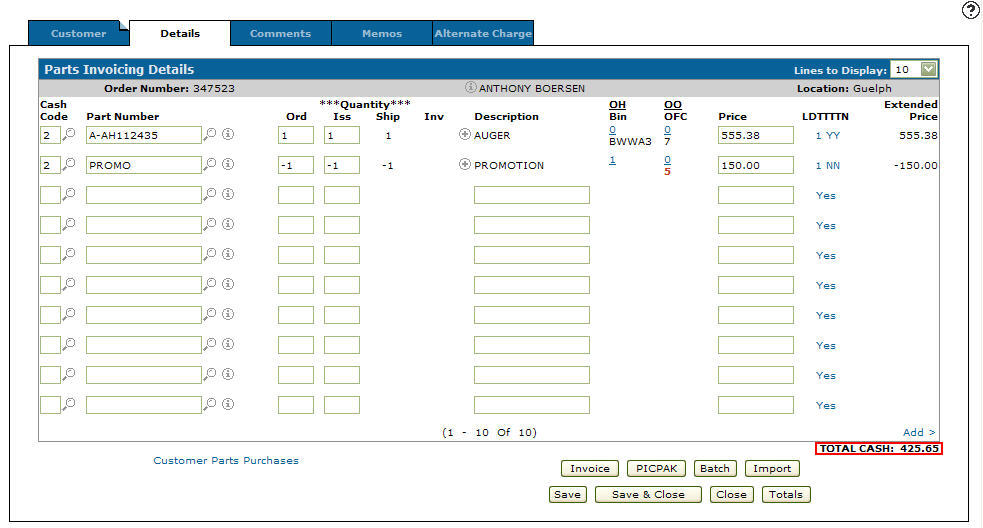
Create a new part invoice, as described above, with at least one part on it and save it.
You can now add the PROMO part.
-
On the next line, enter Cash Code 2 and the PROMO part number.
-
Enter a negative quantity in the Ord and Iss fields.
-
Calculate and enter the discount amount in the Price field.
-
Click Save.
The system populates the remaining fields and applies the promotional discount to the invoice.
-
Click Invoice to generate the invoice.
Real-time Parts Invoice Billing
When real-time billing is enabled, you can submit the invoice for immediate processing. If there is more than one invoice remaining, they are processed by the billing schedule, unless you choose to process them earlier.
To bill a parts invoice in real time:
-
Create a parts invoice, filling in the fields as required.
-
Save the invoice.
-
Click the Details tab.
-
Click Invoice.
The Invoice PDF window opens and the invoice is posted immediately. If everything is in order, the invoice is posted in real-time and now appears in Invoice History.
VESign Process Notes
VESign (feature 6519) enables electronic document signing after the invoicing process for Parts Invoices, letting you send invoices to customers for signature directly from IntelliDealer. When sending a Parts Invoice for signature you can send it using one of these methods:
-
From the Details tab, click Send VESign Invoice to send the invoice for electronic signature.
-
From the Details tab, after completing the standard parts invoicing process by clicking Invoice:
-
Reopen the parts invoice.
-
On the Details tab, click Display Invoice to send the invoice for electronic signature.
-
-
From the Invoice History:
-
Navigate to the Invoice History Listing screen.
-
Locate and open the desired invoice.
-
Click Send VESign to initiate the signing process.
-
If an invoice has already been sent for signing, you can view the signing status on the VESign Dashboard. Or, to view the status on the Parts Invoice, use these steps:
-
Open the Parts Invoice and click the Details tab.
-
Click Display Invoice.
The Invoice PDF window opens.
-
Click View VESign Details .
The VESign Signing Details screen displays the status of the document.
Once the customer has signed the document, it is stored on the Multimedia tab of the Parts Invoice.
Screen Description
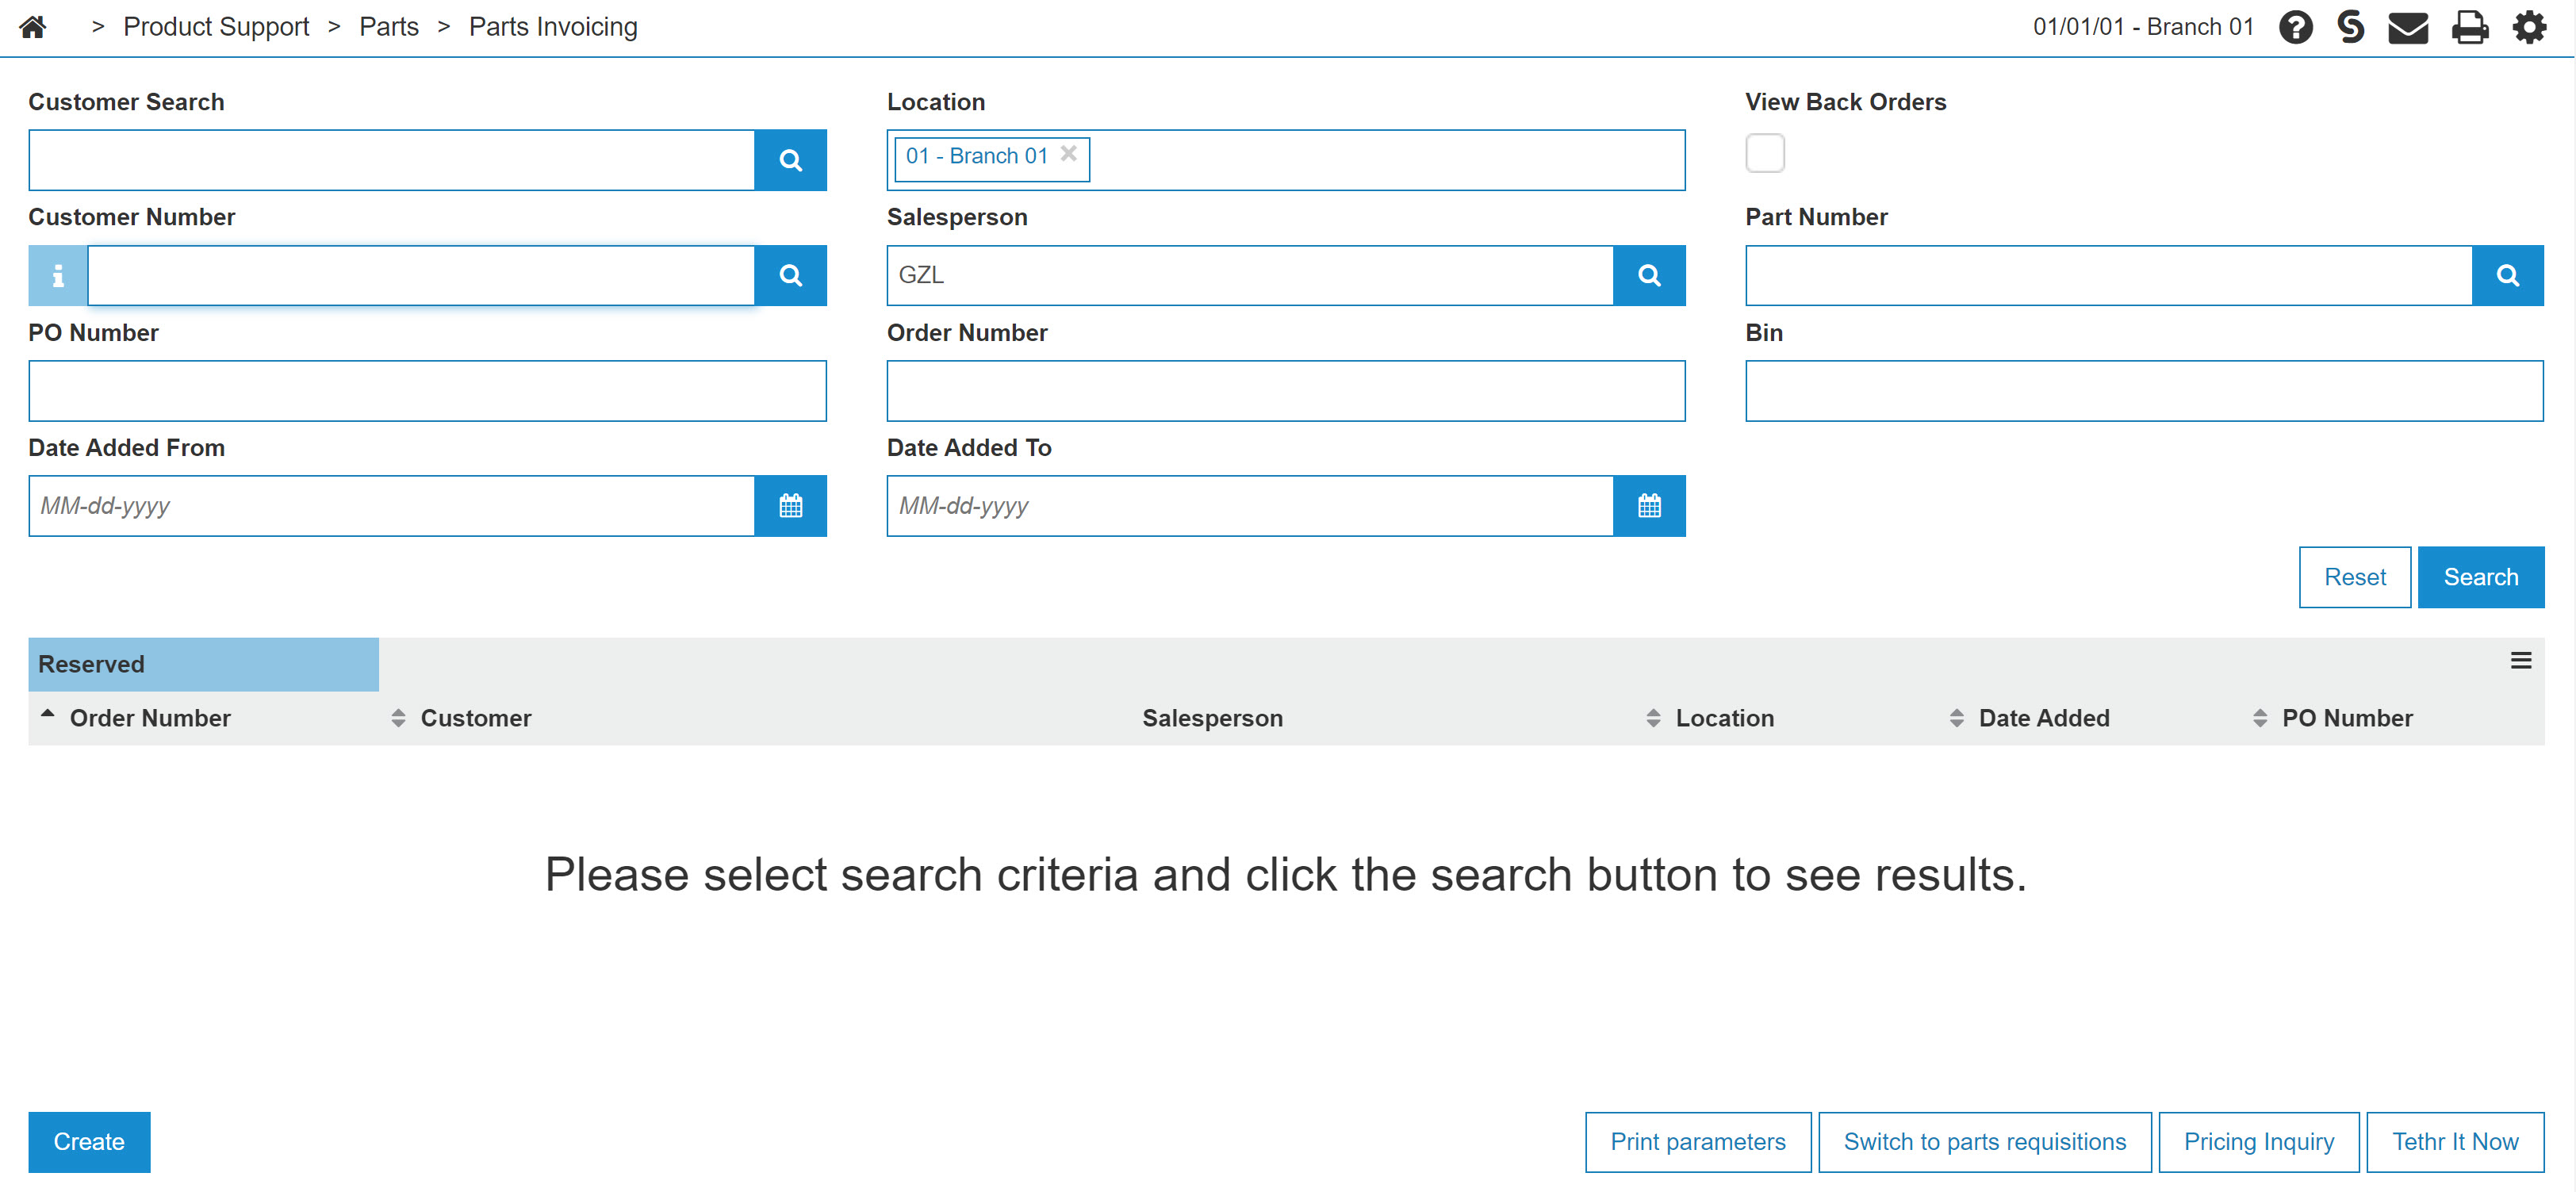
The search options on the Parts Invoicing screen are:
| Field | Description |
|---|---|
| Customer Search |
Search for parts invoices by entering a customer search word. This field only looks at the search field in the parts invoice file header (SALORD) and does NOT look at the search fields on the customer profile. To search Customer Profiles, click the Search |
| Customer Number |
Search for parts invoices by entering a customer number. |
| PO Number | Search for part invoices by entering a purchase order number. |
| Date Added From | Narrow down the parts invoice search results by selecting a date range starting from a selected day. |
| Location | Search for part invoices by entering a location. |
| Salesperson | Search for part invoices by entering a salesperson. |
| Order Number | Search for part invoices by entering an order number. |
| Date Added To | Narrow down the parts invoice search results by selecting a date range up to a selected day. |
| Part Number | Search for part invoices by entering a part number. |
| Bin | Search for part invoices by entering a bin number. |
The View Back Orders checkbox toggles between displaying back orders in the listing grid.
Note: Field level-security assigned to your user profile (as defined on the Field - Work With Field Level Security screen) may change the appearance of, or hide, certain fields listed below.
The fields on the Part Invoicing screen are:
| Field | Description |
|---|---|
| Order Number |
The order number associated with the parts invoice. A reverse highlight on the order number indicates that a part, or parts, have been issued or reserved for this order but the order itself has not yet been invoiced. An I at the end of an Order Number indicates that the order has been invoiced but not yet cleared by a billing run. The characters INQ at the beginning of an order number indicates that the invoice is an Inquiry Invoice (INQ) |
| Customer | The customer number associated with the parts invoice. |
| Salesperson | The salesperson assigned to or who created the parts invoice. |
| Location | The location of the parts invoice. |
| Date Added | The day the parts invoice was created. |
|
PO Number |
The purchase order number on the parts invoice. A PO number with the prefix "CRF" at the beginning of the PO Number indicates that a credit has occurred on the specific invoice and a credit reference number has been applied. See Applying a Credit Reference Number on a Credit Invoice. |
| VESign Status |
The signing status of the VESign document. Can be one of:
IntelliDealer checks for a status update every 30 minutes. |
The  icon option Export to CSV creates a CSV file version of the results.
Click an Order Number or hover over it and select View/Edit from the pop up menu to open the Details tab.
Hover over an Order Number and select Ship Confirm from the pop up menu to confirm partial shipment of the parts on the invoice using the Ship Confirm Details tab.
Note: The Ship Confirm option only appears if the Allow Ship Confirm switch is activated on the Authorization List For Product Support - Parts Invoicing screen
Click on a customer name on the Customer field to open the Customer Profile screen.
Click the Print Parameters button to schedule a print of all listed information.
You can switch between this screen and the Parts Requisitions screen by clicking the Switch to parts requisitions button.
The Pricing Inquiry button opens the Price Inquiry screen.
Click the Tethr It Now button to open the Tethr It interface.
Click Create to open the Parts Invoicing Header screen where a new parts invoice can be created.