
Surplus Returns
Under certain circumstances you may decide to return surplus stock to a vendor. To do so, you must create a Surplus Return file. Use the Surplus Returns screen to search for, create, view/edit, or update a surplus return.
To open the Surplus Returns screen, navigate to Product Support > Parts > Surplus Returns.
Topics in this section are:
Creating and Posting Surplus Returns
To post a return to the Part Master and/ or general ledger, you must:
-
Create a Surplus Return. See Creating a Surplus Return File and Producing a Report.
-
Edit it and add parts to it. See Adding Parts to a Surplus Return.
-
Update it. See Updating a Surplus Return.
If you update the Surplus Return file using Post return to G/L and update Part Master while Do not update G/L in Surplus Returns is not enabled, the system will debit the Accounts Receivable account at the current cost of the part(s) and credit the Inventory account at the average cost of the part(s). If there is a difference between the current and average cost of the part(s), the system will also post an entry to the Cost of Sales account in the amount of the difference.
Surplus Return Communication Records
When transmitting a Surplus Return file to Case New Holland or John Deere vendors, the system will advise you to also send a communication record of the transaction to the vendor. The communication record must be sent to these dealers so that they can review, approve and possibly edit the return. Without the communication record, Case and John Deere dealers may not be able to post a surplus return.
If you are at a Deere dealership, you may confirm the delivery of a communication record in the Returns section of the JDPOINT website. If the communication record does not appear on the JDPOINT website, check for the communication record file in the following locations:
- /pfw/DATALIBRARY/javaxml/tobesent/johndeere
-or- - /pfw/DATALIBRARY/javaxml/sent/johndeere
The communication record file name will appear as:
- If stored in the /pfw/DATALIBRARY/javaxml/tobesent/johndeere database, the file will be listed as DLR2JD_18APR2012_102250.DAT.dtz
- If stored in the /pfw/DATALIBRARY/javaxml/sent/johndeere database, the file will be listed as:
2012.04.18 at 10:55:04 AMMain:getting DTF Poll Data:P1XML.597332054
2012.04.18 at 10:55:04 AMEError sending request. Error Message:
2012.04.18 at 10:55:04 AMEPoll Error~~No poll files available for download
2012.04.18 at 10:55:04 AME.
2012.04.18 at 10:55:04 AMEPlease report this error message to PFW Support.
2012.04.18 at 10:55:04 AMEENDENDEND
2012.04.18 at 10:55:40 AMMain:sending DTF Poll Data:/PFW/PFWF0063//javaxml/output/JohnDeere/DLR2JD_18APR2
2012.04.18 at 10:55:40 AM012_102250.DAT.dtz
2012.04.18 at 10:55:40 AM Success
2012.04.18 at 10:55:40 AM
2012.04.18 at 10:55:40 AM ENDENDEND
2012.04.18 at 10:55:40 AM
(The highlighted lines indicate that the communication record was completed.)
Creating a Surplus Return File and Producing a Report
-
Navigate to Product Support > Parts > Surplus Returns.
-
Click the Need to create a new return file and produce a report? Click here to add link.
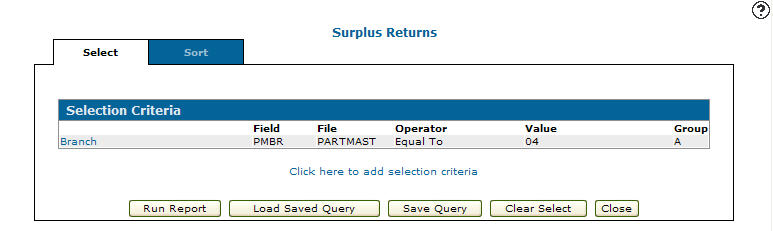
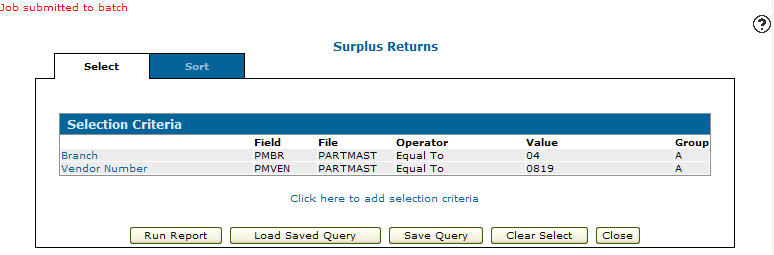
The Selection Criteria tab appears, allowing you to select the exact criteria for the return.
-
On the Selection Criteria tab, select the Click here to add selection criteria link.
-
Fill in the fields with these selections:
-
Group—the group code to be used as a logic function between groups.
-
Field—the Branch field (PMBR).
-
Operator—an operator code to applies to the values entered. Choose Equal To to specify one location.
-
Value—the location for the surplus return file.
-
-
Click Save to save your selection criteria and remain on the Selection Criteria screen.
-
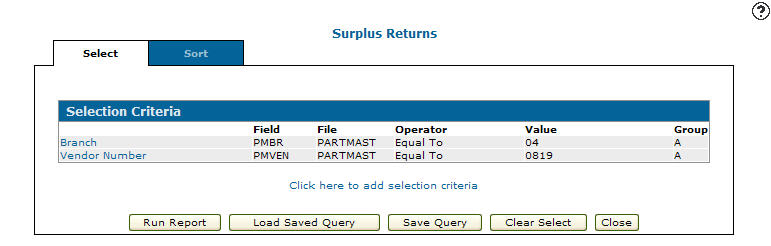
Click the Click here to add selection criteria link to add a vendor Field to the selection criteria.
-
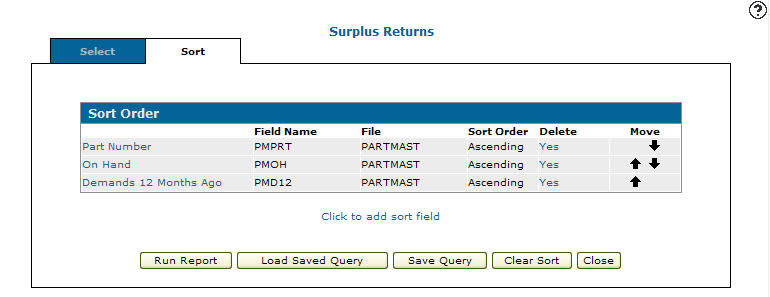
Click the Sort tab.
The Sort Order tab appears.
-
Select the Click to add sort field link.
The Add Columns screen appears.
-
Select the columns that the report will be sorted by.
-
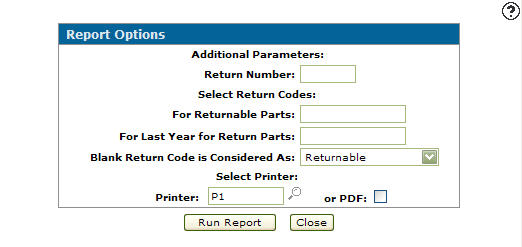
Click the Run Report button.
-
Fill in the fields
-
Return Number—up to six characters long.
-
For Returnable Parts—a code used when a part is marked as returnable. See Return Codes.
-
For Last Year for Return Parts—a code used when a part is marked indicating that the current year is the last year the part is eligible for return. See Return Codes.
-
Blank Return Code is Considered As—indicates what a blank code represents.
-
Printer—that will print the surplus return report
-
or PDF—select to create a PDF from the surplus return report.
-
-
Click Run Report.
 The Surplus Returns screen appears.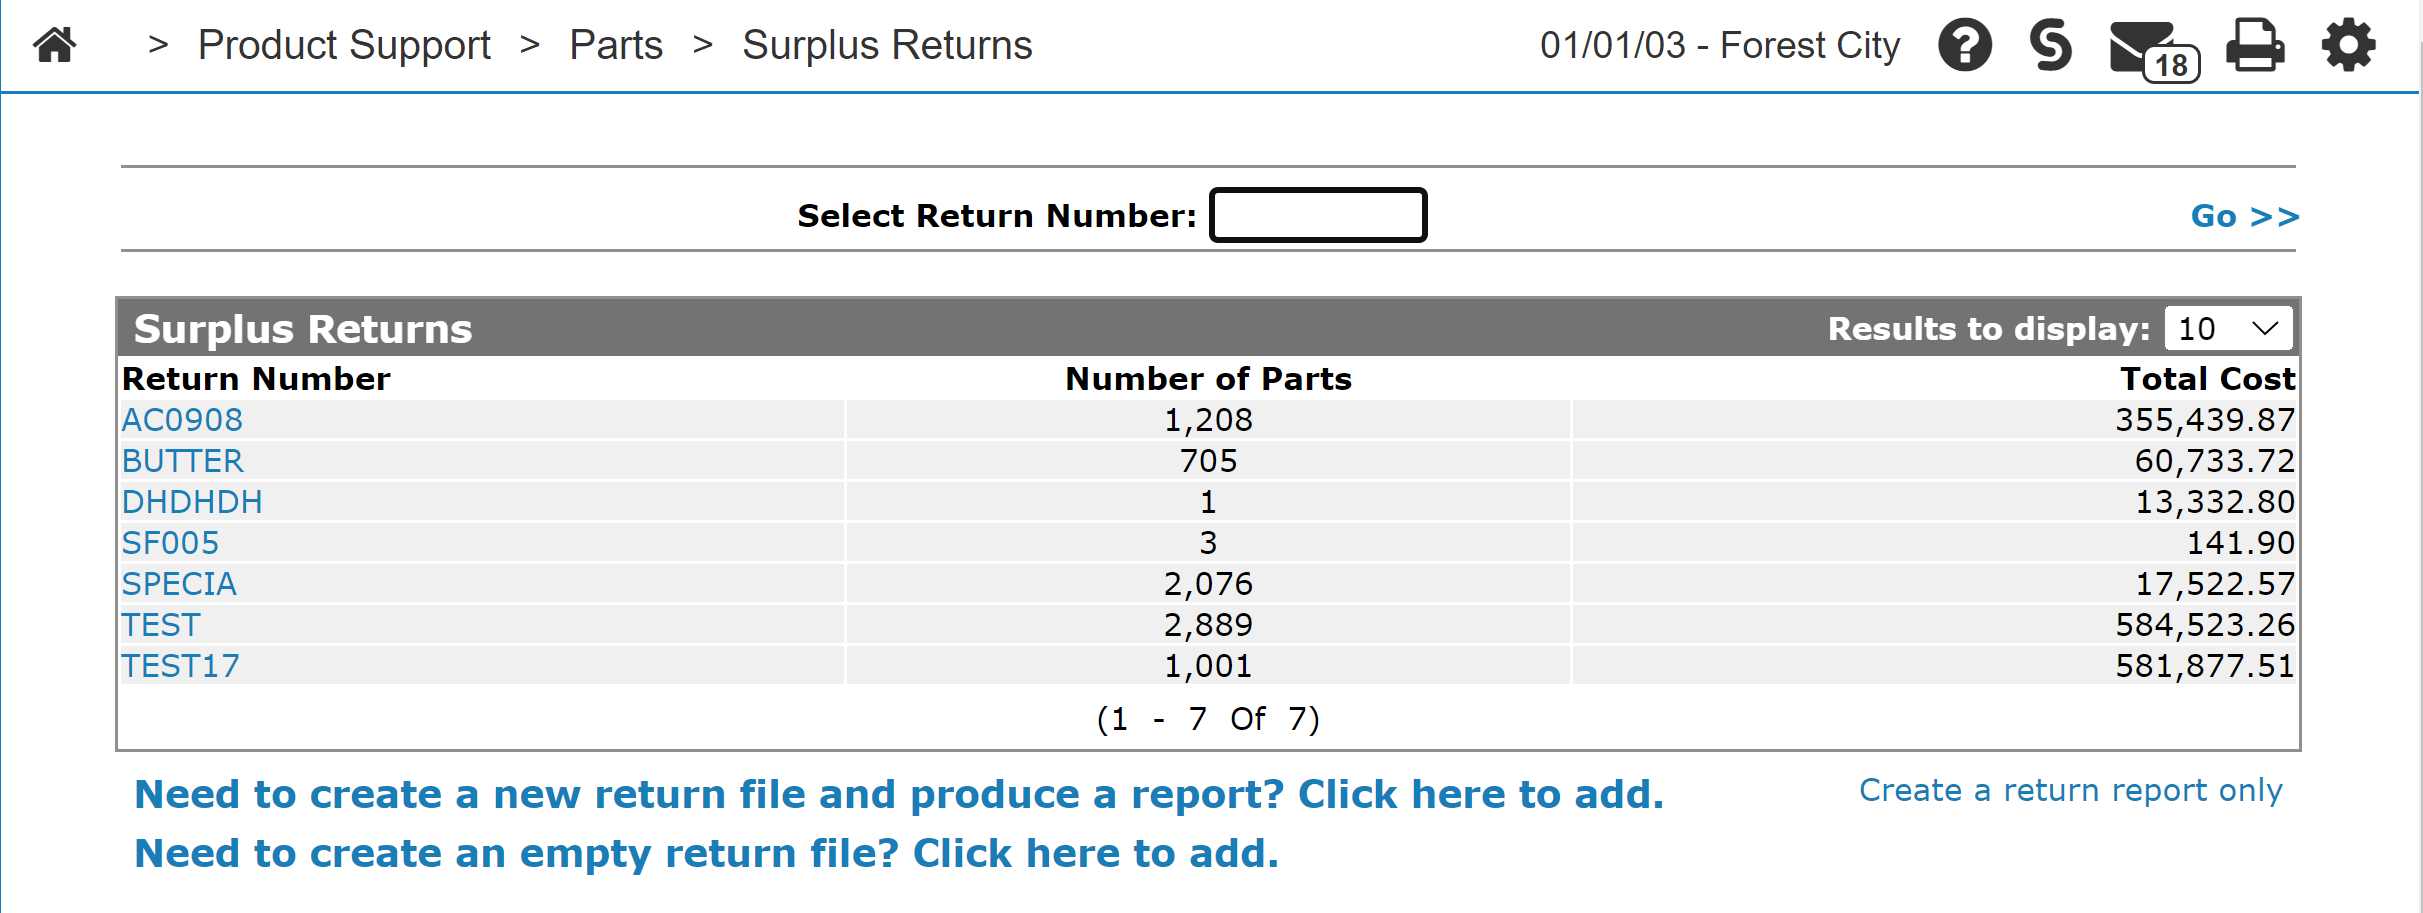


Screen Description
Search field on the Surplus Returns screen is:
| Field | Description |
|---|---|
| Select Return Number | Search for surplus returns by entering a return number. |
Fields on the Surplus Returns screen are:
| Field | Description |
|---|---|
| Return Number | The return number for the part(s) that are being returned. |
| Number of Parts | The total number of parts on the return. |
| Total Cost | The total cost of the parts on the return. |
Hover over a Return Number and select Edit from the pop-up menu to edit/add parts to a surplus return.
Hover over a Return Number and select Update from the pop-up menu to update a surplus return and create a Surplus Return report (PAR094N) or create communication records for a surplus return.
Click the Need to create a new return file and produce a report? Click here to add link to create a new surplus return file producing a report.
Click the Need to create an empty return file? Click here to add link to open the Create Empty Return screen and create a blank surplus return.
Click the Create a return report only link to run Surplus Analysis reports (PAR034-100 and PAR034-010).